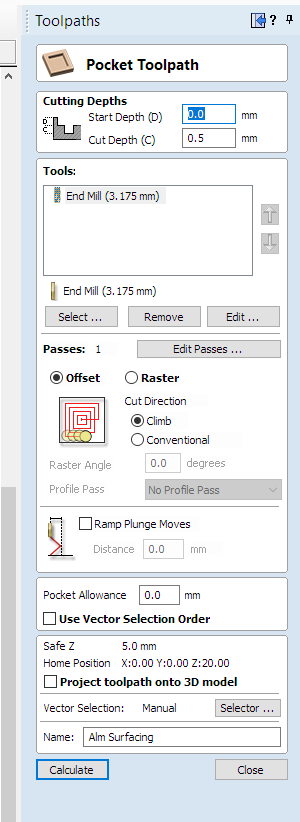
I don’t see any problem with the G-Code. Looking at it the Z does not go below -0.5mm and loading it into CAMotics shows it’s a spiral out to surface the work piece as you said.
I also believe you are using the correct post processor. I don’t think this problem is Vectric related.
Does everything look and feel OK on the mechanical side of things? No play in the axis etc.
I just thought of something to try. After you zero the machine, jog just off the work piece and goto Z zero to confirm that the Z zero is in the right place. I believe that is basically the same thing that Neil is trying to confirm with the paper method, that Z zero is in the right spot to eliminate probing as the problem.
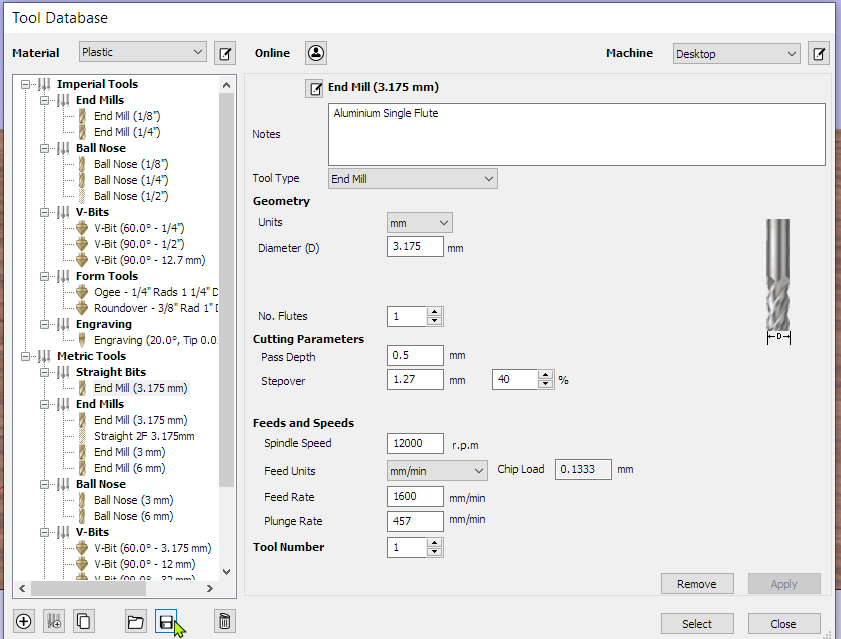
EDIT: I looked up the BlueCarve Bluey and it does use an Arduino Uno with GRBL 1.1, same as the LongMill so I’m fairly certain the the post processor is correct.
Thank you so much, that’s great, one big piece of the puzzle.
Everything seems mechanically fine, if I run the Z axis up 100mm it is bang on 100mm. Thinking out loud, I have not tried to repeat that multiple times. I’ll give that a go to see if a dimensional error occurs.
The Z axis drive is a direct coupled lead screw, so as long as nothing is too loose/tight it should be fine.
Thanks once, again. I did a series of repeatability tests and it was spot on.
One interesting thing is, after I probe, the Z rises by it lifts up 3.5mm. I don’t see that setting anywhere.
Can you please confirm if my start up process is correct;
My Process;
Set cutter over bottom left corner
Zero all
Probe
Start.
I never know if I am supposed to “Zero All” before or after probing. I tired after and had a crash, so I assume that’s wrong.
OK, I manually set the cutter to a paper thickness off a measuring block.
Pressed "Zero All’
Jogged all over the place
Press Go XY0
Press GoTo Zero Z
And it came back spot on.
So the issue is almost definitely related to my probing function. I’ll have a Google and figure out how to start a carve without probing, using just paper. New plan for tomorrow evening (getting late here in NZ and I’m starving) Have a good evening
Yeah don’t zero all after a probe, the probing sequence should set zero for whichever axis you choose, XYZ or XY etc.
Hitting “Zero All” with the paper method is OK as long as you are in the correct X and Y.
Have a good evening and I will keep an eye on this thread and help if I can.
EDIT: To use the paper method for the Z you can just probe X and Y, make sure you look at the image in gSender because you start an XY probe from a different spot. Then you can jog over the piece and use the paper and just use the “Zero Z” button to zero the Z as the X and Y will already be set from the probe.
The “Zero All” before the probe is not needed, but shouldn’t hurt anything, because the probing will just reset the zero’s anyway. That’s assuming that you are probing all three axis.
As has been pointed out, I also think the problem could be your zeroing technique. You have to get your mind around what’s going on and don’t add extra steps to the procedure … just because.
Thanks, I’ve tried a bunch of Youtube videos and they all skip over the steps. Can you share your zeroing procedure please. Mine is this (I assume I am missing something)
Set cutter over bottom left corner
Zero all (not necessary it seems)
Probe
Start.