WasteBoard Proof of Concept

Now that my LongMill seems to be behaving itself, I can start working towards doing the wasteboard. I did a quick proof of concept on a 4x4x1/2 piece of MDF (my actual wasteboard is 3/4" thick).

I did a quick grid of 1/4" diameter x 1/4" deep pockets for accurate placement of the next stage. I then drilled out the holes with a 9/32" drill to make them large enough to take the anchors / tee-nuts for 1/4x20 bolts.

With the through holes drilled, I used a spade bit on the bottom to allow the anchors to be flush once they’ve been pounded in. I think I need to drill slightly deeper on the real board, but it works approximately as I thought it would.

The real wasteboard will have a grid of 64 anchors at 4" intervals. I anticipate that the CNC portion won’t take more than about 15 minutes based on the time it took to do this grid of 16 anchors. The remainder of the process will take quite a bit longer than that…

3 Likes

Looks good. Have you given any thought to perhaps doing the spade bit pocket at the same time that you do the 1/4 holes. You could actually bore the 9/32 hole through using the 1/4 cutter. Just do a pocket operation .750 deep. Then you would just have to flip the board over once you installed the inserts.

1 Like

Jeff has a good point. It’s a CNC - Let it do the work for you. I did mine by surfacing both sides, then boring and countersinking the holes at the same time. Not matter how smooth and flat you think your piece of MDF is, surfacing will help. It’s slow and very messy - Use the dust boot or keep a vac hose on it - but it’s worth it. I also drilled a 1/4" hole dead center in the table top and 6" in +X, -X, +Y, and -Y. This is easy if you set the step size to 6" in UGS. I put a 1-1/5 long piece of 1/4: drill rod and now whenever I move or re-install the wasteboard it goes back in the same spot.

I like this kind of nut, inserted from the back. They resist pullout a lot better than the screw-in kind. Two things I learned - 1) Make the through holes where the shaft of the nut fits only as large as they need to be for the nuts to fit through. This helps keep them tight in the hole and perpendicular to the surface so getting the clamp screw started is easier and you can use the nuts for the side-force style clamps. If you’re using F360, bore rather than drill - Better diameter control. 2) Make the countersink deep enough for the flange on the nut or they can interfere with the board laying flat.

think your 4" spacing is probably good. I used 5" in both directions, but I think the next time I’ll go down to at least 4" and maybe even 3". When your work piece is small it helps to be able to get the clamps closer.

Glad to see your issues have been resolved. Start having fun.

Bill

I ran the CNC code this morning, and will complete the drilling / pounding in anchors this afternoon. The CNC took exactly 11 minutes; the rest will take longer :sunglasses:
CNC_Grid1

1 Like

Hi Frank,

Glad to see things are working for you now.

Out of curiosity, what type of operation did you choose to do the holes? I was trying to do some fairly precise 8mm and 10.6mm holes last night in some 1/2" flooring, using the circular operation in Fusion 360 and I had to run the code multiple times to get it accurate to the .1mm mark. Maybe I should have used a boring operation?

-Jeff

I did it in FreeCad 0.19 nightly. Used a 1/4"circular path profile cut on the inside with a 1/8" 2-flute bit. After the grid was cut, I removed the board. Drilled through the board through each of the cnc holes with a 9/32" bit which is JUST large enough for the tee-nut. After that, I flipped it over and used a 7/8" spade bit to sink a (roughly) 1/8" pocket for the anchors to be flush. Final step was to lug it back inside and reinstall on the table.
Total time was around 2 hours.


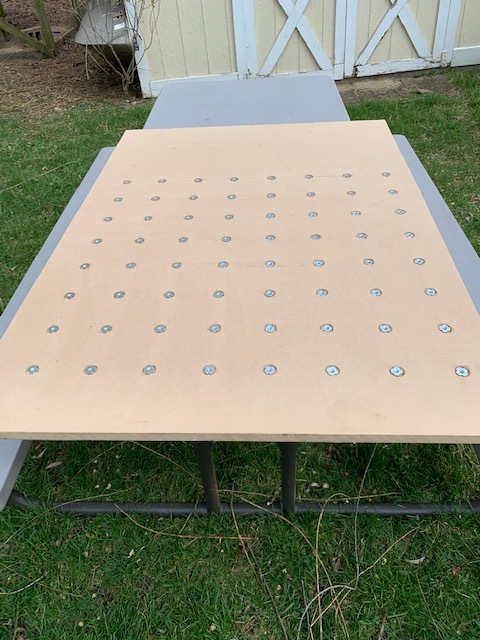
Anchors away! (note: I live just north of the Great Lakes Naval Training Station :sunglasses: )

I plan to do a surfacing pass tomorrow then an alignment grid after that (just a grid of lines 2mm deep with a 2mm cutter.)

Surfaced and the grid cut in.


The 4" grid is there so I can align stock accurately with the machine’s axes.

1 Like

Nice looking waste board, Frank.

Nice looking boards!

I did a similar project in carbide