In a series of compounding failures, I had a definite case of the Z axis plunging further into the work - and the cause was very clearly the bit slipping in the collet. After the second failure, the bit was very clearly extended much farther out of the collet (in fact, it was barely in it anymore).
So, here is the sequence.
The first failure was mine - I had a series of operations, and had failed to regenerate a contour operation after moving the model. So, on the contour pass (after the adaptive clearing), the bit dove into some uncleared area, just brushing a hold down and causing the work to come loose.
After hitting the e-stop and realizing the work was scrapped, I flipped the piece over, since I had enough thickness to cut it on the other side. (The plan was to cut the backing off after the cut).
On starting the new cut, the bit sounded wrong, and was not leaving a good finish. I thought it may have been due to burning / dulling the bit on the previous failure. However, things were really not looking good once the part ran - terrible finish, inconsistent depth. This had me scratching my head.
Taking a closer look at the bit in the router, it turns out the stick-out was way too much - the bit was barely in the collet anymore. This clearly explains the Z axis diving, the weird sound, and also explains the terrible finish - the bit would have very little rigidity, and be bouncing all over the place, especially since it was a 1/8 inch bit. Being an up-cut bit, the twist would in fact pull the bit into the work.
It’s nice to have a conclusive reason for a symptom like this - and in this case, the conclusive reason is the bit was slipping in the collet, and pulled itself into the work.
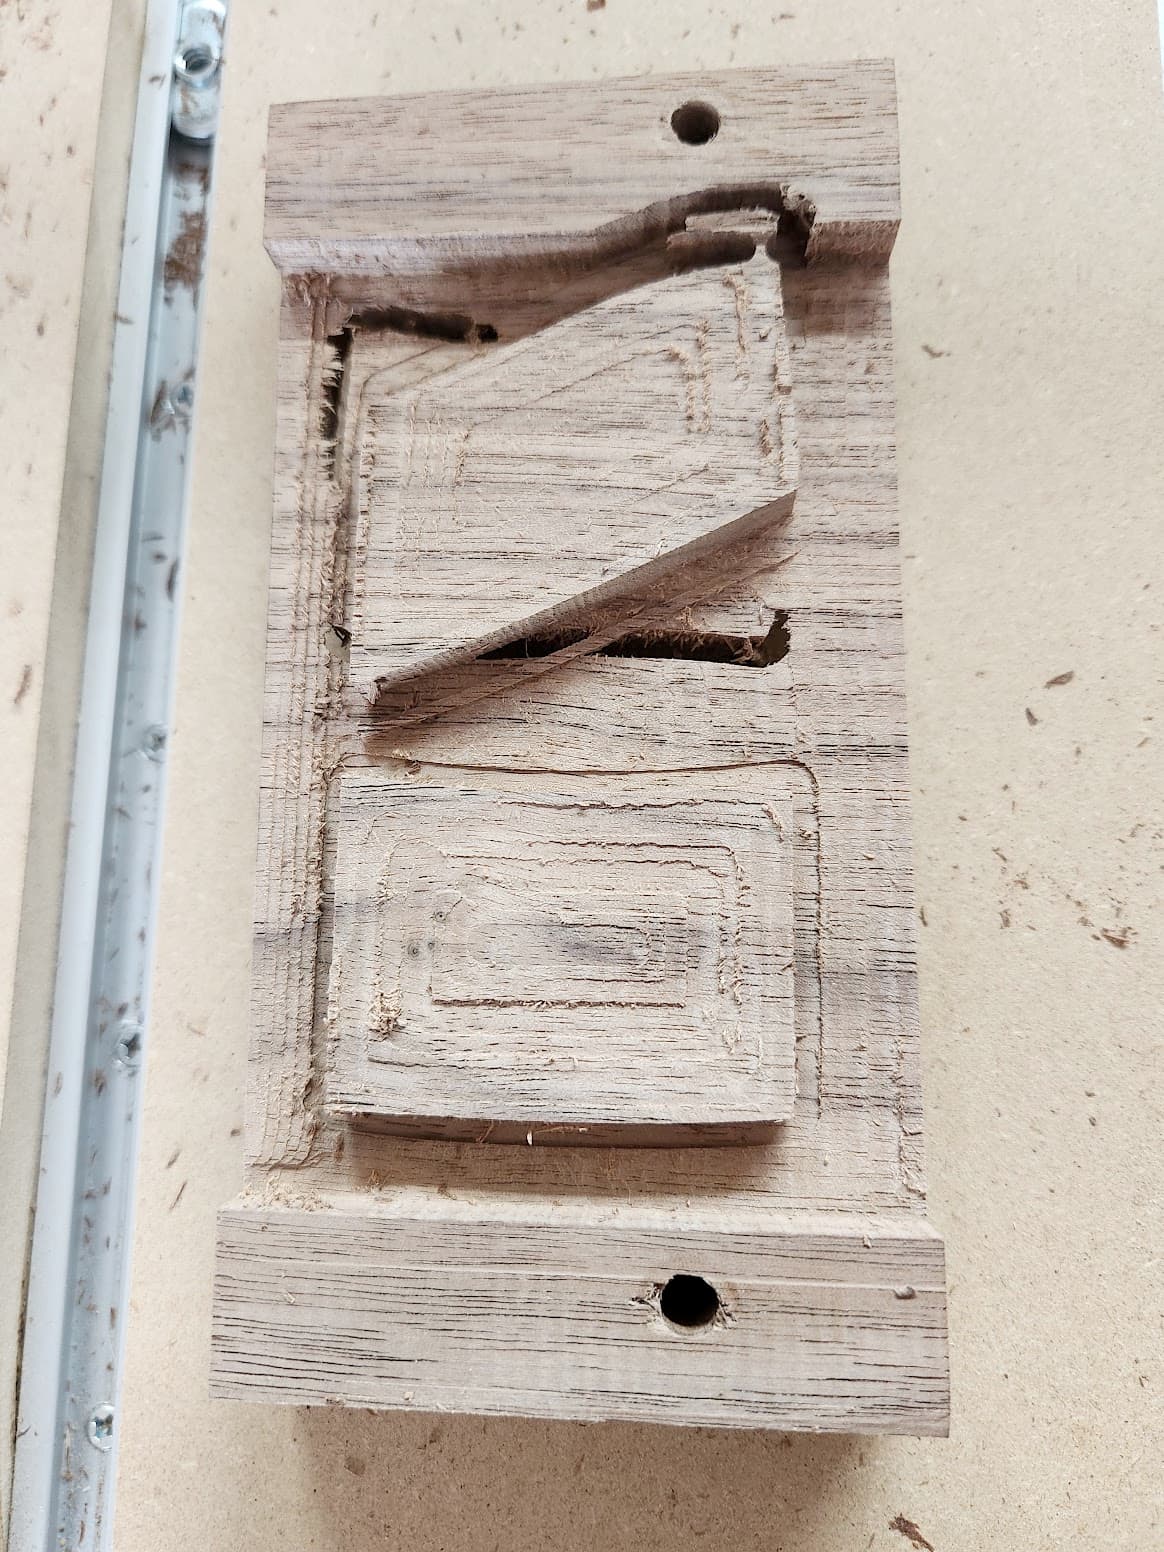
Since a picture can really help show the results, here is my amazing failure. Live and learn!
Thanks @gwilki, yes, flying bits is a bit terrifying. I do wear safety glasses and hearing protection when the mill is running, but who knows where the pieces might end up. Ultimately I could see an enclosure being a huge safety measure, but that comes with additional cost and complexity.
It’s interesting - often I tend to use down cut and compression bits (to avoid tear out when working with plywood) - I suspect up cut bits are less forgiving of having debris in the collet. I do use a 1/4 to 1/8 adapter for the smaller bits, I may buy the actual 1/8 collet to remove a potential weak link.
@elbarsal When I first started with the LM, I used the 1/4 to 1/8 adapters, too. I had issues with them from run out to slipping bits. I went with the true 1/8" collet and have had no issue since. Sienci didn’t sell the collets then so I paid ridiculous shipping from the US. Now, Sienci carries them. If you are in Canada, they are a great source for them.
Happily Sienci local pickup is a very easy option for me - sometimes even same day! It was a definite plus to be able to buy from a company in the city I live in. That 1/8 collet is now definitely on my list!
Funny…I went the other way !
Tried multiple copies of the precision collet on multiple bits and ruined multiple work pieces.
Now I use the adapter and haven’t looked back.
With the 1/4 inch bits I was having some disastrous slipping at one stage on pockets and deep profiles ( I work primarily with hardwoods).
After changing my default pass depth to be significantly shallower, slowing my feed rate and marginally increasing the spindle speed, I am no longer having the bit bind and work loose.
@GregM shallower passes solving the problem does make sense - I didn’t see the issue happen until my first screw up (where the bit dove through uncleared work because I had not regenerated the toolpath).
There are multiple forces happening at the interface between the bit and the work - the twist in the bit causes a component of that force to be axial, basically screwing itself into the material. Some component is radial (that is, directly opposite the direction of the cut), and some component is going to be tangential (that is opposing the rotation of the bit). A deeper and or more aggressive cut will increase the magnitude of all of these forces.
It would be interesting to add instrumentation to the mill to record the strain being applied during cutting. I’m not sure how or where strain gauges or small load cells could be added (especially without compromising the machine) but it could show some insights.
In keeping with this topic… As a newbie, is there a general rule of thumb on how much of the bit shaft should be pushed into the collet? I’ve done some cuts with 1/8" bits and due to the short overall length of the bits, not much can be set in the collet or the collet nut bottoms out before the full required depths are achieved.
I ‘like’ to have bit in all of the collet if i can if that makes sense. So pushed in from the bottom untill flush with top when disassembled. Not that I always disassemble but you get a feel for that length. Failing that, like with a small engraving bit, I put as much as I can in the collet leaving a 2mm gap between collet and spoil board at max depth. So with those it’s more of a leave max cut depth plus 2mm sticking out and hope that leaves enough in and go slow.
Not very scientific but I’ve only had a problem once and I had a feeling that I was pushing things when that happened. A bit actually wasn’t in far enough and started to come out which causes vibration as the bit gets out of vertical, which cause the bit to come out faster etc…