Hello everyone. Very excited to get my longmill in a few weeks. I have a pretty simple question to ask everyone. When mounting your machine is it better to have it at the same height as your wasteboard or mount to the board underneath and therefore have your wasteboard higher then the bottom of the siderails of the machine.
I seem to see people doing it both ways and was wondering if it made any difference with available z-height and setup.
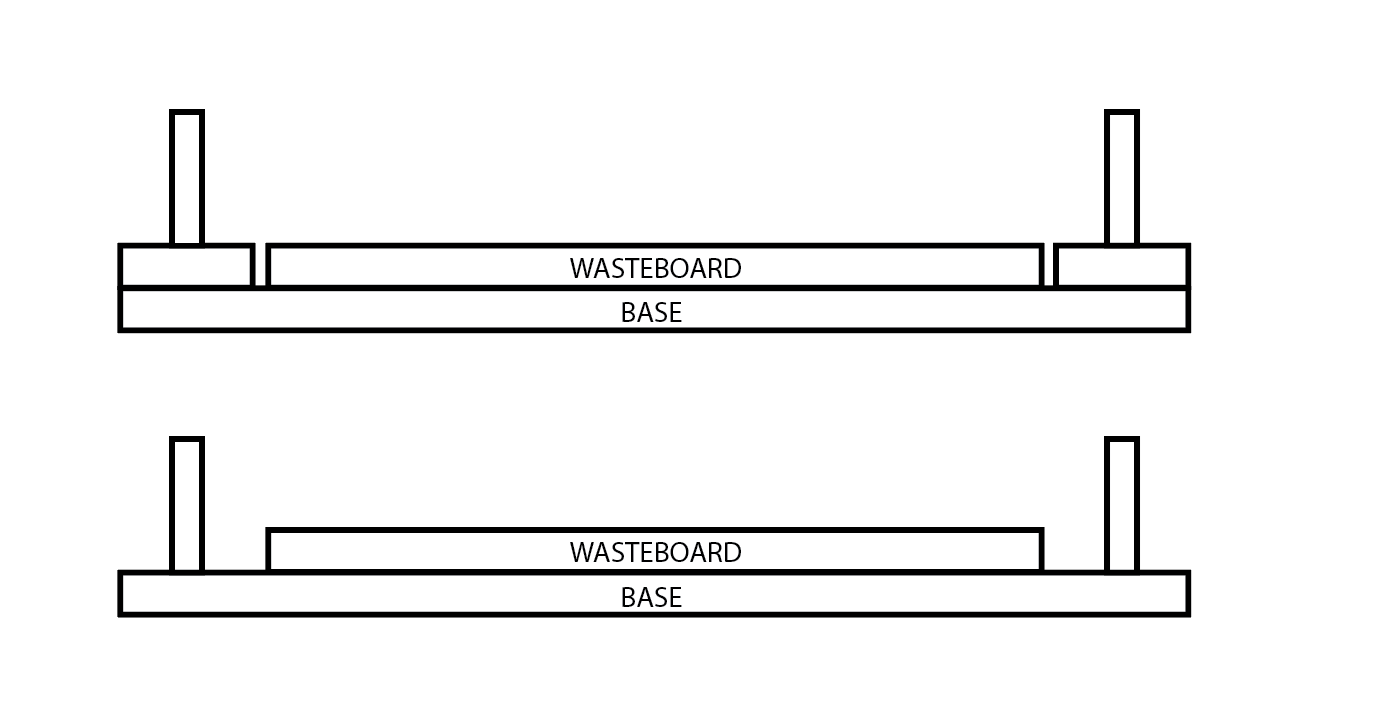
Here’s a quick diagram showing what I mean by having the machine either level with wasteboard or mounted on the base.
@beldmade Welcome, Greg. It’s just a matter of personal preference. If you mount as in your second version, you lose in Z whatever the thickness of your spoil board is. To me, that is the only drawback. The drawback of the first option is that, with short bits, you may not have enough Z travel to touch the spoil board. You can always address that by adding a “secondary” spoil board when you are using short bits.
I mounted mine as in your second picture. I figured that I would be using small, short bits much of the time and that I would not need the additional 3/4" in Z travel that option A would give me.
So far, my decision has worked out.
Edit: Since writing this, I have changed many things in my installation. One of the changes is that I have mounted my feet to strips of 3/4" MDF. Using the Vortex, I need all the height that I can get.
I’ll second everything that @gwilki said. I found it impossible to cut through a piece if your bit was small due to my mounting position of the router.
Greg, I went with version 1 for a couple reasons: I face a 0.050" deep pocket in the waste board as big as the LM X and Y travels will allow. With a 1" facing bit that turns out to be about 30.7x32.2". Now you have a flat reference surface with an extra 3/4" of Z height for taller jobs, and you can insert faced replaceable insert waste boards up to 30x32" and still have the original 4" of Z height. These inserts can be designed for particular jobs - templets for engraving name tags, a jig for when you have to flip a part over to mill the back side, several spacings for hold downs, etc., and you don’t run out of Z capacity. I like the extra Z height, but it can make the dust shoe less effective if you don’t use the insert because the router will be lower than the shoe, and the router will be mounted lower in the clamp if you don’t use an insert, which can make it less rigid. Therefore I usually use one with 3x3" screw inserts. Wouldn’t change back.
Currently I do the same as Pic 2, but have plans to do a combo which is Pic 1 with threaded inserts to attach a second waste board on top (securely) for shorter bits, or thinner pieces. Been carving a bit of 1/4" and 1/8" stock recently.
This gives me the option of templates/jigs for different projects as @BillKorn mentioned, above a flattened surface wasteboard and flattened top piece.
I just need to have some extra time in the day to get it done…
Hmm thanks for the insight everyone. I think I’m leaning into option 1 since I’ll be doing t-tracks and I think it would be easy to make up a jig to get extra height if needed for smaller bits.
I mounted mine like the top picture. If you buy a full sheet of MDF you should have plenty left over. I figured I wouldn’t need that extra 3/4" very often but may occasionally want to Mill something thick.
Hi, All you Longmil users. I made the wasteboard like in pic 1, with water-resistant 3/4" MDF. Since I used T- channels and I did not want to Route out the grooves for the T- channels. I cut 7 strips of 3/4" x 4 1/4" x 48" MDF. I figured it would be easier to remove and replace the segments as needed leaving the T-slots in place and not having to deal with the groove cutting and all the dust. Thank you for sharing.
I did as you show in diagram #1.
I have 30x30 MK2.
I made the base a 48x48 torsion table out of 1/2" plywood. I mounted a 48x48x3/4" MDF on it.
Then I mounted and squared the MK2 on the MDF.
When I got the mk2 running, I used it to drill a matrix of holes on 200mm centers in the MDF.
The holes went through the mdf and plywood.
I then countersunk each hole to accept a 1/4-20 nylon flathead screw ( about 3mm below the surface).
I hammered 1/4-20 T-nuts in the plywood from below and screwed the mdf to the base table.
Finally, i had the MK2 cut through the MDF at the limits of travel.
I did surface the MDF. I didn’t need to take off more than 1mm to make it flat. I put three coats of shellac on the mdf to seal it from moisture.
Now when I need a new wasteboard, I drill, counter sink and cut out the new MDF board, remove the nylon screws, lift out the old board and replace it with the new board.