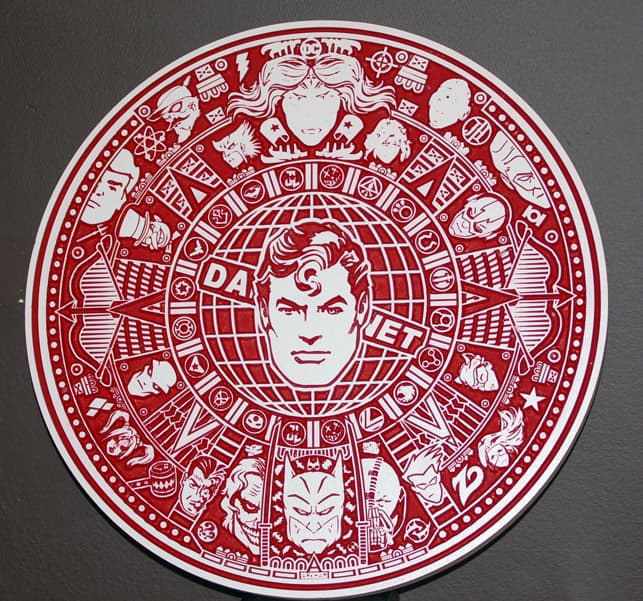
This is not my design. It was created by Kyle Emerick and is available on his website sandyeggo.com.
I did this for a neighbourhood kid who is a comics nut. It is about 14" in diameter. It’s carved to a maximum of .125". I used a 1/4" tapered ball nose (from Sienci) to carve the larger parts. Then a 60° V bit (also from Sienci) to do all the rest. Finally, I used a 1/4" down cut end mill (guess where I bought it) to cut it out. All told, the project took just under 2 hours, to complete, including bit changes.
Painting was a pain. The material is 3/4" melamine-coated MDF. I smudged (technical term) red acrylic paint into the carve a bit at a time, and wiped it off the white with a dry paper towel. When the red was dry, I went over it again with an alcohol-dampened rag to get off the red haze.
The level of detail of Kyle’s designs really is incredible.
Love it and thanks for posting it. I came across sandyeggo site a couple of nights ago. I was thinking about trying this and the Star Wars design as a gift for a friend. I was planning to use 0.75 MDF, highlighting the vectors (-one of the outer circles), cross my fingers, and click go for a 0.5 in. 90-degree Vbit vcarve. I’m not being lazy, just not sure about a tool path strategy with that much going on.
@Swinly What software are you using, L? I am using VCarvePro and if I just went with a v bit, the big parts cut much too deeply (Unless is set a max depth - see below). In VCP, using the vcarve toolpath, it will carve between lines in one pass. The wider apart the lines, the deeper it has to go to fill in between them. I hope this is clearer than mud. So, using a clearance bit, I can set an arbitrary depth. I chose .125. The clearance bit does the big parts down to that depth and leave the small parts alone. The v bit then cleans up the edges of the big parts and does all the small parts.
If you want to use only a v bit, in VCP, you set a depth and it will use the v bit to carve it. You will end up with rougher bottoms in the wide parts and it will take longer than by using a clearance bit. It won’t do any harm, though.
I’m using Carveco Plus. It’s very simular to VCarvePro. The terminology is a little different. Once you learn one you can find your way around the other. I do have the trial version of VCarvePro. I do like it better by a bit but…I’m getting off topic. Anyway.
After you make your toolpath for the clearance bit you make another for the vbit for the rest going up to the vectors of the big parts? The vectors for the clearance toolpath are left out of the v carve portion of the path? Does that make sense or do I need to rethink my question? lol thank you
@Swinly Lonnie: ( I finally know your name. Tks for adding it.)
In VCP, we are spoiled, since all we need to do is create a vcarve tool path including a clearance bit. The software takes care of what parts the clearance bit carves and what parts the Vbit carves.All I need to do is set the max depth. VCP then creates 2 toolpaths, one for each bit. Then I create 2 gcode files.
Yeah, I was wondering why you typed " L" in the other post while typing another’s name. I was wondering how I go about earning the rest of my letters . Then as I was looking around in the preferences I saw my name was “L”. I also discovered the dark side of the forum and switched to it. (cue Star Wars- The Imperial March theme) Star Wars- The Imperial March (Darth Vader's Theme) - YouTube