From Andy:
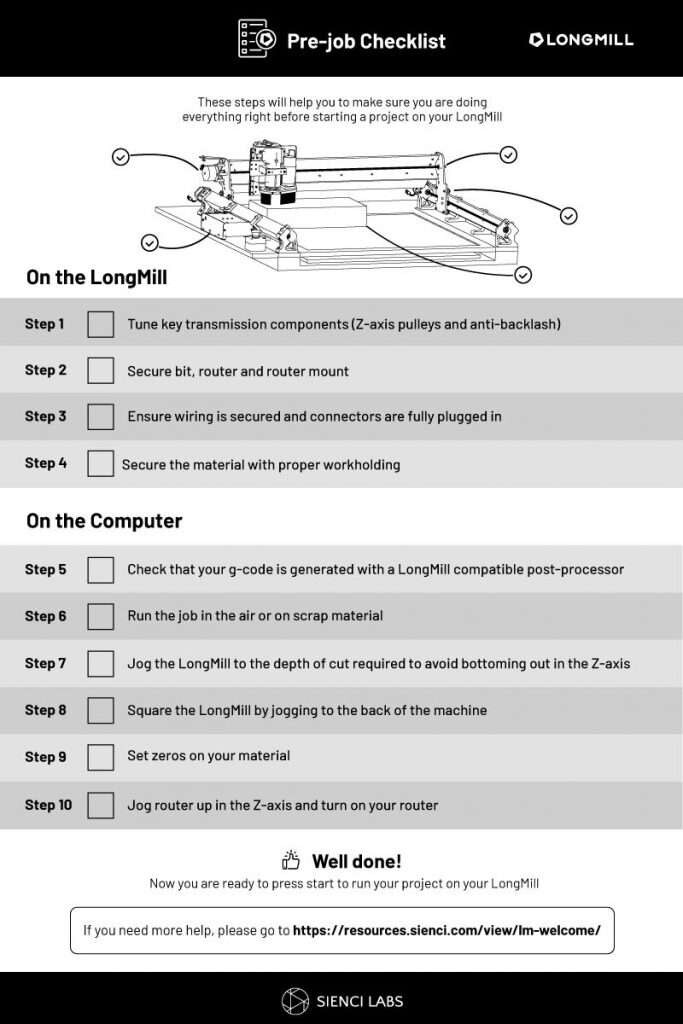
Hi everyone. Our amazing designer, Leandro, has recently been working on a new project to help new and experienced users follow the step by steps of running their machines. We are envisioning this as something like a poster, paper pad, or laminated checklist for CNCers to use to help them remember to check each step of the CNC setup process.
We’re calling on our users to provide feedback on the design and let us know:
What steps you take before starting your job on the CNC. What steps would you move, change, add, or remove to the checklist?
What other reminders you want to have before running a job. Is there a common mistake you make before running your job?
What format you want to see the checklist in. Would you prefer this in a large poster, penpad, laminated sheet, etc?
A copy of the checklist can be downloaded above, please feel free to print out a copy or save it somewhere.
Please feel free to comment on the social media posts for this news, or contact us here: Contact Us | Sienci Labs
I would suggest that you move item 8 in the “on the computer” category to the “on the long mill” category. It is more a hardware thing than a software thing.
Make sure the Longmill is free from obstructions; nothing is under the Y-rails. I had a piece of scrap slide under the left Y-rail just behind the middle foot. It likely would have prevented it from moving on that side if I hadn’t noticed it.
I think this is a great idea. The outline tool will let you know how big your project would span across your material. This might be better than just running the job in the air.
We tried to organize the steps based on whether you need to be at your machine, or whether you need to be at your computer - is this intuitive in the checklist?
With that in mind, I withdraw my previous comment.
However, having read the steps again, I believe that they are out of order. Here is my thinking, FWIW:
Squaring the Mill should come before any of the other movement steps. If the Mill is out of square, all the other movement steps will be off and will be changed when the Mill is squared.
Setting zeros must come before running the job in air or on scrap. Otherwise the job cannot run properly.
It should be made clear that the current step 7 can only be accomplished by, first, jogging the Mill in X or Y so that the bit is outside the perimeter of the work piece. (Maybe that’s obvious. ??) Even then, the user must first make a note of the max depth in the tool path, and then lower Z to see if the Mill can get to that depth before bottoming out the Z gantry. (I know that this is a common issue so it’s a very good point to include. I’m just not sure if, as worded, the point is clear.)
I’m sure that others will jump in to this discussion to tell me that I am all wet.
I think step 9 could be explained a bit more. I think it means to jog the bit to the x and y zero position on your material (either bottom left corner or centre point) then set X to 0 and Y to 0 on the control panel. I discovered failure to do the last step gives the tool path a mind of its own. For step 10 I usually use the Z probe which takes the bit to the correct starting height. A check list is a great idea!
I thought a “pre-flight checklist” before each job was requested but can’t find it and I’m not sure this was envisioned to be before the start of each job or not.
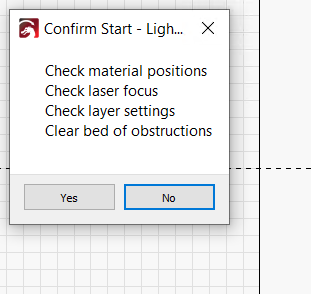
I use Lightburn on my standalone laser and they include the option to have a user configurable pop-up when you hit start. You can add anything you want in there and just requires you to hit OK when ready. I put things in there that I need to check (laser focus, material position, clear bed… ) and gives me a last chance to think before taking off.
For the Longmill, I would see things like Router speed dial, workplace preset, Router power (I use IOT and sometimes have my router power off when using the vacuum alone then forget to turn it back on until I see the non spinning bit crash and break)
I wouldn’t necessarily want to have to check off individual boxes each time to start, just a reminder list that I could accept when ready.
I have this posted on the wall next to my MK2.
Simple but effective.
I refer to it for EVERY job and EVERY bit change.
CNC Checklist
Material Type
Material Size
Speeds and Feeds
Save G-Code
Load G-Code in G-Sender
Zero XYZ
Router Speed
Test Run
Outline
Dust Boot
Hearing Protection
Vacuum ON
Router ON
Start Job !