I just completed my second maintenance run on my AltMill and decided to do a video about it.
In the video’s text description you’ll note that I found three issues with my machine, which I’ve overcome as indicated below:
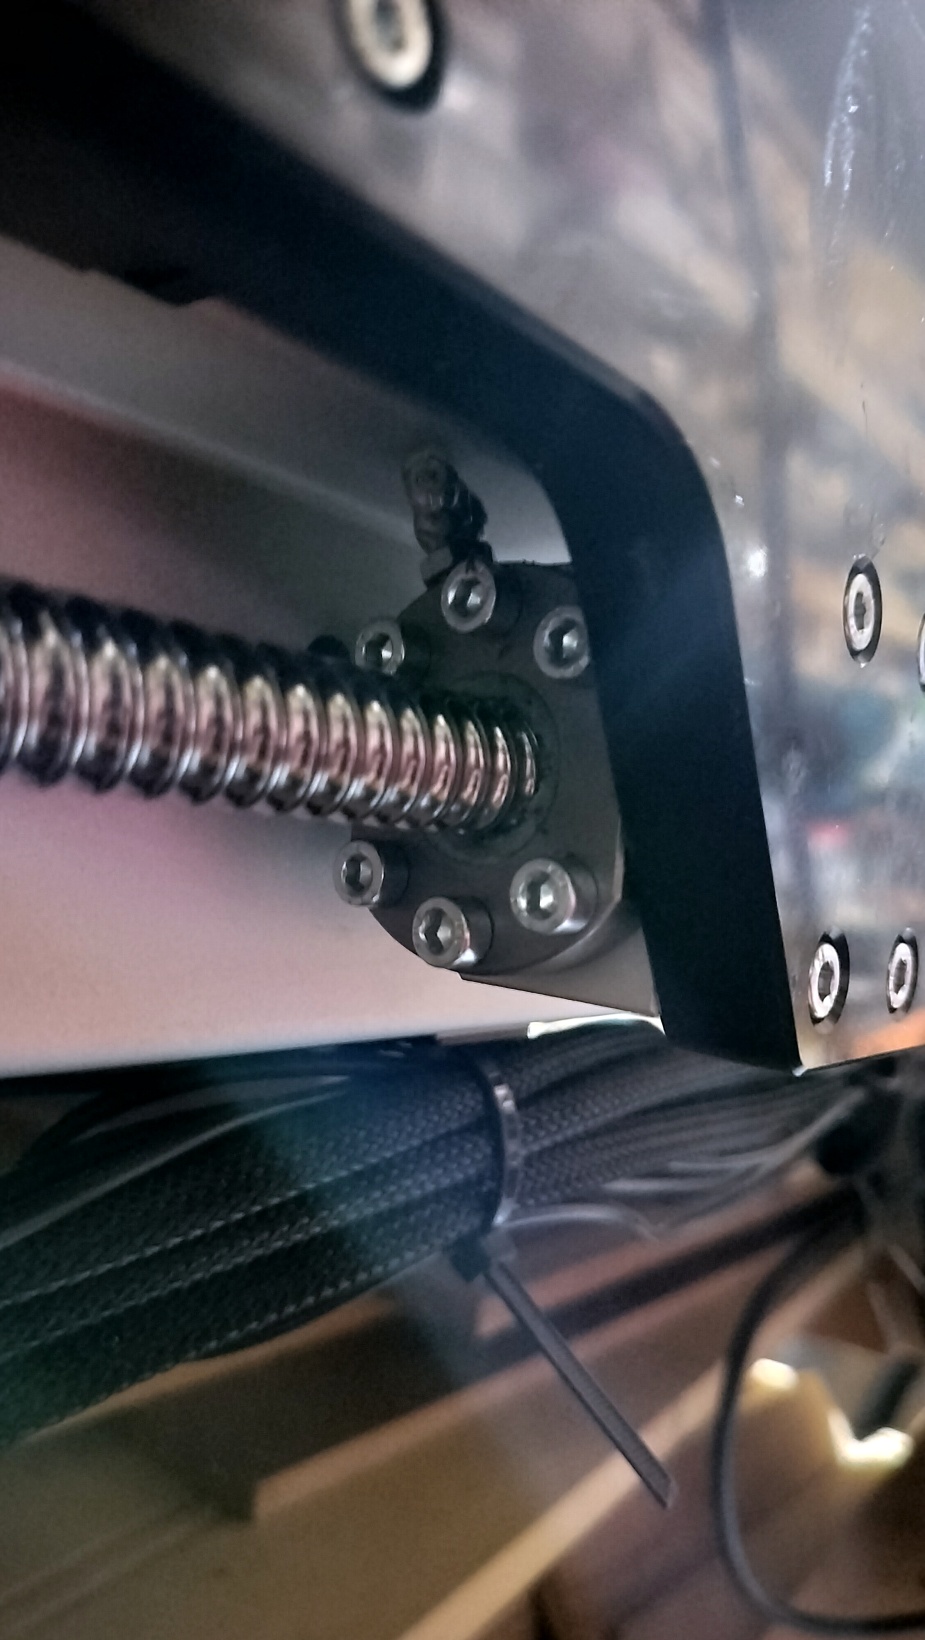
The right-side Y-rail’s ball screw assembly arrived flipped over, making the grease nipple inaccessible. It was a simple matter of undoing the 4 screws holding it to the X-axis gantry plate, then turning it over. Interestingly enough, once I’d finished the job and had the machine move under power to its home position (back left corner for me) , this half-turn didn’t affect the precision of the machine, as a check confirmed.
The X-axis dome-headed screws (4 of them) were all missing from my machine. I’ve contacted Sienci Labs to send me 4 of them.
Oiling the Z-axis bottom set of bearings appears to be an impossible task, as the dome-headed screws are located on their underside. (oil doesn’t run uphill very well ). So to lube them, I oiled the ways (the two rails), and ran the assembly slowly up and down to get the oil up into the bearings.
Lubricating your AltMill is a relatively straight-forward undertaking and after you’ve done it a few times it should take only 15 minutes or so. Easy Peesy!
I replaced all 12 linear guide block screws with brass M5 grease fittings and use a needle nozzle on my grease gun. The small tapered tip of the nozzle presses the ball of the zero in so grease can easily be applied. This is especially useful for the bottom blocks of the Z axis linear guide blocks.
I use Mobil EP 2 grease on all 12 guide blocks and all 4 ball screw blocks.
Tom, would you happen to have photos showing the grease fittings and how much clearance there is between the two lower Z-axis linear guide blocks and the spoil board?
Much appreciated!
Thanks again for sharing your method of lubricating the linear blocks. It appears that Sienci Labs modified their lubrication instructions to now include greasing as well as oiling them. I have a feeling that the reason for this was the relatively difficult time users were having to acquire that particular oil… but I’m not sure if there’s much difference between the two lubricants in this particular application.
While researching the topic I came across this information provided by Thompson, a bearing and stepper motors specialty company. As you can see, they recommend machine oil or low viscosity grease for light loads and high speeds, NLGI 1 or 2 grease for medium speeds and loads and a grease with an EP2 additive for high loads. I’m not sure how much loading the linear bearings take, but I have a hunch it’s fairly light.
This is the grease I used on my Next Wave HD520. I definitely use the grease tip to get into the tight spots like behind the spindle carriage. I purchased this off the Next Wave website.
Thanks for the lead, as that’ll help any US based members. Canadians don’t have that option for either of the two lube products you’ve mentioned as Amazon.com won’t ship them to Canada.
Yes, those are similar links which I’d shared with others previously. The main difference between the Amazon.com and Amazon.ca product is in the oil. Here in Canada we can only get it in the larger 1 gallon format, which is enough to do 10 CNCers their entire lifetimes!
I am in the process of doing the maintenance on my Altmill and wanted to get a better understanding of the issue with the ball screw on the left side Y axis.
Can you please elaborate on what you mean by “turning it over” for the ball screw? I don’t quite follow your explanation. I have remove the 4 screws on the X-axis gantry but don’t see how the ball screw can be turned over or flipped.
This is the orientation of my ball screw at this time. Is this how the ball screw was oriented your your machine?
If you remove the 4 machine screws holding the ball screw to the gantry plate on that side, then jog the machine 80mms backwards (document the exact distance you moved it, so that you can move it back when you’re done). That will then provide you enough free space between the assembly and the rail to allow you to carefully rotate the ball screw assembly 180 degrees (the rotation direction won’t matter). Doing so will temporarily bend the drive screw very slightly, but it’s resilient enough to return back to its original position right away. There should be enough slack space between the assembly and the rail to allow you to rotate it without undue force. Then before doing anything else, jog the machine forward the same distance you’d moved it prior to rotating the ball assembly. If you did that correctly, because the screw holes in that assembly are drilled completely through, the holes in the gantry bracket and the ball assembly should be lined up perfectly. Because the holes are threaded the full way, you should be able to then screw the machine screws back into place. DON’T overtighten them, as you’ll risk stripping them. I used a bit of LokTite (the low strength version) on the screws just for added security against them loosening off.
@acruther Probably. I have a cheap one as well and it works fine. Difficult to get that grease cartridge in though. But it’s a big gun and unlikely I’ll ever fill it again considering the amount of grease you will use.
would one be able to lubricate a longmill mk2 like this? currently i wipe down my lead screws then apply 3 in 1 oil. same with the z axix and on he slides. i will also use #0000 steel wool the X Y axis rails to knock the crud off.
You take a precision ground surface and you are introducing scratches. You might not see them but they are there. Thinking a bit more, you could be running wheels with the older mills (I have an Altmill and was horrified reading your post) and it might not be ‘much’ of a problem but no matter how you slice it, you do not want to touch a precision ground surface with anything abrasive unless you know what you are doing.
When I clean my screw of crud, I temp mount a tooth pick on my x-gantry, have the tip fit into the grove and run the gantry down the full length of the axis. Cleans deep, fully, fast, easy, and gently.
It’s amazing what these grooves can hold. Even more amazing that the machine keeps running with all that sud tugged away.
Anyhooo, thought it would be nice to post an alternative manner to clean the screw without needing putting some back into it.
I was actually only thinking of the rails. I can’t envision cleaning a screw with steel wool (even 0000).
Anyway, wheels can ride over small scratches but once you get into anything using ball bearings to roll on the surface of the mating part you want to avoid anything even remotely abrasive..
 ). So to lube them, I oiled the ways (the two rails), and ran the assembly slowly up and down to get the oil up into the bearings.