New custom dust shoe design

Jeff: I cannot attach dxf files, as this forum does not accept that file format. It says that it will accept svg, but I tried to attach an svg file in another thread, and it failed, too. If you want the dxf and/or svg, just send me a PM and we can likely make that happen.
In the meantime, here are pics of my set up.
Captions as follows:

001 shows the overall setup. There is a bungee strung from the ceiling holding up the 2.5" hose. The flex hose goes to a 4" solid PVC pipe to which I can connect another flex from my dust collector.

002 shows the top of the bottom/brush part of the shoe. The three magnets hold it very firmly. You can see that I was still playing with the design after I cut this out on the Mill, as judged by the rough cut out. Iā€™ve since modified the vcarve file to match this design.

003 shows the shoe and the hose connection. I just used the Sienci brackets to connect it to the LongMill.

004 is a bad pic of the underside of the top part of the shoe. You can barely see that the back part of the brush is attached to the top of the shoe. When the bottom is slid into place on the magnets, the brush on the top meets the part on the bottom and completes the ā€œcircleā€ around the router.

005 shows the underside of the bottom part of the shoe. The cut out for the router doesnā€™t look as bad here as in pic 002.

1 Like

Grant,

This is great. I need to give my situation some more thought but Iā€™m thinking you have pretty much what I was looking for right here. Thank you for sharing it.
-Jeff

Iā€™ve sent the files to Jeff and Michael by email.

@gwilki, Gentleman and scholar.

Chris kindly (and very quickly) added dxf and svg files to the list of acceptable attachments, so here are those files for my dust show.
new_shoe_topandbottom_2.dxf (15.4 KB)

new_shoe_topandbottom_2.svg

2 Likes

Ok Grant, I figured out what was going on. When you were uploading the SVG the forum is displaying that as an image rather than a downloadable link, however you werenā€™t able to see the image either since for some reason it was being displayed as 20x14 pixels!!

So what I did (I fixed up your original post) is that I created a link by using the uploaded image as a reference, similar to what was outlined on the Glowforge forum here: https://community.glowforge.com/t/easy-way-to-link-svgs-in-forum-posts/46740

The short of it is this: after uploading the SVG originally and submitting your reply, youā€™ll want to:

  1. Right-click on the image and click ā€œCopy image locationā€ in order to get the link to the image, then
  2. Paste that link as well as the image name into the HTML code that I made below which then turns it into a more ā€˜downloadā€™ looking link

<a class="attachment" href="/uploads/default/original/SVG_LINK_HERE.svg" target="_blank">SVG_NAME_HERE.svg</a>"

  1. Edit your post and add that code blurb into it so that it now links to the image link

From that point, if a user is wanting to download the SVG, all they should need to do is: Right-click -> ā€œSave Page Asā€¦ā€ and then they should be able to save it as an SVG

Alternatively if you just want to post the SVG as-is, then any user can follow the same ā€œSave Page Asā€¦ā€ procedure for your posted SVG. To make sure the picture is being displayed at a readable size, just edit the pixel size in your upload: ![new_shoe_topandbottom_2|PIXEL_WIDTHxPIXEL_HEIGHT](upload://oKmXktoikwnDIhwuUKsqt0yBGkh.svg)

ā€“
Whew, wasnā€™t expecting this level of troubleshooting for SVG uploading

Grant, these guys seem to have really thought through the dust boot situation and made a number of innovative design decisions. At first I thought $120 was nuts for it but the more I read through the details and looked at the execution the more I started thinking it makes sense to reward this kind of innovation and investment in niche products. Itā€™s how a rising tide lifts all the boats. Check this out: https://www.reality3dp.com/vacuum-dust-collection/shapeoko-3-dust-boot-makita-rt070

1 Like

Iā€™ve seen Keith has this dust boot, I think he was quite satisfied with it. You didnā€™t hear this from me, but weā€™re in the process of testing a new boot design which is sturdier than the previous version, easier to adjust, takes up less X-axis travel, and has a viewing window (although no LED lighting :stuck_out_tongue: ).

I know lots of people gravitate towards the dust boots that mount to the router body because theyā€™re usually much simpler in design, but Iā€™ve always been more partial towards the Z-axis independent boots myself. Seeing as the material youā€™re cutting is usually flat, Z-axis independence allows you to have a much wider range of motion i.e. deeper plunges with the router while the dust boot maintains a good ā€˜sealā€™ with the surface of the material.

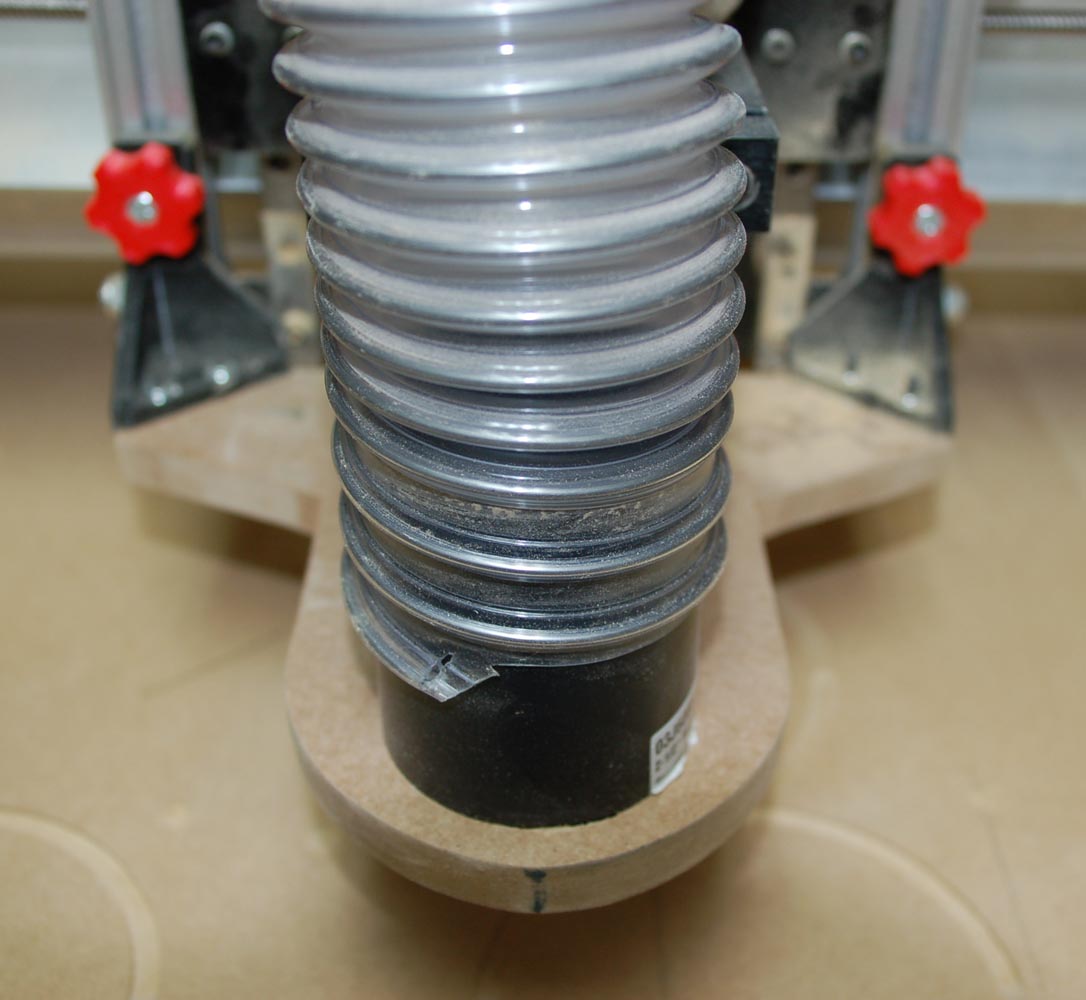
@jwoody18 @chrismakesstuff Thanks for the link, Jeff. Iā€™m still playing with designs and have not settled on one, yet. I have the hose out front and that seems to work very well. As Chris mentioned, the one you linked to attaches to the router, so it goes up and down with it. Many do.

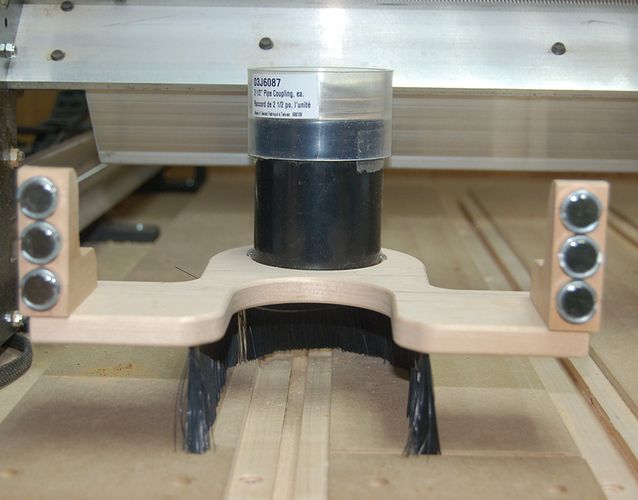
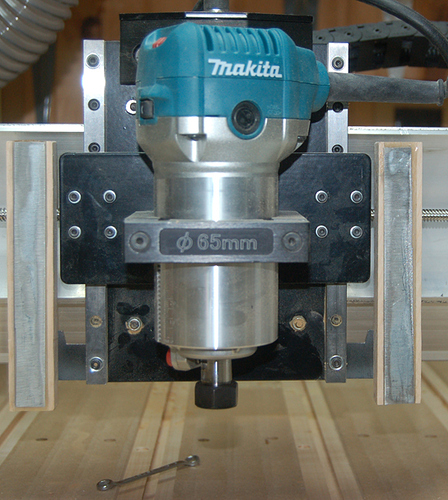
On one of the Sienci pages, Chris goes into the pros and cons of Z dependent and independent designs, and he leans to independent. For my kind of cutting, I think thatā€™s the way to go for me. I tend to do things that require bit changes and the bit length varies quite a bit. So, I go from a short V bit to a somewhat longer 1/8" mill to a longer yet 1/4" mill. With the shoe attached to the router, I would need to change the height of the shoe for each bit. Either that or set it for the longest bit and live with the brush being off the surface for the shorter bits.With my current design/Sienciā€™s design, I can set the height once and leave it.

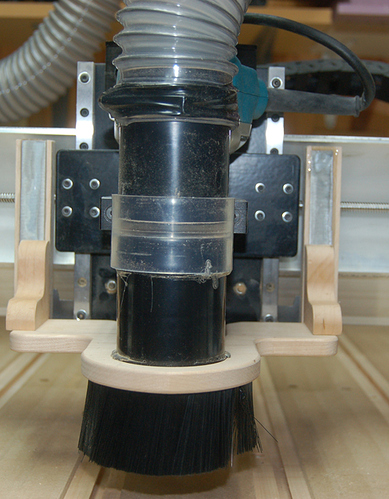
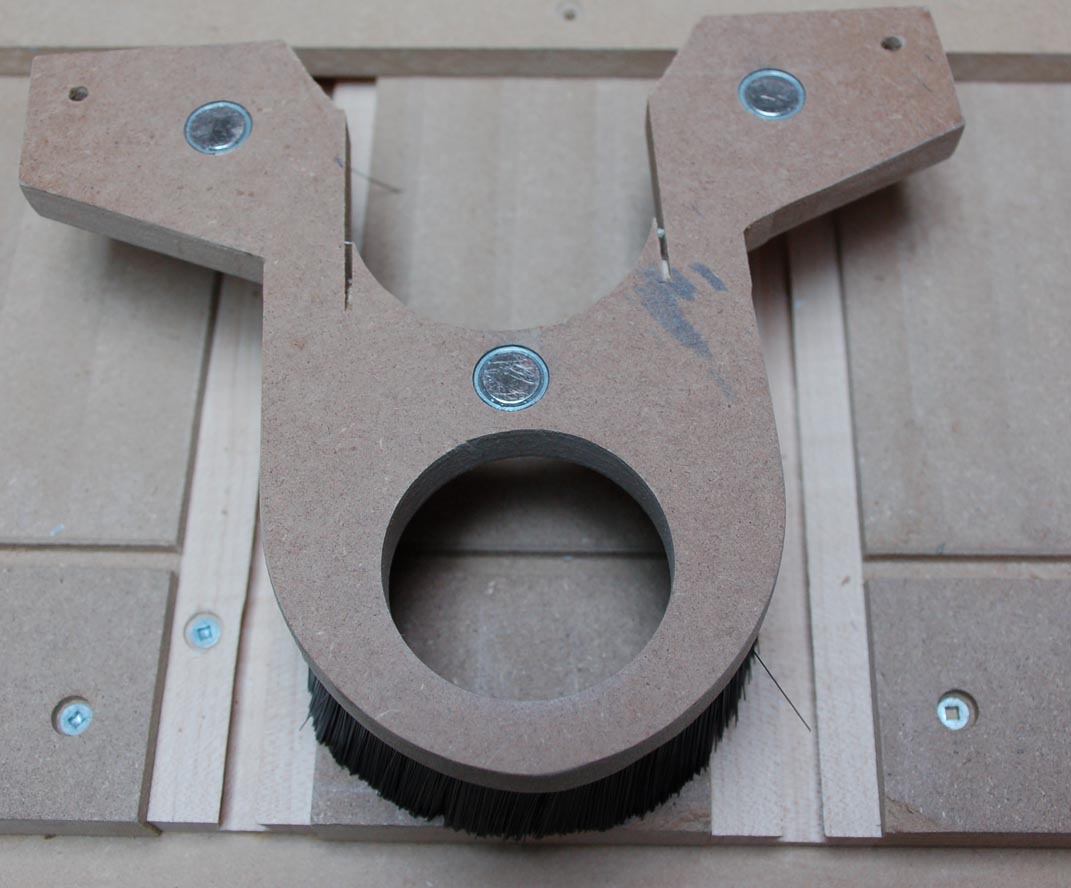
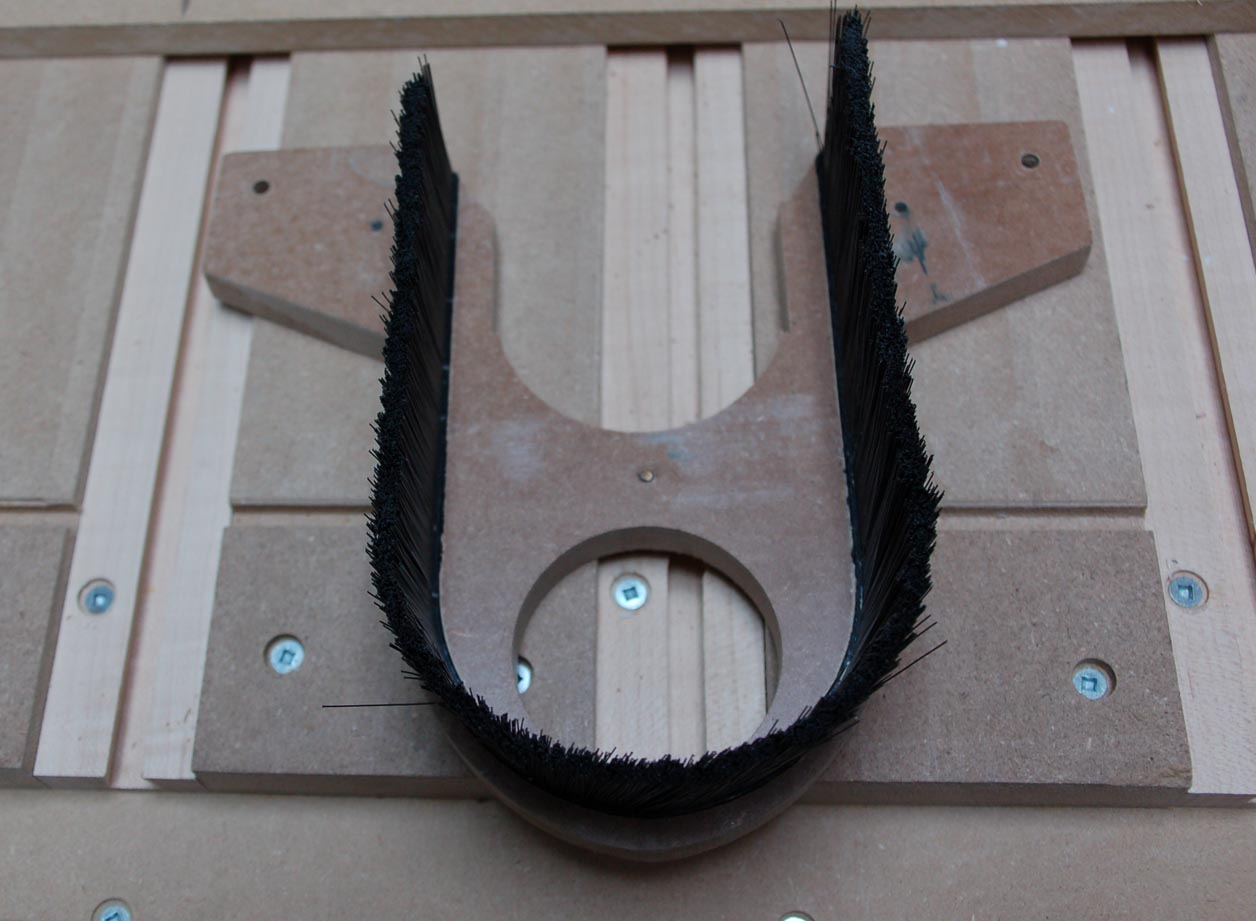
I already have the brush completely removable and held in place with magnets, so I donā€™t have a visibility problem while changing bits. (The top part of my shoe uses the Sienci brackets to keep it in place, but the only part of the brush attached to it is the back piece.) I could always remove the front piece of brush, I suppose, to be able to watch what is going on. The trade off would be reduced dust collection, but it may be worth it.

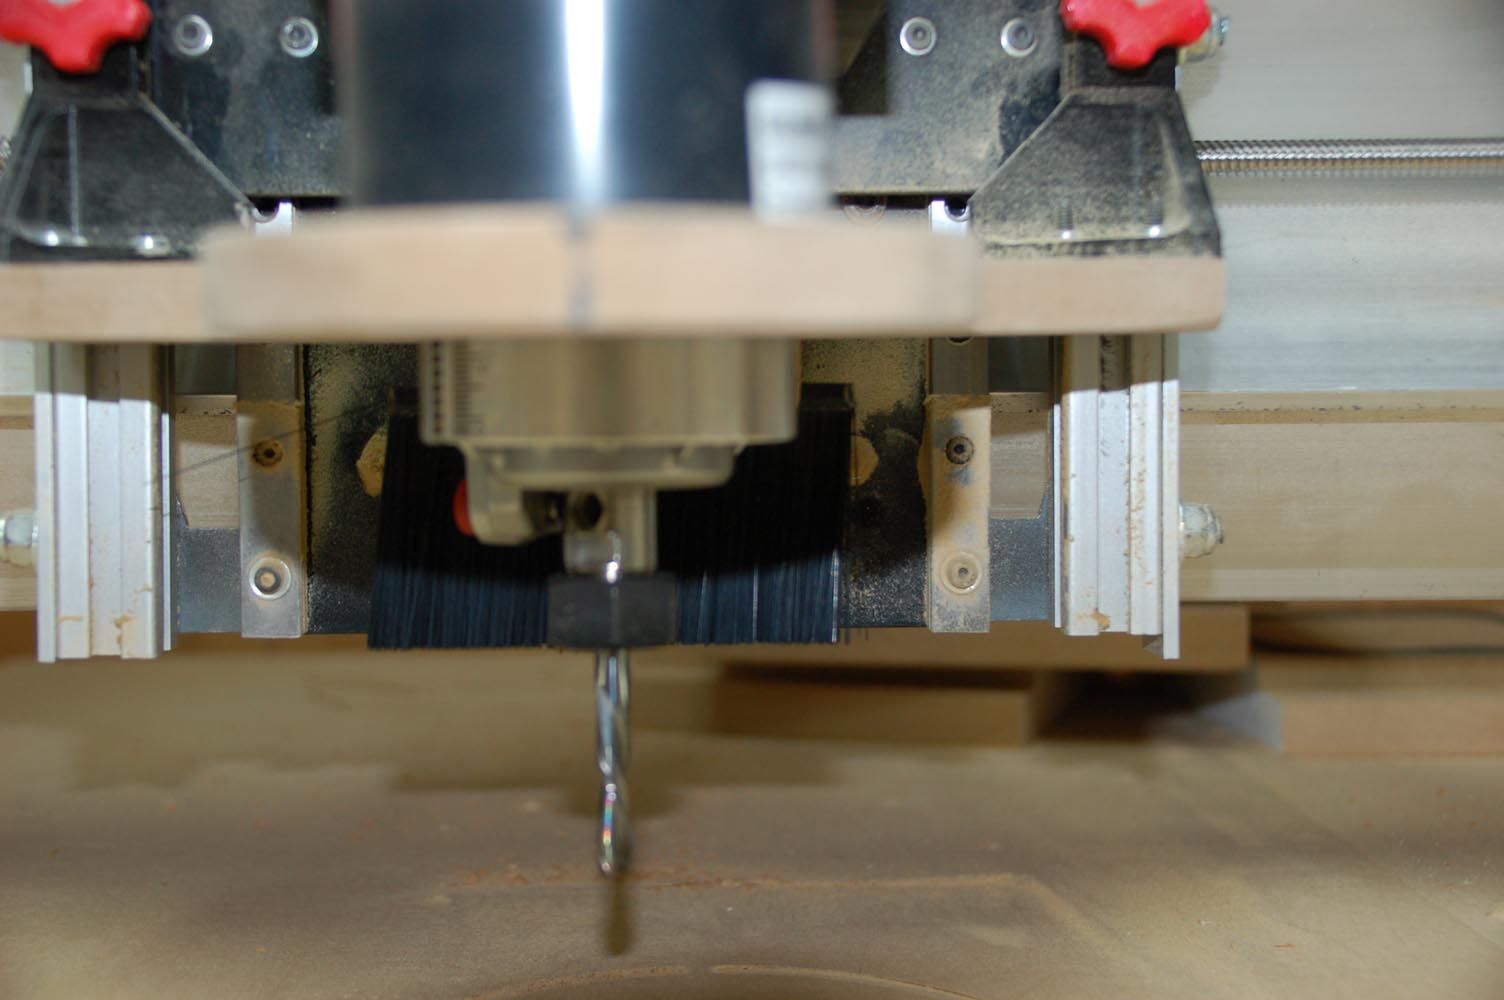
My biggest beef with my current design stems from my lack of concentration. :blush: My order of things tends to be to raise the router in Z quite high, slide the shoe bracket up high, and install the bit. Then I jog to roughly XY0. More and more, I use centre of the piece as XY0, so I jog to that point. Then, I put the touch plate in place to find Z0. Then I start to jog the router down close to the plate, forgetting that I have not lowered the top plate of the shoe, which prevents the router from lowering. Duh!

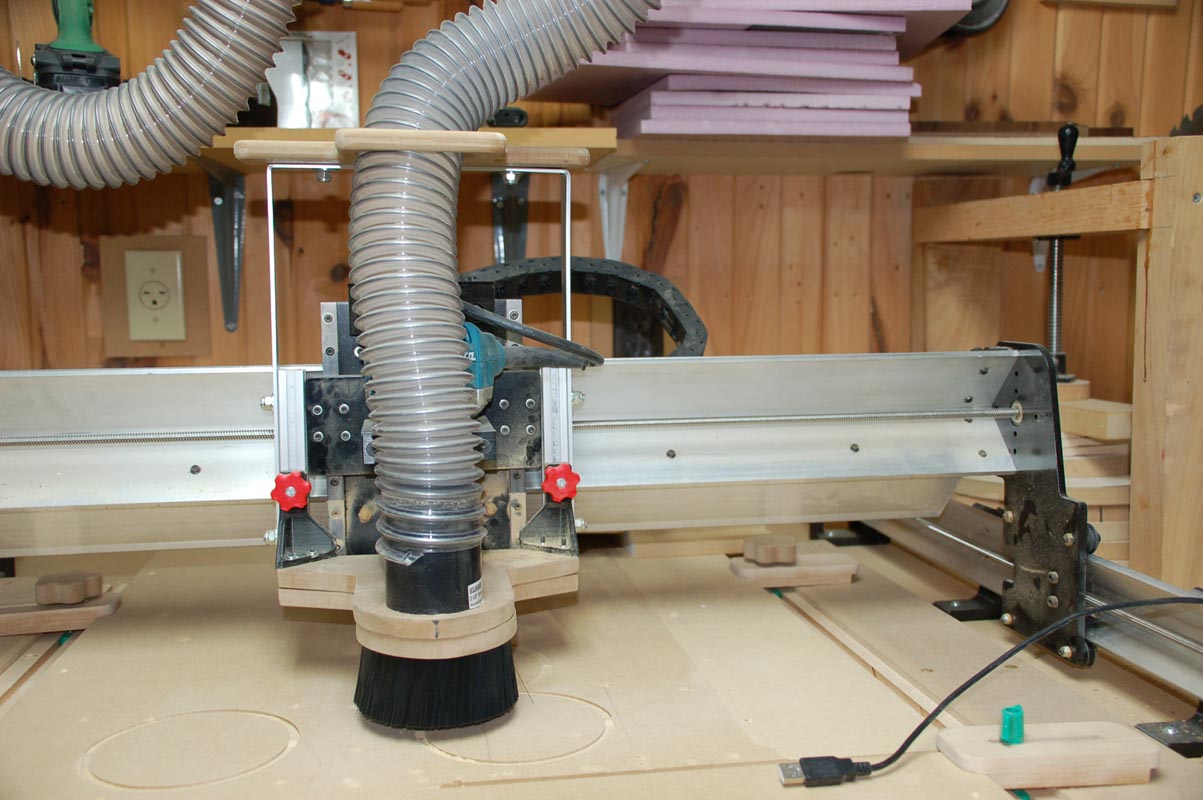
So, my next iteration - still in the drawing phase - has the top plate still held in place with Sienci-like brackets. But, the opening in the top plate allows the square router bracket to pass through it. I donā€™t believe that I will lose much dust collection ability, as the lower plate, held on by magnets will still only have an opening just clearing the body of the router.

So far, Iā€™ve been using 1/2" MDF for my playing. However, Iā€™m not sure that it will be strong enough to take the stress from the DC hose if I cut away for the router bracket, without going to a ridiculous width.

The easy solution to my problem, of course, would simply be to pay attention to what Iā€™m doing, which has been my solution so far. Iā€™ve only met with occasional success, however.

Long reply to your short post.

2 Likes

Grant, totally understand where you are coming from. Iā€™ve got the exact same ā€œforgot a stepā€ issue happening.

Itā€™s annoying to raise it out of the way to change the bit, although I should really be raising the router itself and leaving the dust shoe downā€¦ Except that if I leave it down, then the zeroing block isnā€™t usable as the brushes bush it around. Zeroing with the boot on is a pain. I need to get to a modified version like the one you shared and add magnets. The bottom definitely needs to be removable to make things faster.

I would really like to be able to see the cut, as well. The shoe is so large there is quite a large work area obscured by it. I am very intrigued by the design I shared having the narrow end of the ractangle brushless so you can still see the bit and also easily change it without adjusting anything.

Iā€™m running a fairly beefy Ridgid shop vac on a 2 1/4" (or whatever the darn size is referred to as). I was originally concerned with any gap in the brushes affecting suction but I have to say it really pulls and hasnā€™t been an issue so Iā€™m not quite as concerned with always being right on the material, if I went the route of the 3D printed example.

What I can say is that after putting the machine together and regularly saying to myself ā€œWow, I really like the way the Sienci guys did this, this is so smartā€, I did NOT have the same experience with the dust shoe. I think the dust shoe, in itā€™s current iteration, definitely feels a lot more like an after thought and isnā€™t up to the same standard (yet - Chris did say above that they are redesigning it).

If I was in Chrisā€™ shoes, I might be tempted to reach out to the company that designed the one linked above and talk about licensing or doing a Longmill enhanced version. Clearly they have spent A LOT of time thinking about dust shoes. :slight_smile:

-Jeff

I totally get the theory there, but it does make me ask aloud whether there is a material loss in suction, or at what point it occurs, with the boot that moves with the router. What Iā€™d offer as customer feedback is that while I originally bought the dust shoe (and got around to installing it) because I wanted to control the mess and reduce the dust - it didnā€™t take long for me to realize that a balance of dust collection, convenience for setup, zeroing (with block), bit change speed and visibility of the active cutting area was probably a better target. Of course what weights each item gets will vary widely by operator, but I think all items will appear on the list for most of us.

-Jeff

@jwoody18 Never one to leave well enough alone, Jeff, Iā€™ve been working on a new one this afternoon. I just did one quick cut with it in place and it worked very well. Iā€™m going to make it a bit pretty tomorrow, then try it again. If it works, Iā€™ll let you know.

Chris, looking forward to the increased X travel and ease of adjustment. I like that window idea!Please stick with the Z-independent version - Theyā€™re way more effective.

I suppose I should make sure I give the current boot a 10/10 for collecting dust. It picks up probably 97% of what comes out and isnā€™t hard packed in to the cut line. I was astounded how clean it was the first time I used it.

-Jeff

I agree. It even works well with aluminum chips. I put a thin piece of acetate film that seals up against the router on top of the wood, and you can look in and see chips and shavings swirling around and up the chute.

@jwoody18 @BillKorn Well, guys, I have made and tested dustshoe2.0. On the pro side, it means that the router is completely open while I change bits and set XYZ0. On the cons side, I lose about 2" of X travel. Dustshoe3.0 is in the design stage, but I need my steel guy to open. That version will use the same shoe, but the supports that connect to the Mill will mean that there will be no loss in X travel.
Iā€™m attaching pics of 2.0.
I tried the idea of having a clear acrylic window in the front, but my table is too low for me to bend my old back to look through it. Without a light, I couldnā€™t see anything anyway. When Iā€™m finally finished with the design, I have some 1/2" thick clear acrylic that I will make the shoe out of. That should help with the visibility issue. I want to make sure that Iā€™m happy with the functioning before I use the pricey material.

shoe_back shoe_mounted shoe_supports

2 Likes

@gwilki, G: looks nice. No wonder why I was waiting before cutting out your version 1.0. Something told me there was more to come. With you guys and Sienci working on new versions Iā€™m impressed with the 2.0. What strength are your magnets? I bought some N52s and they are so strong I can hardly get them apart. So I bought some N45s and they are nearly, but not quite, as strong as the N52s. Since I see 6 magnets on your version 2.0 how easy/hard is it to move up and down or remove? I too have a couple of pieces of 1/2" clear acrylic Iā€™m saving for the final version. You guys are awsome trying to improve the dust shoe.

@Heyward43 I donā€™t know the N number of my magnets. I get them from Lee Valley. They are 1/2" diameter. They fit into cups, which are screwed onto the brackets. In terms of strength, the shoe will slide up and down without too much effort. It does not move in use. To remove it, I need to tilt it up, which releases the bottom two magnets, then I can pull the third one on each side straight off. I likely will try it with 2 magnets on each side.
Iā€™m glad that you did not waste time, material and effort on 1.0. :wink:
I think/hope that 3.0 will be the final version. It will use the same brackets on the shoe, with the same magnets. Assuming that it will work, it will get me back all of my X travel. Iā€™ve been back and forth with Chris and he confirmed that I could use the top and bottom two 3mm bolts on the Z gantry to hold the new supports.
Chris is working on a new design, too, which I have no doubt will be much prettier than mine.

2 Likes

That looks great. I so rarely need the full X that this would work. Does having one side open affect how well it draws?

@BillKorn I lose some collection, for sure, not having the router completely surrounded by brush. For me, the trade off is worth it. I really like being able to install a bit and get XYZ0 set with the bit completely unobstructed. I get a lot of air flow from the dust collector, and I think thatā€™s part of why this works for me. In one of my earlier incarnations, I was reducing the dust collector 4" hose down to fit into the original black fitting. It simply took way to much away from the flow. Now, I have 4" running to the left back corner of my table, then an adapter taking that down to a 2 1/2" flex to the router.