Hi, I see at least a couple folks here have upgraded their Onefinity to run on the SLB but not without some setup questions/problems. I am thinking of doing this myself now an an original x35 woodworker. I would want to replace the open loop steppers at the same time with closed loop ones. I am already running an 80mm spindle and Huanyang VFD. I assume I’ll need to add some proximity sensors. I’d also like to add a rotary axis sometime. Can anyone who has done this share the recommended components and setup? Did it meet your expectations?
1 Like
@dsunds Welcome to the group, David.
I have not done this, but I can tell you that you cannot run closed stepper motors with the SLB, with the exception of the A axis motor/rotary. If/when Sienci markets the SLB-ext controller, which is the standard controller for the AltMill, you will be able to use closed loop steppers.
Andy/Sienci talked about a Close Loop Stepper Motor and SLB-EXT Kit in their July update:
So what’s next?
- As of current, we are knee deep in sourcing for Batch 6 AltMill. A survey to determine demand would help us understand how many additional components we should order to support upcoming demand.
- We need to determine what sort of resources and documentation to provide to allow users to retrofit the kit to their own machines.
- We need to see what type of machines people are looking to retrofit, so that we can have proper wire and cable lengths on hand.
If you want to help, please feel free to answer the survey (in the update link above)
@JPlocher FYI, there is more up to date information in more recent blogs. In short, the kit is still not available.
Follow up question. I’m now considering upgrading to the SLB keeping the open loop motors. The controller upgrade would be appreciated and I really like the UX for Gsender.
Two more questions:
- Am I required to use limit switches or can I continue to use stall homing. I don’t think I’ve had any issues with the BB stall homing. Putting a limit switch on my Z axis looks tricky.
- Does the SLB detect tool crashes? I am thinking this might be detected much like stall homing? While this wouldn’t catch other causes of stepper skips, it might catch my CAM mistakes.
FWIW I am also considering just selling the X35 and getting in the queue for an Altmill. I don’t need it, apart from the controller and skipping, the X35 has met my needs. I would like the 2x4 form factor better than 32x32 but I’d have to reconfigure my tiny shop… Decisions! If anyone has done either of these things, upgrade the controller to SLB or upgraded the machine I’d like to hear your experience.
@dsunds I upgraded the controller on my Long Mill Mk1 to the SLB when it first became available.
I do not have limit switches on my LM. I don’t know what stall homing is, so I cannot address that. The SLB does not detect tool crashes, although I may not know what that means, either. ![]()
I have not upgraded my machine. I started with the Long Mill Mk1 and other than adding a diode laser module, the vortex and the SLB, it’s still the same machine.
Stall homing is when the controller looks at the motor current and determines ‘home’ by the fact that motor current has exceeded a magic limit.
A (tool) crash happens when the system hits an immovable object. Alternatively, a tool crash could also be saying that something screwed up and the tool went places that it wasn’t supposed to go to. It could be hitting a clamp, it could be burying the mill in the spoil board because it thinks it needs to go to China to visit it’s birth place.
The following is my WAG:
I am about 99% sure that the Long Mill controller can not sense these events …. it will send steps until it has sent all the steps it needed to independent on wether the carriage actually moves.
I do not have a Long Mill which is why there is a 1% chance I am wrong.
I suspect that instead of homing, the controller will assume that physical 0/0/0 is at the position it was when turned on and you manually set your x/y/z to the 0/0/0 position.
@Jens Thanks for the education, Jens. I am quite positive that the LM with the SLB cannot sense stall homing or bit crashes.
Without sensors/limit switches, when you turn the machine on and connect to gSender, the machine coordinates are whatever they were when you turned the machion off. They are not assumed to be 0/0/0. They are not assumed to be anything, really. Work 0/0/0 is, as you say, where I set it for each project.
There are a number of coordinates. When I was suggesting that 0/0/0 is the place the machine was turned on, I am referring to the small coordinates that are just below your work space coordinates on the gSender screen. Does gSender remember those coordinates? What happens when both the controller and gSender are turned on (ie a cold start)- does gSender display anything other than 0/0/0?
Just checked on my Altmill. Physical machine coordinates are zeroed on startup.
I previously mentioned ‘smaller coordinates below the main coordinates’ - that was for the 1.4 series of gSender. In 1.5 the physical coordinates are to the right of the work space coordinates.
My bad …..
Whenever I startup/restart gsender the workspace coordinates might be zero but they can be anything inbetween. I always manualy press xzero yzero and retouch z (forgot that last week and was surprised to see my 2mm endmill survive the dive)
Machine coordinates are numbers that don’t mean anything to me. They are not relevant when not having switches. If I tell the machine to go 3 miles thataway, it shall bloody go 3 miles thata way.
I have reasons. (The next whiskey bar..)
Agreed …. my only point was that machine coordinates reset to zero but yes, they are irrelevant to a large degree (as are machine coordinates on machines that have zero sensors).
You loose a few features such as single button presses to move to the corners but day to day the physical coordinates are rarely used.
Alright I took a look at the code.
- The SLB uses Trinamic TMC2660C-PA-T drivers.
- These include a stall detection feature https://www.analog.com/media/en/technical-documentation/data-sheets/TMC2660C_datasheet_rev1.03.pdf
- There is nascent code support sienciHAL/Src/longboard32.c at 8345c9c204e2abb874407e137b6bfcd27c7de64b · Sienci-Labs/sienciHAL · GitHub
- It is listed as “Still to Do” Welcome! - SuperLongBoard
- Has parameters starting at $220 Firmware & Flashing - SuperLongBoard
I don’t know how much interest there is in this but if there is, I could be a tester or contributor.
Apart from not having to install homing sensors, the stall guard feature would be interesting to try to tune for tool crashes.
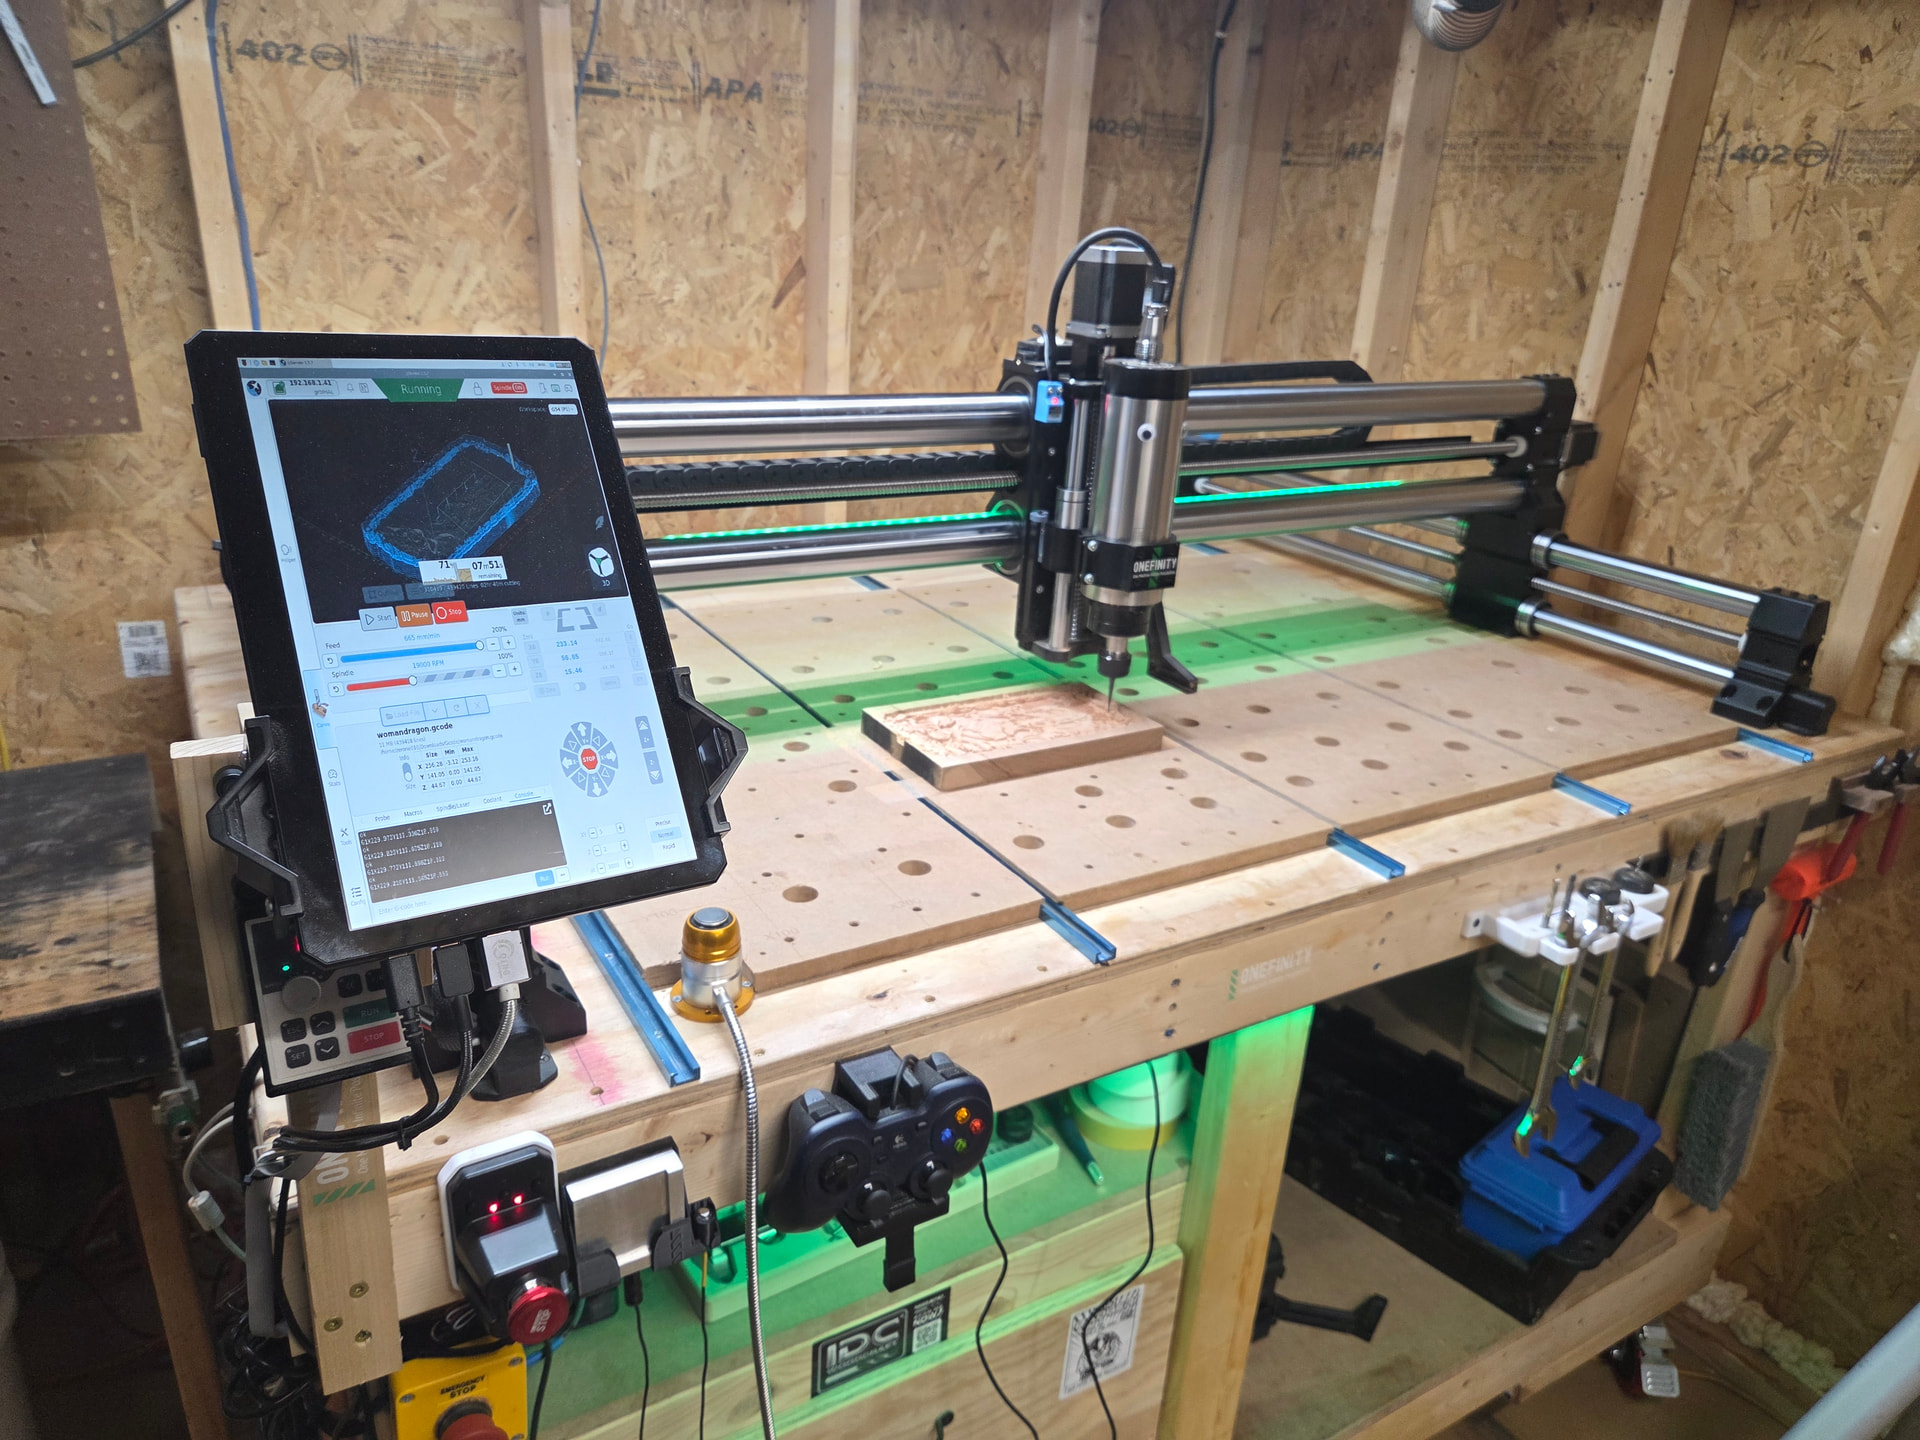
I just finished up with the main steps of converting my Onefinity Journeyman from Buildbotics to a Super Longboard. I started this because the Buildbotics controller just did not meet my needs. The SLB has so many features that the B.B. did not. I tried to use as much of the original parts and wiring as I could (cheap) I used the original steppers (have the z20 z axis), the original motor wires, screen (10”) and touch plate. I have a 2.2 kw er20 spindle and vfd (Zhong Hua Jiang with H100 VFD) as well as a raspberry pi 5. Put a 256gb m.2 nvme SSD hard drive in the pi. I’m running gSender on the pi5 hooked up through ethernet to a 5 port switch, Slb is hooked up through ethernet to the same switch. both have static ip’s. using the 10” touchscreen on the pi is a little rough, my eyes are not what they used to be. I installed sn04-N2 npn nc proximity sensors (front facing, square sensors) on the X, both Y rails, and the z axis. For the switch mounts, I found some on Makerworld and thingiverse but had to modify them to suit my needs. Z axis was the trickiest one to mount. Wiring the motors was pretty straight forward. Onefinity uses a crossover inside the tubes, keeping that in mind the wiring goes black A+, blue A- , red B+, green B-. I set the acceleration to 250 on all axis, travel resolution on x is 399.348, y= 638.95, z=634.92. microsteps at 32. I flashed the firmware with SLB Alpha B5.0.10 AS so that I could utilize the auto square. after the machine was running and calibrated I installed the Onefinity touch probe. had a little bit of issues getting it going at first. I also installed a tool length sensor. Both did not seem to work together at first. no combination of $6 and $668 would let them both function. so I tried wiring the probe to the tls port and the tls to the probe port. with $6=0 and $668=1 they both work perfectly. I also wired up neopixel leds under the x gantry (rail) and 40 leds under the table the machine sits, wired to the ring input. At first the leds on the gantry stayed white all of the time. tried adjusting the settings to no avail. ended up coming across a post on this forum with the solution. the author had used a capacitor across the + and - or the leds and a resistor on the data line. I found that I only needed a resistor (330 Ohm) on the data line for mine to function properly. So far the machine is working great. I am so happy I made the switch to the Super Longboard. Eventually I plan to purchase the SLB-EXT with closed loop stepper motors. I figure when I do I will use the SLB for my laser engraver.