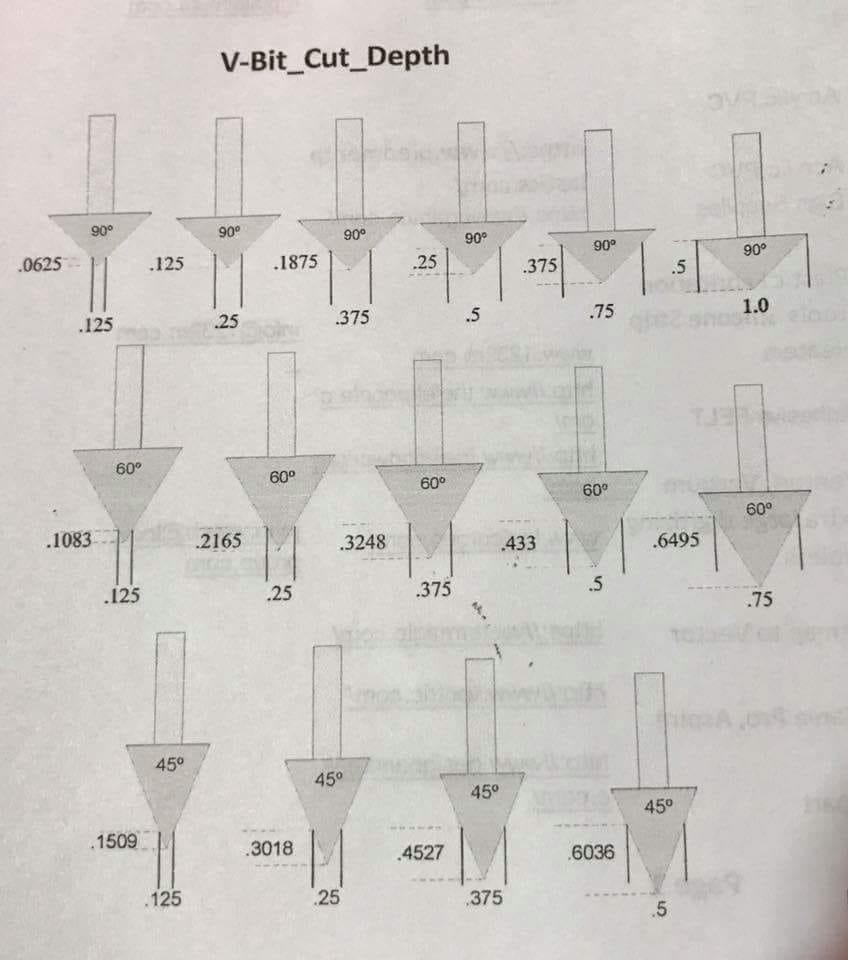
I’ve started to figure out V carving and understand the trigonometry of the bits and the cutting depths. I thought I had it figured out until I watched a video today where someone carved different size and styles of text with only a 30 degree engraving bit. Most of the text was thicker than the width of the bit but came out perfectly. I thought with V carve the bit runs down the center of each letter/shape? I tried some thicker letters with a 30 degree bit and it looks like a spline with a fork at the end showing the path to the corners almost like a very spindly serif style font. Any guidance would be appreciated.
@Teeman What software are you using for your toolpaths, Tony?
Can you post a link to the video?
There are a couple of ways to do what you want, but it may be easier to know exactly what you want to do after we see the video.
Video link below, he starts carving at around 14.15

I’ve been using Carbide Create to create my gcode for my tests.
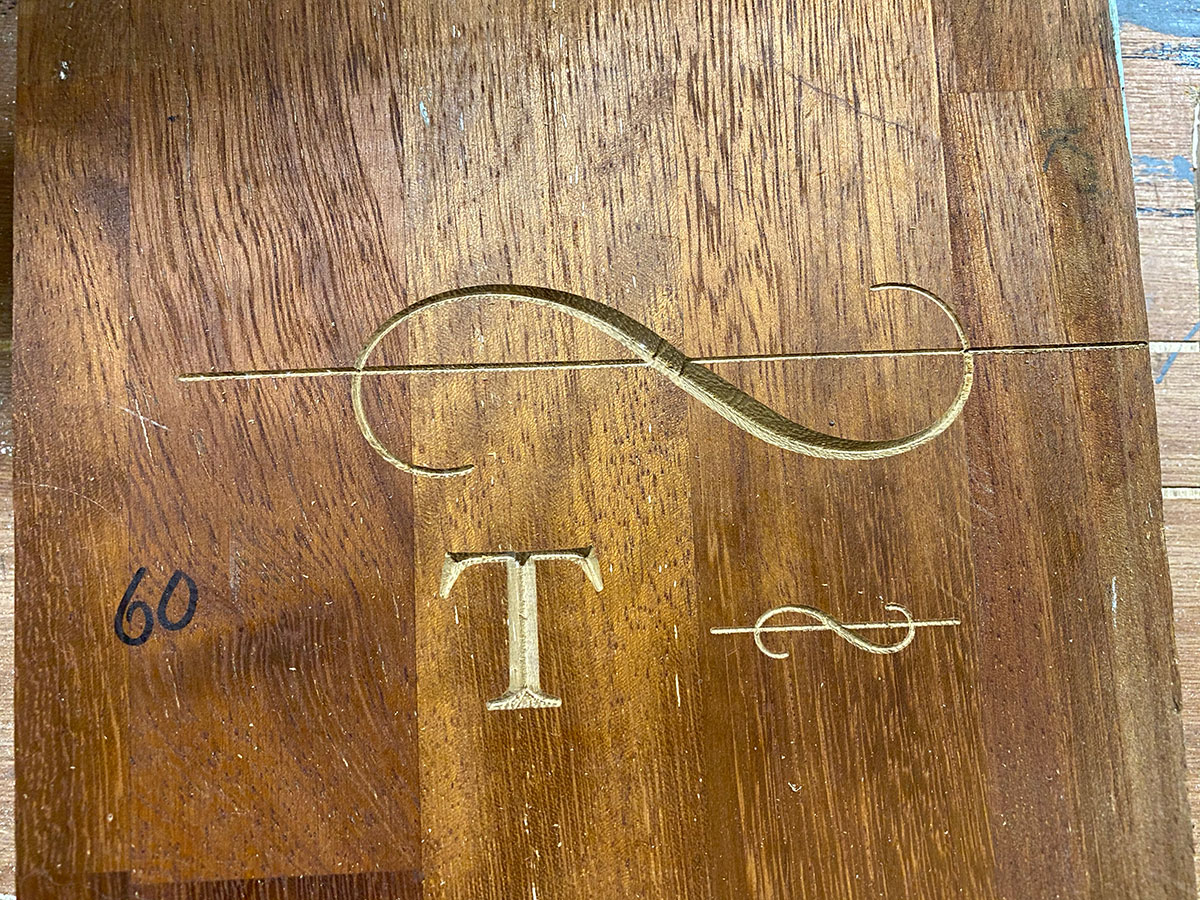

Here are some of my tests.
T and flourish was with a 60 degree bit.
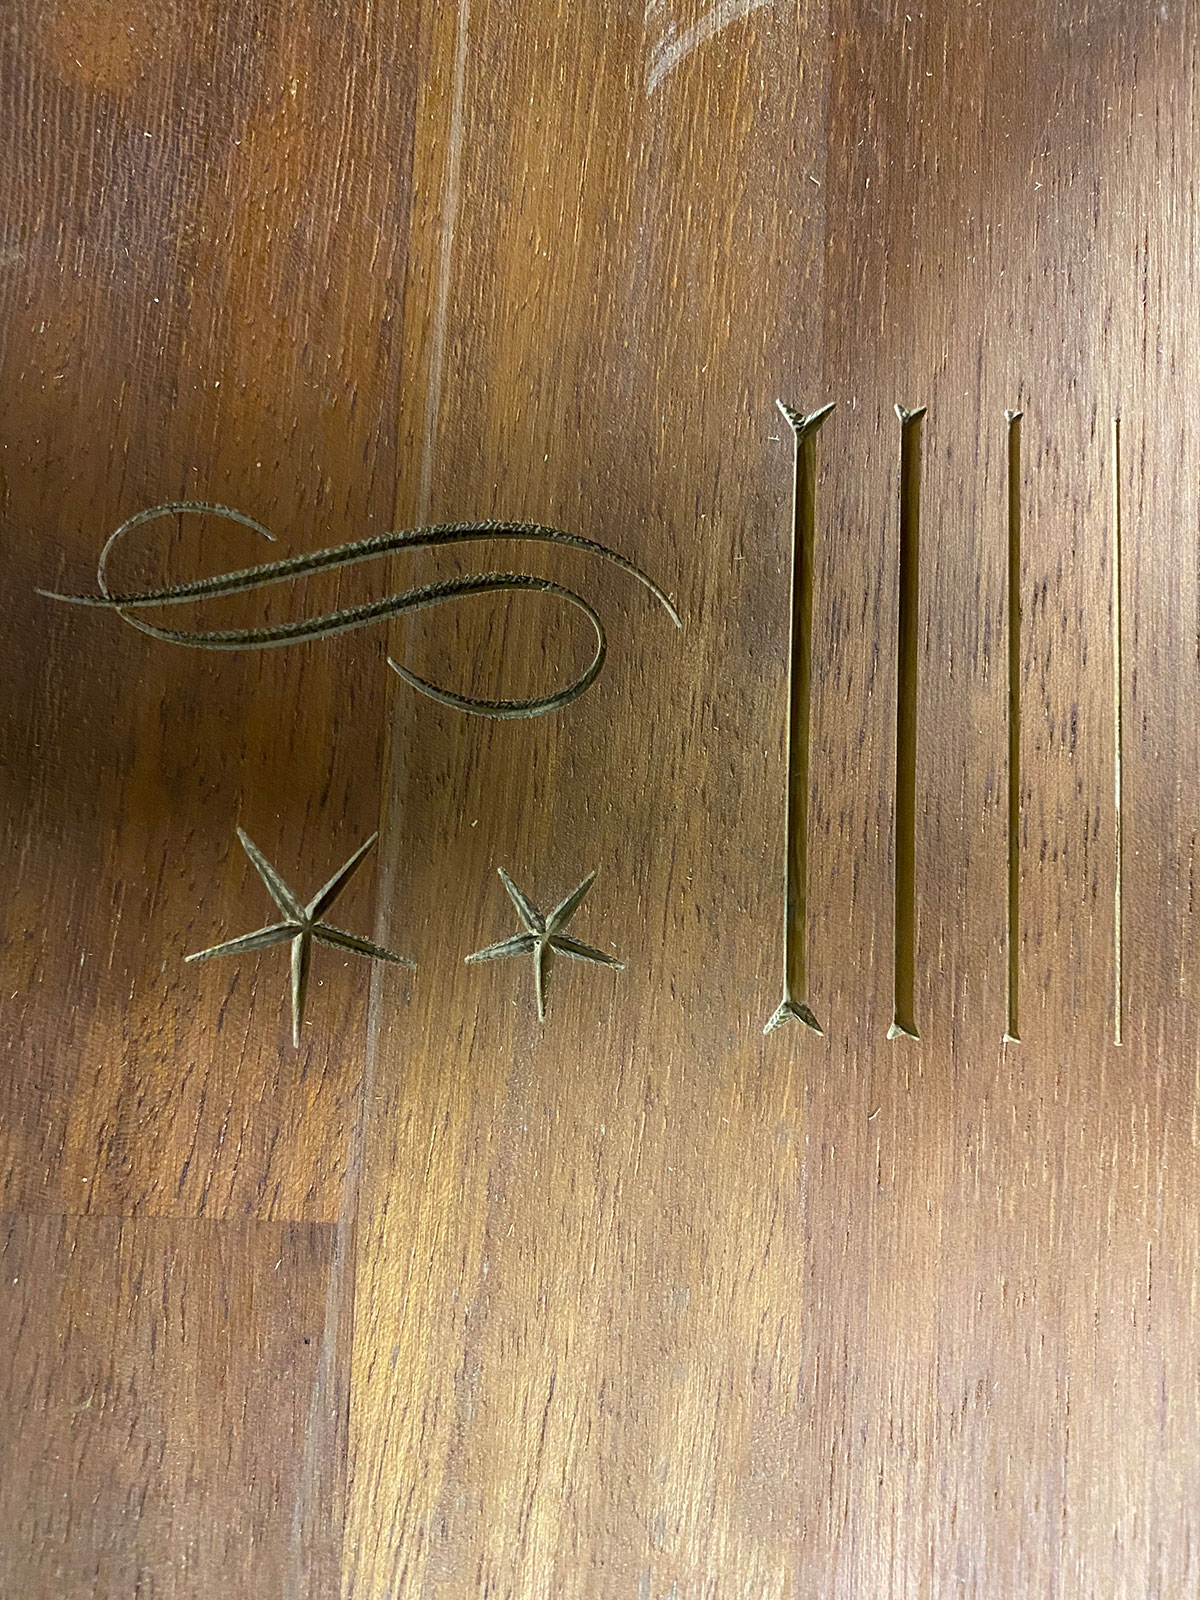
Then I tried some lines/stars and flourish with the 60 (spot where I forgot to set my zero!!!)
The last shot was with the 30 incomplete lines, stars and skinny flourish.
@Teeman You’re right, Tony, that is how v bits work. I watched the video but I don’t get a sense of how wide the text is, but he is doing a single pass so the text cannot be any wider than the max width of the bit, which in his case is 1/8".
I don’t quite understand what you are saying about your tests. For example, in your last pic, what did you draw to get the 4 vertical lines?
Hi I put the pics in the wrong order, my comment about the last shot is actually the second from last. My test file was 4 rectangles (lines) of different thicknesses. I was hoping the 30 deg bit would do multiple passes and fill out to the thickness of the lines.
On the video at around 18.45 the bit is used to create some larger scripty type so the bit can carves the detailed serifs and flourishes on the letters but the body of each character is thicker than the 1/8 bit. Do you know has he managed this?
@Teeman I think that I finally figured it out - maybe.
First, I don’t know if you can do this in CC. The video looks like the screen from either VCarve or Aspire.
In either of those, here is how it can be done. You draw the text, then convert it to curves. You then use a pocket tool path - not a V carve tool path - to pocket out the letters. You can set the max depth of the pocket. The 30° (or any angled bit) V bit will pocket out the letters so that you get then angled edges on the text. Again, in VCarve or Aspire, you can use another bit to pocket out between the two angled sides, giving you a smoother bottom, if you choose.
All that said, I don’t think the guy in the video did it this way. It looks like he just used the bit and carved the letters in one pass. If that is the case, the letters cannot be any thicker than 1/8" - the max diameter of the bit.
Cheers, I was thinking along the same lines forgive the pun. I suppose its all the fun of learning!!! I presume after any pocketing I would inset the line by half the width of the 30 degree bit so as not to widen the characters shape?
I think it would be good to share some of the files and techniques on the video on the home page. There a couple of examples of text and ornate shapes being V carved which could be useful teachings.
Thanks
@Teeman Tony: I’m not sure what you mean about insetting the line. Again, I must repeat (I’ll stop now; I promise.), I don’t know anything about CC. In VCarve, I would not do any insetting. I would select the letter, which would then show a dotted line around the letter. Then I would choose a pocket tool path using whatever V bit I chose. The software “knows” the diameter of the bit, and would create the toolpath so that the letter is carved out to the line. This is the same with any bit. You create the pocket - in this case a letter - and tell the software to carve it out. It takes the bit diameter into account so that the bit carves to the outer limits of the pocket. No “insetting” required.
No problem. I meant I would use a flat end mill to hog out the majority of the letters and then inset an outline with the v bit to chamfer the edge. Were you suggesting pocketing everything with only a v bit?
1 Like
@Teeman No, to your question. You can do that, of course. In VCarve, when creating the pocket toolpath, there is an option to “use larger area clearance tool”. So, for example, if I choose to use a V bit for my “main” tool, I can choose an end mill for the clearance tool. VCarve creates 2 toolpaths with that one set up. Then, it creates 2 gcode files - one for each bit.
You can use the v bit for the entire pocket. You just end up with more tool marks on the bottom of the pocket, owing to the fact that you are making many passes with a pointed v bit.
That all make sense. I wanted to use V Carve but can’t afford it so I’ll just carry on experimenting with Carbide Create for now. When I figure the best way with my toolchain should I post any solutions to this thread in case anyone is interested?
1 Like
By all means post solutions. It not only helps CC users but may help others. Also you might want to try Carveco Maker ($15/month) with 1 month unlimited trial. If you trial it they ask for a credit card so if you decide not to subscribe be sure and cancel before the trial runs out. If you forget you’ll end up paying for another month.
@Heyward43 Cheers for the tip, I’ll give it ago.
2 Likes
2 Likes
@McCutty Thanks for the information.
@Teeman - I think the CC Advanced V-Carve toolpath is what you are talking about. It will use a roughing bit to take out the middle of the area and then a V-Bit to take out the edges. I use it for my inlay work.
You have to manually edit and split the g-code files since it exports the file with multiple tools, but other than that it works great.
1 Like
Cheers. I was looking at that feature but because I don’t think I can use Carbide Motion with a longmill I thought it wouldn’t be an option. I didn’t think off manually splitting the Gcode - genius!!!
Is it easy to spot where to split the file?
Yes, in the code look for T commands.
Here is an example
X285.06Y166.57
Z19.05
(Advanced …)
M0 ;T60
S10000
G0X306.49Y197.59
The Z 19.05 is the last move of the first tool. Split the file there.
Be sure you setup tool numbers in the software. In this case Tool 60 is my 60 degree v bit (helps me remember which bit I used)
1 Like
Thanks Jay, can’t wait to start experimenting this weekend.