Xometry review - Professional 3D Prints for Hobbyists?

TL;DR I’ve been blown away with the on-demand manfacturing experience getting some small hobby projects done by Xometry for 3D printing ad professional CNC milling. I’ve added headings to make my long post easy to navigate.

BACKGROUND

I’ve got various hobby projects on the go and found myself needed some nice 3D printing. I don’t have a 3D printer and don’t think I have the space, time or budget for one. I want to use those for the Longmill CNC projects. :slight_smile:

3D printing, it it’s current hobby state is quite a commitment and I want more flexibility so I have been exploring how to outsource 3D prints and other CNC milling work to the new platforms that have popped up. I wanted to see if it was easy and accessible but also affordable and fast. Plus I wanted to see how the quality of higher end professional manufacturing machines compared to DIY stuff.

POWERTOOL BATTERY ADAPTER PROJECT

I wanted to make a battery adapter to be able to use batteries from one of my set of power tools on another from a different brand. After careful research it was clear this was safe and reasonable with the two brands in question (do your own research on this - can be a dangerous) so I set about cobbling something together by cutting up a USB battery adapter from one vendor and joining it to the top half of a battery (the post/connectors) from a second vendor.

It worked great conceptually but I didn’t want to go the “epoxy the crap out of dremeled plastic” route for the finished product. Instead I wanted to make a slim wedge/adapter layer that allowed existing mounting holes and forms to meet up smoothly and be low profile. I like when things look nice (and last a long time and be safe). Now could I get it made for a reasonable price?

LOOKED AROUND, GOT QUOTES, DECIDED TO TRY OUT XOMETRY

Wow, the on-demand manufacturing space is incredible. With the help of a friend’s son who is very good with CAD/CAM (thanks to years on a competitve high school robotics team) we were able to whip up a nice and compact design to mate all the stuff together. We did have to buy a small pack of tension springs for the battery release buttons.

Once we had the design, we put the STL files out to various names for quotes and Xometry had the best pricing so I pulled the trigger on some SLS Nylon prints (after I learned what that is!). Even at quantity of 1 I was able to do the main piece and the two release buttons for ~$50 (then I spent a few bucks to get the colours I wanted). Which is similar to what a guy on Craigslist locally was quoting me to do it in SLA on his home printer. So much nicer quality and repeatability and a chance to test Xometry for the same price as a hobby local SLA print. That surprised me.

If you have something you want to get 3D printed and don’t have access to a 3D printer or want to get it done in quantity, I HIGHLY recommend trying out Xometry. They have this almost frictionless process where you upload each component as an STL/STEP etc. file and they can instantly quote you.

I couldn’t believe how easily it worked and since there is lots of built in help/support (like a nice page that explains what all the finish options are and shows photos of them) I was able to upload the part, choose my desired settings, choose from 3 pricing options (based on delivery time and country of manufacture desired) and pull the trigger. It literally took less than 10 minutes. Shipping times and costs are all shown live with the quote.

If you use this link ( Create an Account ) you’ll get a $50 credit towards your first project. Heck, that may cover all of the project if you want to make a few little adapters and goodies for around your shop. Which reminds me, I need to make a no-snag end-cap for my track saw track. My house and power cord keep catching on it during cuts…

SO WHAT DO THE PARTS LOOK LIKE?

The first parts (the buttons to release the battery, unfortunately the smaller part) arrive today with the designer in Atlanta. The main body should arrive Tuesday. Super stoked to have the parts in hand and put it all together. I’ll post photos and update this thread so you can see how they turned out. Should have initial pics tomorrow and more next Wednesday.

SUPER ACCESSIBLE - THIS IS GOING TO REALLY CHANGE THINGS

What is amazing about the platform is how accessible it is even for hobbyists and small businsses. It’s clearly built for larger engineering and product design teams and they can scale to 50K or 100K or more parts and very complex projects, but it also scales down really easily.

In my previous life I did some prototype and production projects via www.protocase.com (shout out to them, nice work and they’re Canadian!) and I also worked with a high end local metal shop that had lots of CNC presses etc. (https://www.metalcraft.ca/) The work was well taken care of in the professional sense but definitely not something you could easily do small personal or hobby/side business projects with them. Cost and barrier to entry were just too high.

HANDY FEATURES

Xometry keep all your designs nicely organized (and version tracked if you make changes!) on your profile so you can quickly re-order a part you previously dialed in and built with just a few clicks. Somebody definitely paid close attention to how Amazon made ordering so easy.

ORDER STATUS

For each order they have this nice status page that was definitely inspired by the Domino’s pizze ordering page. If you’ve ever ordered from them you may recall that if you leave the page open it updates from Order Received > Making your Pizza > Baking your Pizza > It’s on the way

Here is part of my “open order” screen with the neat status bar:

MAKE SOMETHING

If you want to try it out, use this link ( Create an Account ) for that US$50 credit and to set up your free account. Upload a CAD file and you’ll have an instant quote. I’m trying to stop myself from wondering around Search Thingiverse - Thingiverse and printing every fun thing I find. So many smart ideas there. And even a 60’s VW bus you can print. :slight_smile: And some neat shop tools/accessories too. I discovered so much stuff just punching in keywords from my favorite hobbies.

I’ll keep you all posted on how it goes and what other projects I kick off with them. It still boggles my mind how you can access millions of dollars of manufacturing from your desktop. This is definitely the future for hobbyists and small businesses.

-Jeff

The first article sample of the part came in and the quality is excellent. The finish is smooth and the materials feels very strong. Looks like we got some of the measurements off by a few mm so we have adjusted the design and are spinning a second prototype next week. But overall the experience has been fantastic. I can definitely recommend Xometry and with a US$50 credit to get started it’s hard to beat. Just make sure you use the link above to sign up or you can’t access the credit.

Here are some photos of the SLS printed sample. I’m still waiting on the CNC milled aluminum. Those are due at the end of the month. I’ll share the details when available.

-Jeff

Very cool. What do you do take the battery cells out and electronics and put them in this and bang new battery for your tool?

Hi Greg,

Ripping out the cells would be a lot more invasive than this design.

My research suggests virtually all current power tools use the same basic battery cells as a starting point. I can’t recall the exact part number right now but the cell details are widely documented. What is different about each power tool vendor is what, if any, over current/over heat etc. circuitry they have and what the target output voltage is. Higher voltage batteries just string together more of the same cells. This is why you often see people on your local Craigslist offering to re-pack batteries in existing dead housings for you.

The project goal was to mate one of the many Ridgid batteries I have to Ryobi One+ tools that I have or may buy. Ryobi make lots of interesting and handy tools, some of which are unusual and outside of the “father’s day drill and driver with battery & charger” combo kit variety. That is to say they are almost never promoted/sold with batteries.

I have many more Ridgid batteries than Ryobi ones. A bit of background for tool nerds or those who like to make their tool money go as far as they can. Ridgid and Ryobi (And Milwaukee) are all made by TTI International. They also make a LOT of other brands. The Ridgid style Orange tools are sold under the AEG brand in Australia and other parts of the world IIRC, for example.

While unconfirmed, my careful external inspection of some specific Mastercraft and other “house brand” hand power tools (especially drills and drivers) suggests many 18V-20V labeled house brands are likely made by TTI as “white label” products. I’m suspicious of the new Craftsman tools too. TTI started out in the business only make tools for other people and bought the Ryobi (brand I think, not the company, unclear) when the Japanese company got in to trouble some years ago. TTI then started pushing in to marketing their own brands and building retail capacity, including buying the Milwaukee brand. TTI is owned by some Germans who have been based in Hong Kong since the late 1970s.

TTI makes Ridgid for sale in partnership with Home Depot principally. Confusingly, Ridgid labeled vacuums are actually from Emerson Electric (unrelated to TTI), and the (truly excellent) line of Ryobi cordless nailers are (I am told by someone in the trade) actually built by Senco (unconfirmed). But in general Ridgid, Ryobi and Milwaukee hand tools all come from the same parent company. If you have both Ridgid and Ryobi, pull out the manuals and look at the US address printed int he manual, it will be identical and tied to their US importer. Oddly, and I think confusingly for customers, TTI just ran a “Battery Event” at HomeDepot where they co-marketed Ryobi and Ridgid together on the same end cap display:

I don’t own any Milwaukee so can’t say the same for them, but I wouldn’t be surprised to find the same address (although Milwaukee also maintain some US R&D offices I’m told - definitely part of the rough and rugged North American trade professional image they want to maintain).

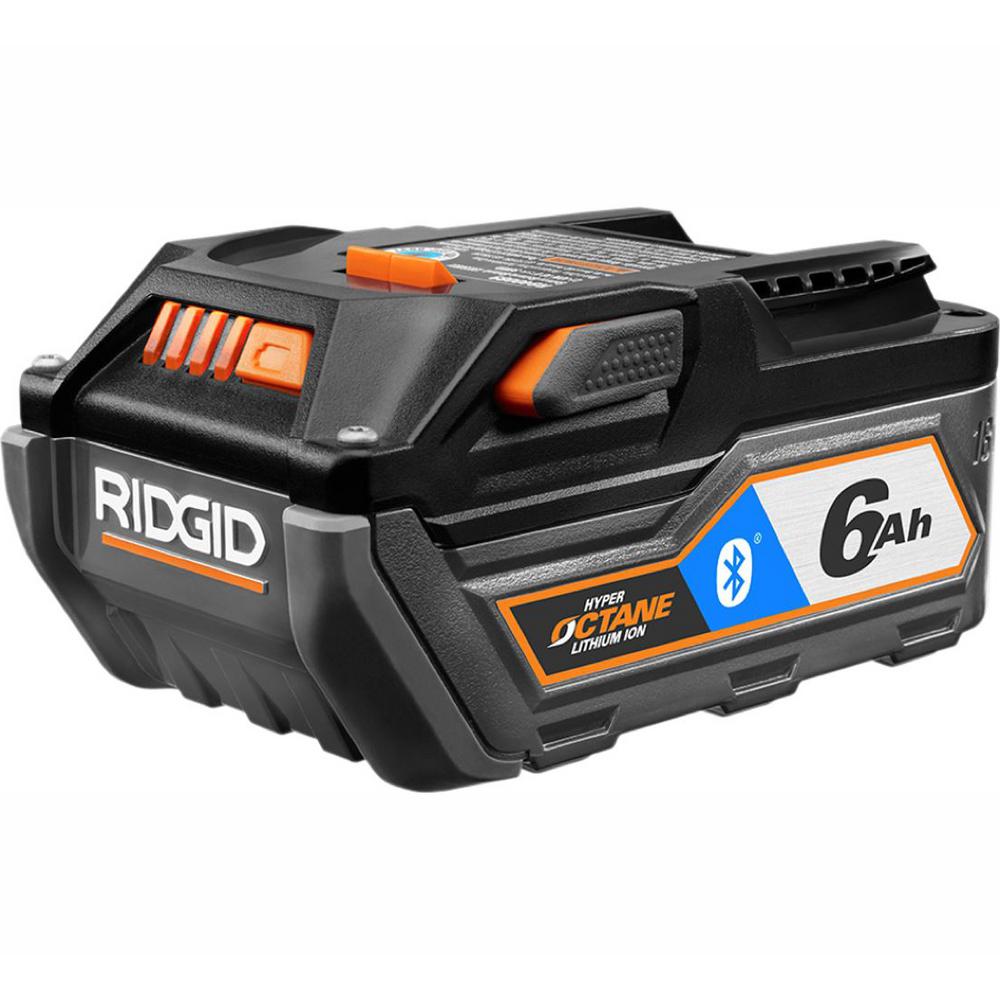
So, back to the 3D printed project… The 18V Ridgid line and the 18V Ryobi battery lines are very similar, although I have been told supposedly some of the components in the Ridgid batteries are of higher quality. Also, the newer Ridgid batteries have Bluetooth. The principle difference from a user perspective is the form factor. Ridgid uses a horizontal connector and clip on their batteries. The Ryobi use a Dewalt-ish post style for the contacts and vertical clips for the retaining function.

Ridgid:

Ryobi:

What this 3D printed shim I had printed by Xometry does is marry the top shell of an actual Ryobi battery (removed from one I had) with the bottom of a Ridgid USB charger adapter.

The USB Charger adapter was the fastest way for me to get something that had the retaining grooves and the contacts and wiring in one spot. Makes it very clean and easy and leaves you with a professional looking and feeling setup. You wouldn’t want your big expensive battery to fall off due to weak clip. :slight_smile: You can buy them here: https://www.homedepot.ca/product/ridgid-18-volt-usb-portable-power-source-with-activate-button/1001029549

So from the top down it looks like this:

Ryobi Battery Top (w/Post)
3D Printed Shim & Release Buttons (springs from Amazon)
Ridgid USB Charger Bottom Half (providing connectors for battery & wires)
Any modern Ridgid 18V Li-On Battery

You can get a sense of it in this photo (the USB charger bottom is missing but all but disappears behind the taller green edge of the bottom piece on the left anyway):

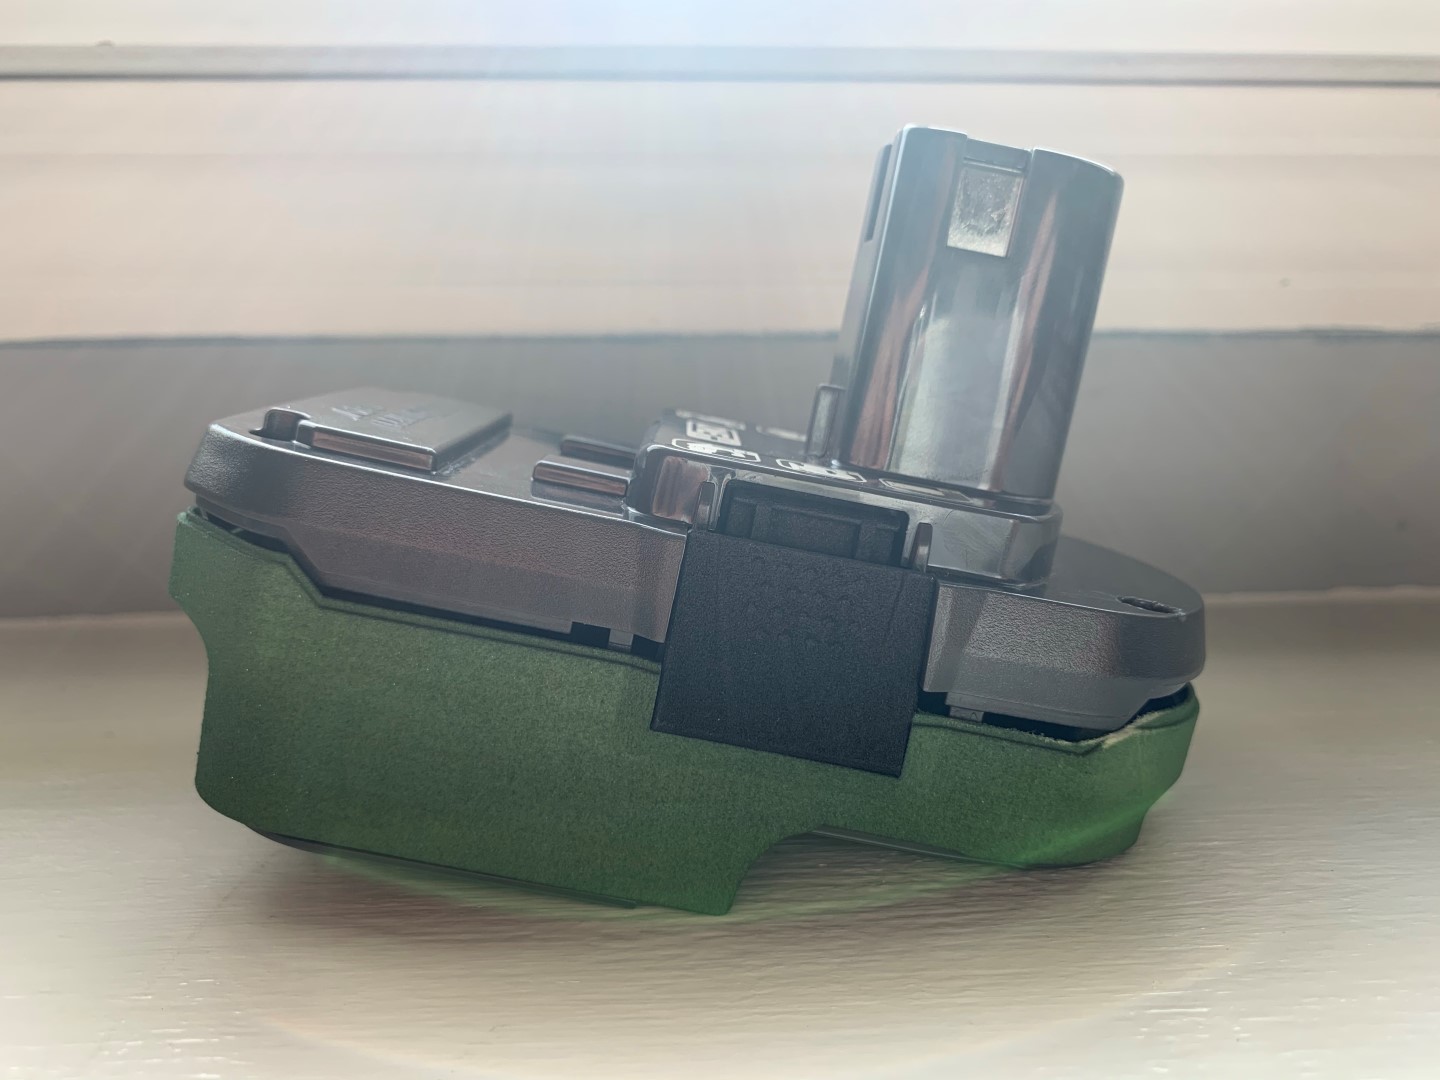
As you can see from the photo, the resulting adapter is about the same thickness of a regular Ryobi 1.5Ah (the small ones they toss in kits for free, as in photo above) BEFORE the Ridgid battery is added. Ridgid batteries most commonly come in 2Ah, 3Ah, 4Ah, 6Ah sizes at the moment and increase in height with the large 6Ah picture above. The only material downside I have seen so far (as I mocked this up by hand and tried it out on some tools) is that depending on how large the ridgid battery is, the small extra height of the shim does affect the center of gravity of the tool. So depending on which tool you use and how large a Ridgid battery you add, it could become cumbersome.

For tools that don’t take the batteries in the bottom “ammo clip” style, you may run in to physical collisions with housings. We have a sweeper unit that takes the Ryobi battery with the post going horizontally and I’m not sure if a Ridgid battery via adapter will have enough clearance due to odd terminal location on the tool. But for most tools it should work great.

** NOTE: Charging would still take place on a Ridgid charger regardless of what tool would use it with. DISCLAIMER: I’m not endorsing doing this. It’s more of a thought experiment and exercise in learning about 3D printing services. If you do anything with electricity or batteries you do so at your own risk. There is a lot of energy in these larger batteries and specifications and designs can change. Proceed with caution and only with the appropriate skills, safety equipment and tools.

-Jeff

LOL Own risk ya. Thats why I watch AvE’s youtube channel so I can know when not to do something. His work bench catches fire I know not to do it LOL.

You won’t see me tearing apart batteries like that any time soon.

Oh man that guy is a riot. He’s definitely Canadian and I think, from listening to him yammer on at one point, that he might be here in BC. If you’re reading this and haven’t seen his videos, check him out here: https://www.youtube.com/channel/UChWv6Pn_zP0rI6lgGt3MyfA

-Jeff

He is in Victoria BC