my trial ended and I was able to switch to the Fusion for Personal Use. Thanks for the help, or at least calming my nerves.
I see there are some limitations for 3D CAMing.
Are there any major 3D CAMing “tools” (I’m not sure what else to call them) that I won’t be able to use?
While I will do a lot of stuff (signs some 3D art..ect.) I’m really focussing/excited to make electric guitars. Ive done few kits so want to do one on the Altmill.
Carved tops would be my 1st real 3D action. That and guitar fingerboard profiles. Also was making some radiuses sanding blocks.
Sorry if this is a frequent questions. I searched and couldn’t find a previous ask…
Yes, there are some VERY annoying limitations for CAM. The worst by far - only a single tool path at a time. Let’s say you are cutting out a project and that project has some features in the middle - let’s say a square feature that needs cutting out of the stock. You also want to contour the outside edge to extract the model from the stock. If you have a paid version of Fusion, as long as you are using the same tool, you could combine the two tool paths (one for the pocket and one for the outside contour) in one file. The free version requires you to make two tool paths, two postings of the .nc file and you can only cut one file at a time. You load the tool path for the pocket and run that followed by loading the file for the contour and running it. Very annoying!!!
Although I haven’t attempted doing a tool change under Fusion control, I am about 99.999999% certain that an ATC setup will be a fancy door stop.
Oh, another limitation is no rapids. If you are cutting a long groove for example and the cut takes two passes with the tool and both passes start at the same end of the groove, you will see the first pass at the appropriate speed and then you will twiddle your fingers while the cutter moves back to the start position at cutting speed instead of as a rapid move. That can add a considerable amount of time in some circumstances.
I am sure there are other limitations but those are the two that are the most annoying for me. If you are not doing commercial work, those limitations are annoying but given some extra time can be overcome.
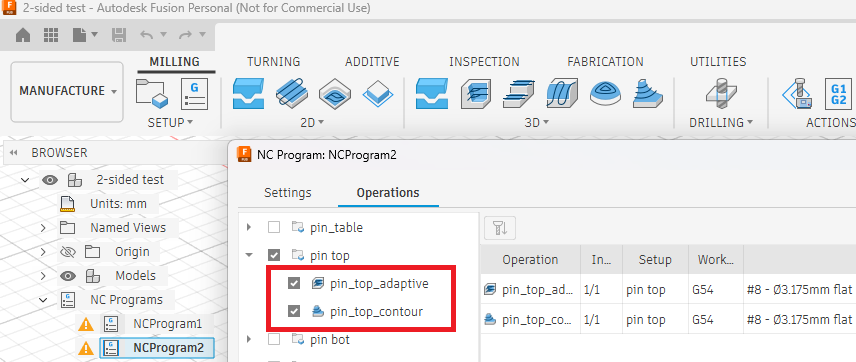
@Jens I may be misunderstanding your description of the tool path limitation, or maybe Autodesk changed things? I am using the Personal version of Fusion, and I am able to combine two toolpaths into a single NC file. Shown below is a screenshot of me editing the “NCProgram2”. In the middle of the Operations tab, I selected two toolpaths. The first is an adaptive clearing operation, and the next is the outside contour, both using the same end mill.
When I post-process, I get one NC file, and I can run it all at once. What am I missing?
I don’t know what to say … I used to do exactly what you are demonstrating when I had the basic paid-for version. I let that expire and was no longer able to do this after the fact. Maybe it has changed or maybe it’s a case of old age / dementia on my part. I guess it could be that I was doing things slightly different and that wasn’t allowed.
I have no projects at the moment but when I get back to it I will test this.
Thanks for pointing this out because that was a huge problem for me and, at the time, I was seriously thinking of renewing my subscription just for that one feature.
Maybe they changed this in the free version because I have the same issue. I will check later today if I can now save 2 toolpaths to one NC program. That would be great!
Another limitation I see is not being able to use the Arrange tool. I think thats what its called. But its the automatic tool for lining up your pieces on a sheet and it is unavailable on the free version. This means you have to manuallly use the align and then use joints (atleast that my way).
I actually checked and I still cannot save toolchanges in one .nc file.How do you all save your files? I just right click and then go to post process. However when I have either a setup selected with multiple tools or i select 2 or more toolpaths to post with different tools I get the WARNING paid only.
Interesting … maybe I am not using ALL of my marbles. Thanks for chiming in …
I never tried doing tool changes in one post. It is easier for me if I keep things simple. I mount one tool and then run whatever tool path I need to that uses that tool before going to the next tool and tool path. I actually tend to use tools that are not ideal because it is easier and sometimes just as fast (when you include the tool change) to make do with the less efficient tool. I use a 1/8" endmill a lot for smaller features and I just do the final contour with that same tool even though a 1/4 endmill would be more appropriate to do the final cut-out of the part from the stock.
Yes, the arrange tool is another function that doesn’t work but then I have gotten used to doing my stuff manually. In my work flow I just do one part at a time and it’s only a minor annoyance at that point. Cutting out a bunch of parts out of a large sheet of plywood would be nice but I don’t have a vacuum table so holding a large piece of plywood is a bit of a challenge.
Like Jens, I have only put the same tool type in a single .nc file. Same reason: simplicity. I think I did accidentally select different tools once and received the warning about needing a subscription for that feature.
OK that all makes sense, I save multiple toolpaths with a single tool as well. And like Jens I too sometimes use and 1/8 DC for a bit too much work because why switch bits. LOL
One thing I havent tried in Fusion is relief carving, I plan to work on this and 2 sided projects soon.
For relief carvings I use two bits, one for roughing (could be a straight endmill) and then a TBN bit.
Double sided projects are tricky and that is probably why I have gotten into the habit of doing one sub-component at a time. I made a lot of drawer cabinets and most of the drawer components are double sided ( I also pre-drill the screw mounting holes for the rails which is why most parts are double sided). In order to not have to worry too much about the second side, I first cut side one to length using the CAM model’s length - this gives me a reference edge for the second side. I then carve all the features on that side and flip the board top to bottom. That way I use the same left edge as a reference and now the top edge of the board is on the bottom and can be used as a reference. This gives me two reference edges and perfect alignment (unless I put too much side pressure onto my plastic dogs which can distort them a bit).
There are many ways of doing two sided work (in my case for plywood) but this work flow has served me well.