Christmas Contest 2021

Thanks for the info. Hadn’t thought of using that.

Name: 3D Carve Cribbage Board

Use case: Christmas gift for my mother

Material: Birdseye Maple

Design software: Carveco Maker

Relief Design: A Swallow Visits the Farm ( A Swallow Visits the Farm 3D Relief Model - CNC Clipart)

Size: 380mm x 250mm x 21.5mm (I come from 3D printing background so everything is metric)

Cut Times:

  • 3D rough cut: 8 hrs
  • 3D finishing cut: 22 hrs
  • Peg holes and lettering: ~30 mins

Bits:

  • 3D rough cut: 1/8" upcut end mill
  • 3D finishing cut: 1/8" D0.5 Tapered end mill
  • Peg holes: 1/8" upcut end mill
  • Lettering/lines: 60 dev V-bits
  • Contour: 1/4" downcut end mill

Lessons Learned: Waiting for replacement bits in the mail (twice) is slow progress, have spares on hand. I was a bit (pun intended) too aggressive with my tapered end mill and it snapped at the tip. I did not have a spare so ordered another set from Sienci Labs. 5 days later received and started the finishing pass again. I lost my zero since Windows decided it was time to install updates… Good timing Microsoft. Reset mu zero and ended very close to the original. Started the finishing pass again and was moving along nicely. Paused the cut to get some sleep. Started the next morning but after 30 minutes of cutting lost the USB connection to the Longmill. Not sure what happened there. In my frustration I move the Y azis instead of the Z axis and snapped my bit again (learned patience). Down to my last bit again so I immediately ordered 2 more sets from Sienci Labs just in case. Waited until Saturday morning to try again. Reset my zero, started the finishing pass and made it to the end after 21.75 hours. A few rough edges because of the re-zeroing but salvageable. Cut the peg holes, lettering and lines in about 30 minutes. Now on to finishing. I will be away for work during the next few days so not able to complete until next weekend. Planning to finish with Tung Oil. I may try to add a trap door with magnets on the bottom to hold the pegs and line that with felt. Really happy with the outcome.


4 Likes

Chess set i made 1st dabble into 2 sided machining i messed up a little when sanding my tabs off i sanded the pawns bases on a bit of an angle nothing major just a little hicup. 1st real project done in Aspire and I really got the hang of it! Used Roasted Ash for the dark pieces and spalted maple for the light. Finished in mineral oil. Didnt even have to sand anything minus the board which was made seperate from the longmill.

Used this video as a Baseline guide
2 Sided Machining Tutorial
Chess Piece STL
Aspire File for all the pieces

Roughing pass was done on a 1/8th inch endmill while finishing was done with with a 1/16th ball nose end mill 2500mmpm feed and speed on the finish pass

This was roasted ash and the light pieces are on spalted maple (not pictured I already wrapped this up! rookie move :frowning: )

Really been working on 3d carving this year got into it with this video became really obesessed very happy with the detial that came out of this

5 Likes

Dear Abby…

Wait… wrong forum… :grimacing:

Merry Christmas all. I’m relatively new to the CNC game but loving it so far. In the few short months I’ve had my longmill I’ve only broken 2 bits. Not sure what the average is but I’m pretty happy with myself on that number. Lol What I’ve learned do far is that CNC is NOT plug and play as I know some people I’ve spoken with assume. I’ve learned to not rush things and ask questions of those who are more experienced. This community and others I’ve met since getting into this have been incredibly helpful and open to teaching. I’ve managed to turn out a few projects but my most recent is a baby’s first Christmas ornament for a close family friend. By no means is it anything compared to some I’ve seen on here but I was pretty proud of myself that it turned out the way it did… on my third try :joy:. Still a few things that aren’t perfect but that just adds character right? I used a 4" x 4" x .25" walnut board. This was my first attempt at something more detailed and fine. The finish is a simple oil and wax. The idea was to keep a natural look and not too shiny. I dont comment much in here yet but I do read the posts and all of the knowledge shared and information given has been a great help so thank you to all that have posted. Oh and the image… Screen shot off of Google and messed around with it until I got it to work. Still learning how to design my own stuff. You’ll notice I had some parts of the snowflake break. Any suggestions on how to prevent that would be awesome! Thank you all and Merry Christmas!

2 Likes

I’m a “newbie”. Had my longmill 3 months but time is limited and I squeeze in longmill time when I can. The machine itself hasn’t been the biggest challenge. I’ve made a point of watching the video and learning the parts of the machine and what they do. I’m constantly checking nuts and bolts and wheels to make sure everything is where it should be and not to tight or loose. The hardest part for me has been the bit selection and corresponding feed rates, plunge rates and depth per pass. What’s to fast? What’s to slow? How deep should I cut? A few settings can take a carve time from 7 hours down to 2. Finding that magic mix of quality of cut vs time is my biggest challenge

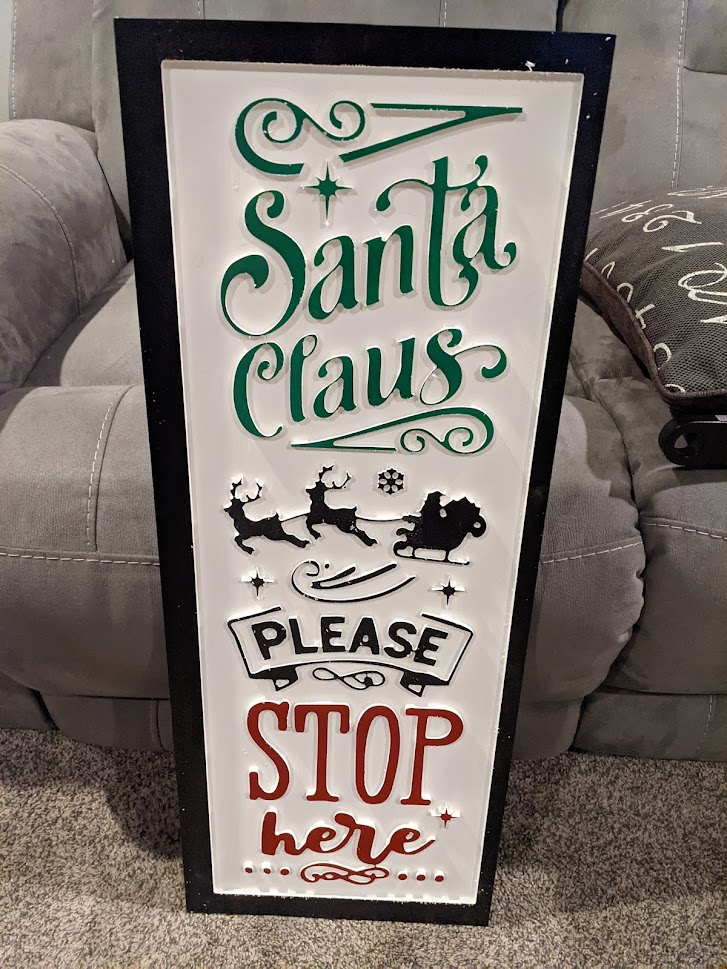
This is my first real project. Before this I made a few hold down clamps and L brackets for my CNC but thats about it. It’s made from PVC sheets and is 30x11.75x0.75.

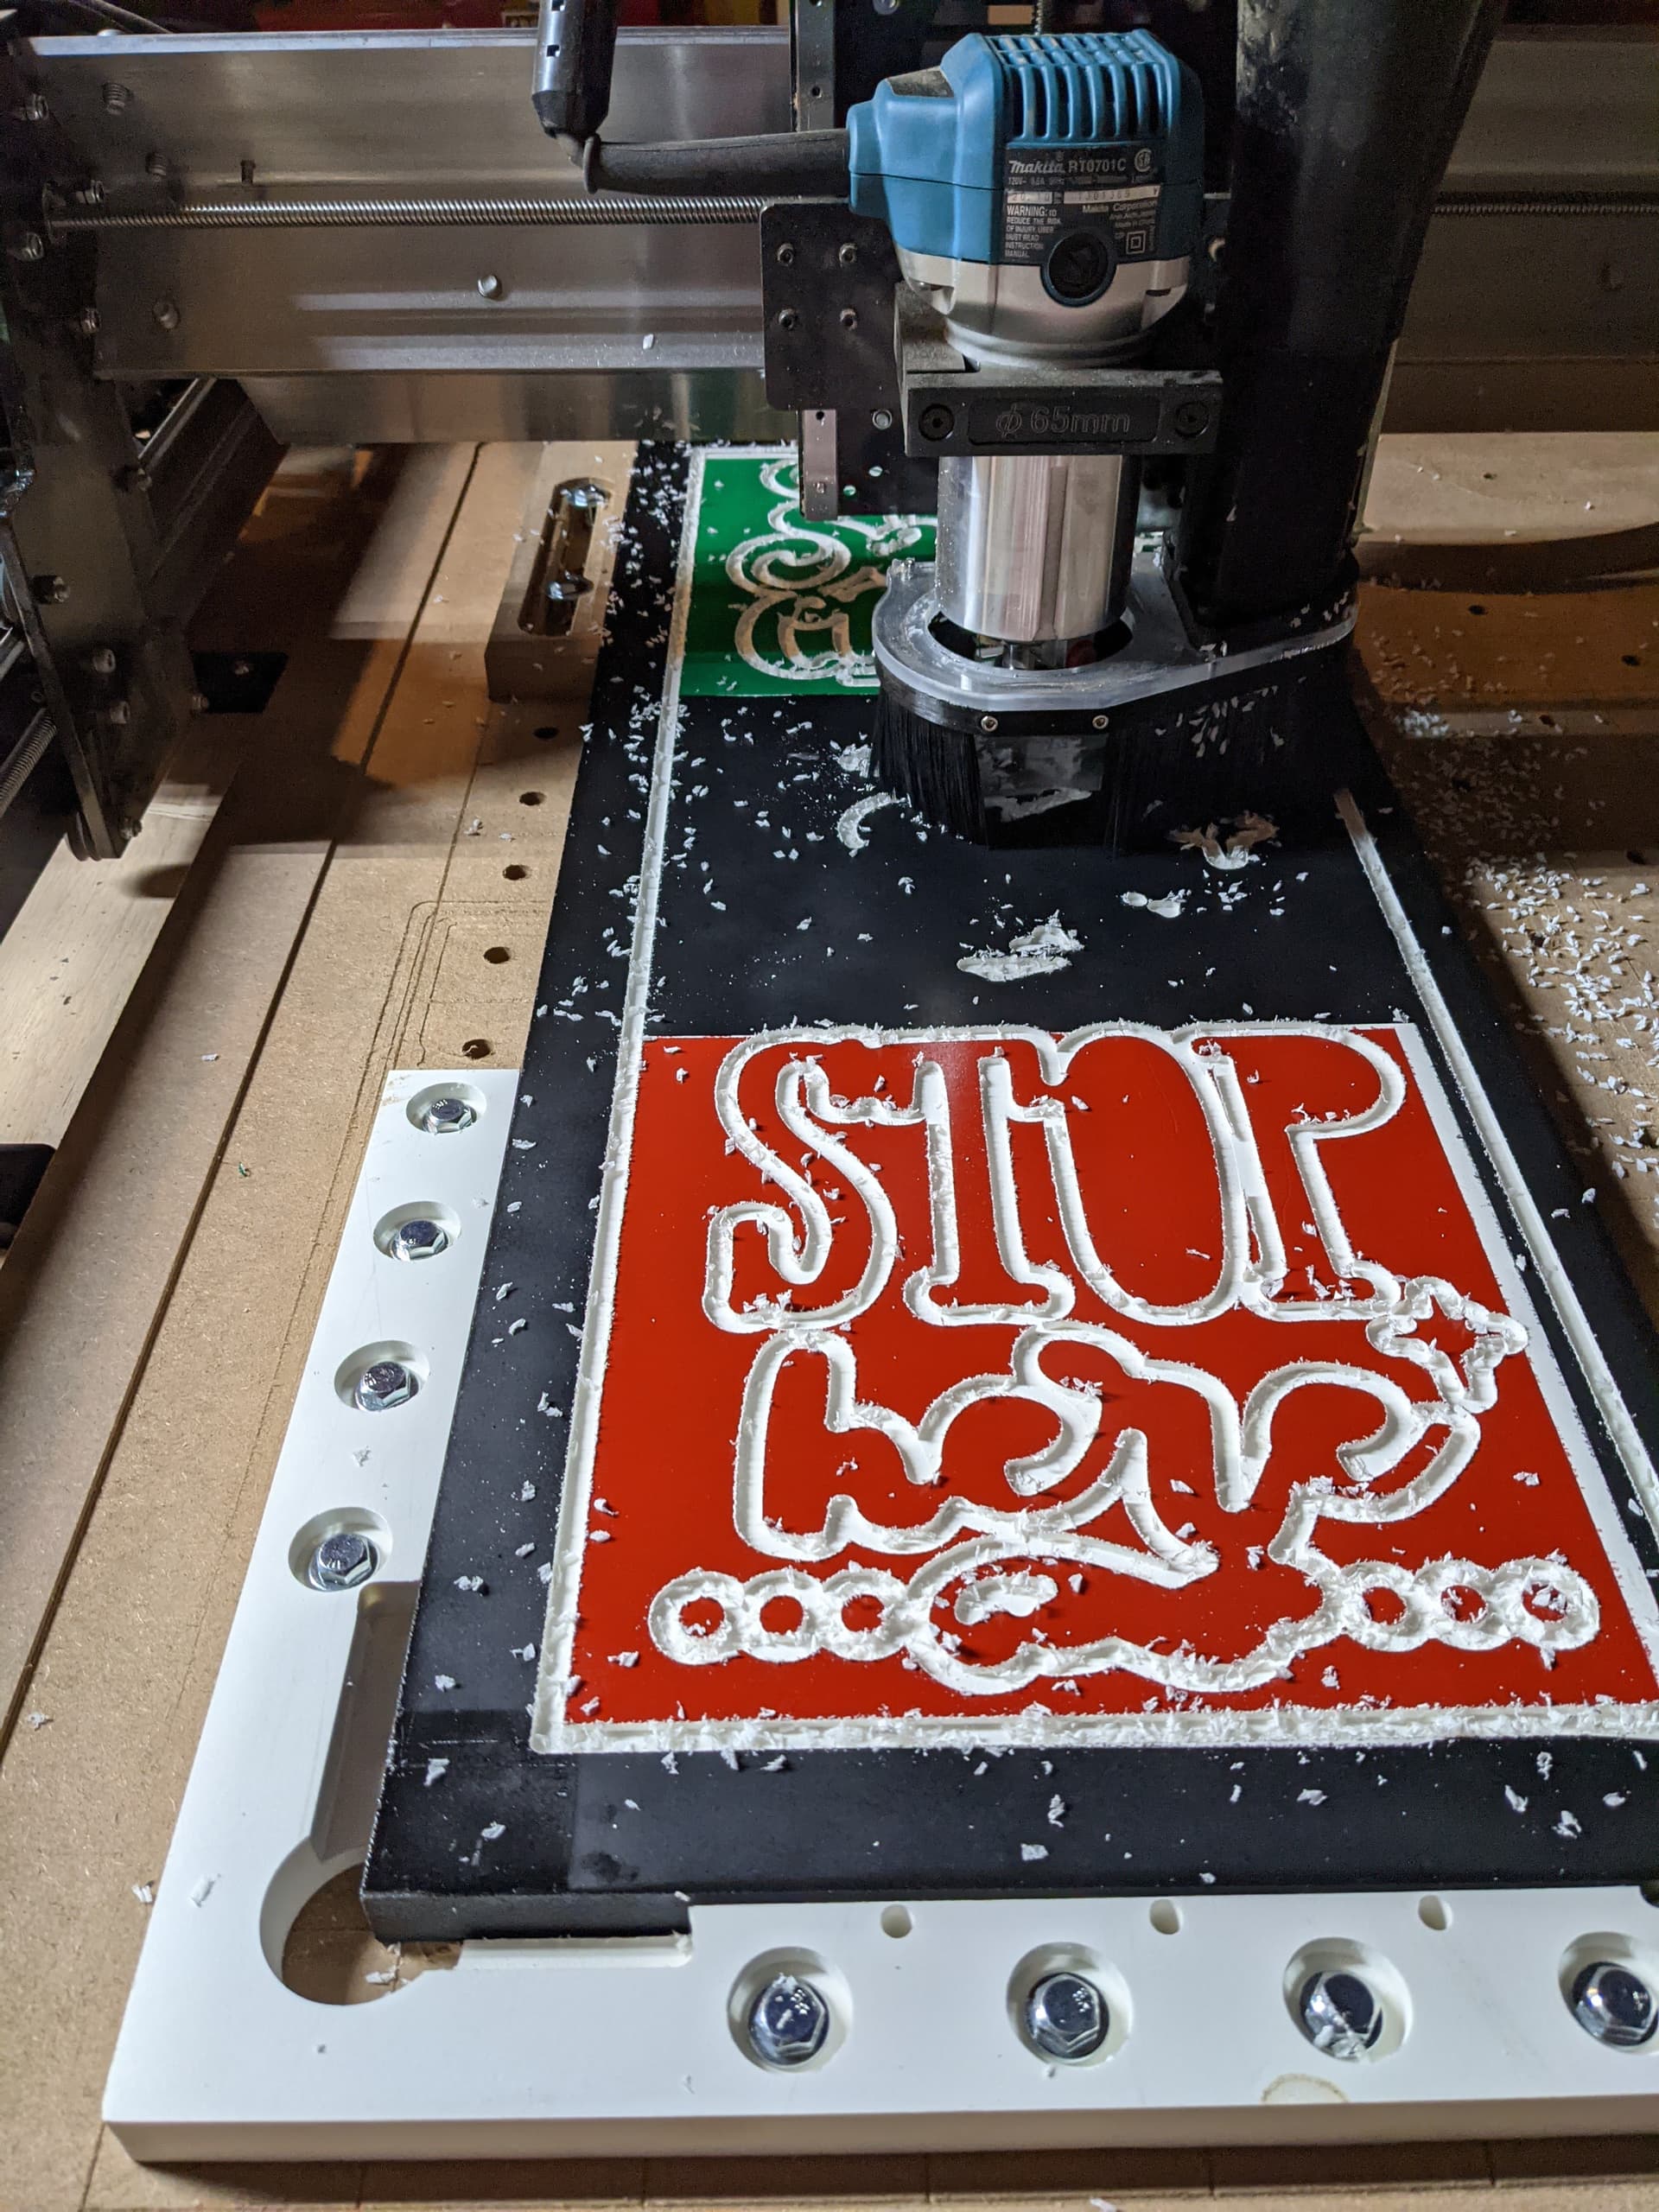
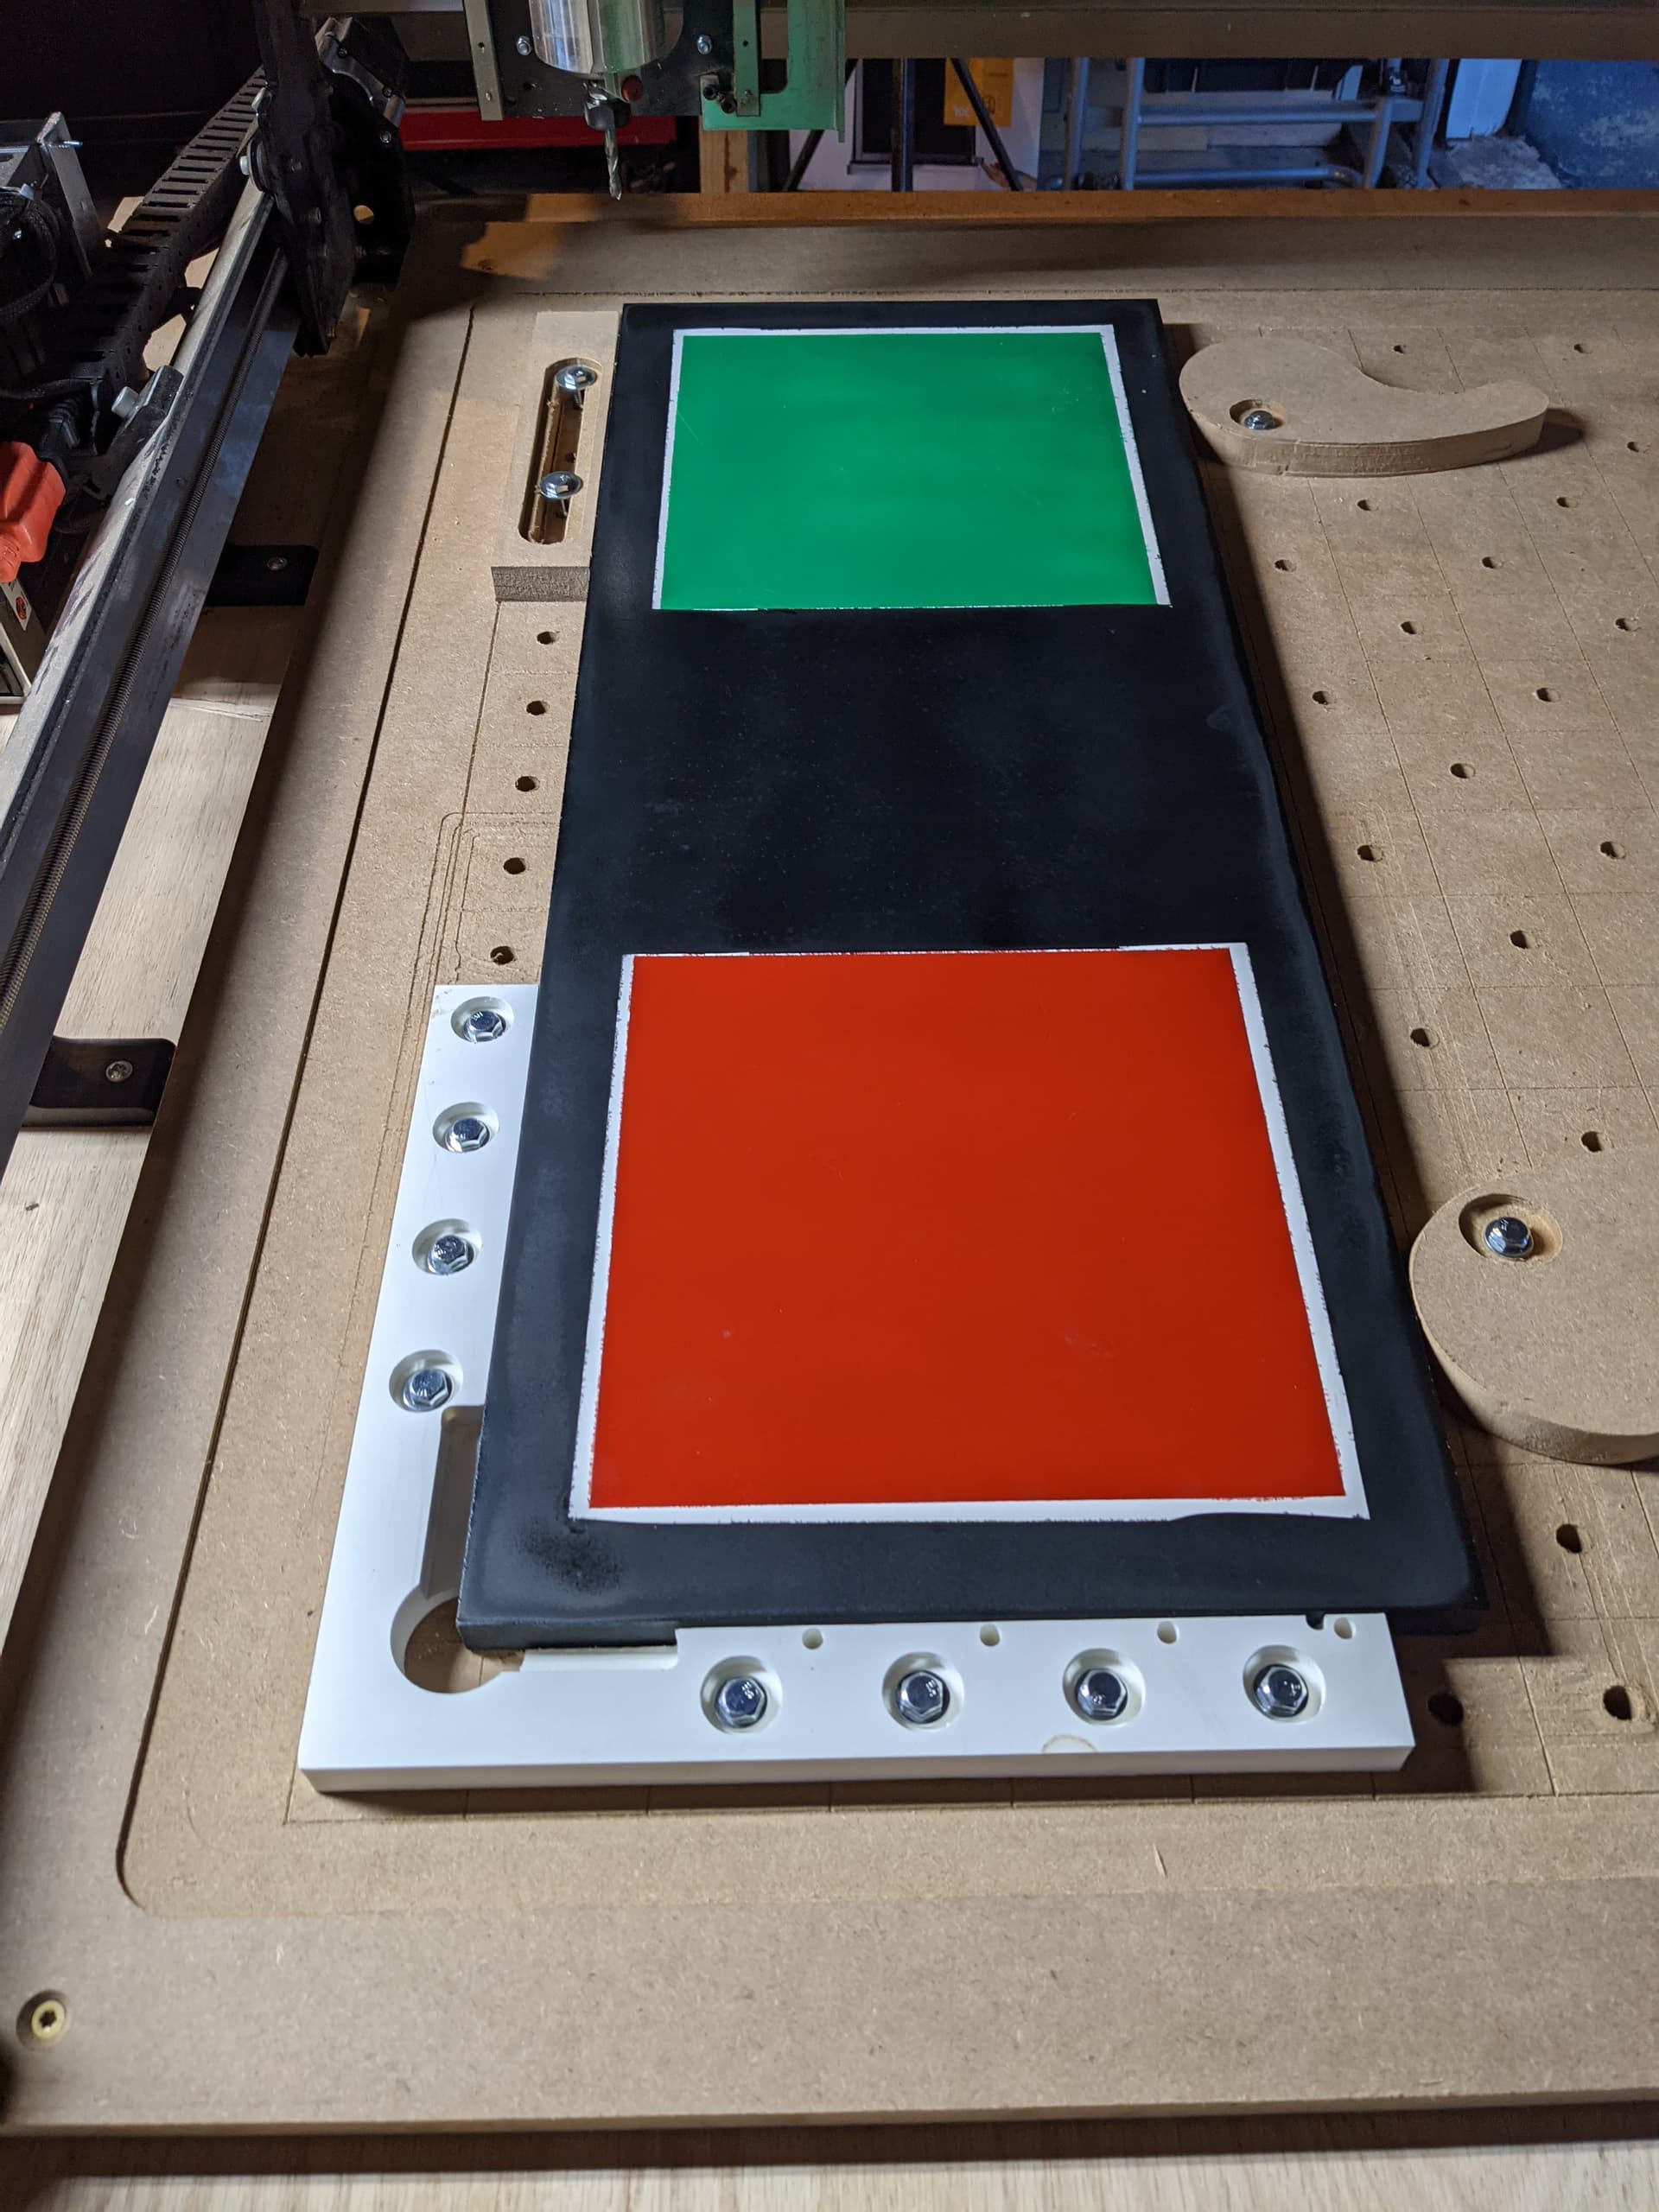
I started by designing it in V-Carve and measuring the areas with dimensions tool for paint. It’s a duel pass (1/4 UC bit to clear and 1/8 UC finish). I had some issues figuring out the touch plate at first (didn’t realize you selected the bit circumference for XY) but over all it came out great I think.

[Paint Dimensions]
10.3 inches up from bottom for Stop Here
10.3 to 19 inches up from bottom for sleigh and please
19 to 28.5 inches up from bottom for santa text
1/2 inch border all the way around

Here is a video of my Longmill.


4 Likes

A gift to a friends dad, A James Bond fan :).

File from Sandy Eggo (https://sandyeggo.com/)

Using MDF 24 inches in diameter.

Software is Vcarve Aspire
Using longmill 60V bit for carving and 1/4 down cut bit to cut the circle.
80 IPM Feed Rate
30 IPM Plunge
Sanded and spray painted with gold (spray can :slight_smile: )

Painted clear coat after the gold paint is dry!

Lesson Leaned:

  • Start the Makita router before pressing start button on gsender.
  • Dust collection is a must, and wear dust mask.
  • Put the sleep option on your computer to “Never”’
  • Never leave the Longmill or install a baby monitor camera.

XFQH0838|375x500

1 Like

That looks great! I haven’t ventured past wood so far. I have looked at rigid insulation and have a few ideas I may try down the road

1 Like

I have done all those same things lol. And the camera is amazing. I set one up a month ago for mine and it’s great

Made this crib board for one of the girls my mom works with. Started off with 3 separate pics and created a 3d file of each on and the merged them all together. Carved it out on the long mill with a .25mm tapered ball nose endmill and then hand painted the logo and burnt the lines with the laser.

3 Likes

My set up now, work great for what i need :slight_smile:

2 Likes

@DannyS It’s good to see you back, Danny. Well done! :+1:

@Mrborn Welcome to the group, Michael. You make an excellent first impression. :grinning:

@darcie.lynn.henderso Welcome to the group, Darcie. I hope that you will post more of your projects going forward.

@Skjersven25 Welcome to the group, Brad. You are certainly starting out here with a bang. I hope that you will post more of your work in the future.

Thanks Grant it been a lot of fun using my Longmill

2 Likes

@Davek I used the same feeds and speeds as MDF for the PVC with zero issues. I also have a sheet of ridged insulation thought I was going to use for Halloween decorations but didn’t try out yet.

Glad to hear that you have gotten comfortable with using the machine itself. Yes optimizing your process and feed rates/cut times is a challenge that every CNC user goes through, experienced or newbie.

Good to see you’ve asked the community for their suggestions as well! I also earned so much just through reading what others have suggested here.

1 Like

I have an unlimited supply of rigid insulation in varying thicknesses through work so at some point I’m going to have to try it out. Free product is always a good thing lol

1 Like


This one was for a couple who dress up like Mr. and Mrs. Clause every year. I cut this out of a piece of spalted maple and the inlay was walnut. I finished it up with mineral oil. I forgot to take a picture of the back but it has their family monogram burned on the back. I used a 1/2 90degree v-bit to do the inlay and 1/4" end mill to do the cut out. The design came off of Etsy.

1 Like