Christmas Contest 2021

I’m a “newbie”. Had my longmill 3 months but time is limited and I squeeze in longmill time when I can. The machine itself hasn’t been the biggest challenge. I’ve made a point of watching the video and learning the parts of the machine and what they do. I’m constantly checking nuts and bolts and wheels to make sure everything is where it should be and not to tight or loose. The hardest part for me has been the bit selection and corresponding feed rates, plunge rates and depth per pass. What’s to fast? What’s to slow? How deep should I cut? A few settings can take a carve time from 7 hours down to 2. Finding that magic mix of quality of cut vs time is my biggest challenge

This is my first real project. Before this I made a few hold down clamps and L brackets for my CNC but thats about it. It’s made from PVC sheets and is 30x11.75x0.75.

I started by designing it in V-Carve and measuring the areas with dimensions tool for paint. It’s a duel pass (1/4 UC bit to clear and 1/8 UC finish). I had some issues figuring out the touch plate at first (didn’t realize you selected the bit circumference for XY) but over all it came out great I think.

[Paint Dimensions]
10.3 inches up from bottom for Stop Here
10.3 to 19 inches up from bottom for sleigh and please
19 to 28.5 inches up from bottom for santa text
1/2 inch border all the way around

Here is a video of my Longmill.


4 Likes

A gift to a friends dad, A James Bond fan :).

File from Sandy Eggo (https://sandyeggo.com/)

Using MDF 24 inches in diameter.

Software is Vcarve Aspire
Using longmill 60V bit for carving and 1/4 down cut bit to cut the circle.
80 IPM Feed Rate
30 IPM Plunge
Sanded and spray painted with gold (spray can :slight_smile: )

Painted clear coat after the gold paint is dry!

Lesson Leaned:

  • Start the Makita router before pressing start button on gsender.
  • Dust collection is a must, and wear dust mask.
  • Put the sleep option on your computer to “Never”’
  • Never leave the Longmill or install a baby monitor camera.

XFQH0838|375x500

1 Like

That looks great! I haven’t ventured past wood so far. I have looked at rigid insulation and have a few ideas I may try down the road

1 Like

I have done all those same things lol. And the camera is amazing. I set one up a month ago for mine and it’s great

Made this crib board for one of the girls my mom works with. Started off with 3 separate pics and created a 3d file of each on and the merged them all together. Carved it out on the long mill with a .25mm tapered ball nose endmill and then hand painted the logo and burnt the lines with the laser.
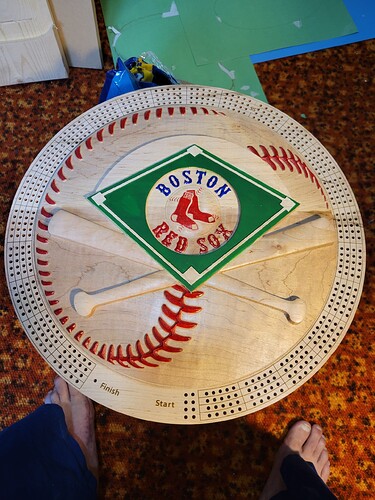
3 Likes

My set up now, work great for what i need :slight_smile:

2 Likes

@DannyS It’s good to see you back, Danny. Well done! :+1:

@Mrborn Welcome to the group, Michael. You make an excellent first impression. :grinning:

@darcie.lynn.henderso Welcome to the group, Darcie. I hope that you will post more of your projects going forward.

@Skjersven25 Welcome to the group, Brad. You are certainly starting out here with a bang. I hope that you will post more of your work in the future.

Thanks Grant it been a lot of fun using my Longmill

2 Likes

@Davek I used the same feeds and speeds as MDF for the PVC with zero issues. I also have a sheet of ridged insulation thought I was going to use for Halloween decorations but didn’t try out yet.

Glad to hear that you have gotten comfortable with using the machine itself. Yes optimizing your process and feed rates/cut times is a challenge that every CNC user goes through, experienced or newbie.

Good to see you’ve asked the community for their suggestions as well! I also earned so much just through reading what others have suggested here.

1 Like

I have an unlimited supply of rigid insulation in varying thicknesses through work so at some point I’m going to have to try it out. Free product is always a good thing lol

1 Like


This one was for a couple who dress up like Mr. and Mrs. Clause every year. I cut this out of a piece of spalted maple and the inlay was walnut. I finished it up with mineral oil. I forgot to take a picture of the back but it has their family monogram burned on the back. I used a 1/2 90degree v-bit to do the inlay and 1/4" end mill to do the cut out. The design came off of Etsy.

1 Like

I have been doing a multitude of LED lights using a 90 degree diamond drag bit. The bases come from Amazon. Most files come from Etsy and then I modify them as needed. These have been fun to make for friends and family. These are just a few I have done this month.


3 Likes

@bhale Welcome back to the fold, Brad. Excellent entries. :grinning:

1 Like

Christmas gift for my niece. She was asked to be an announcer at the Tokyo Olympics this summer.

Carved in an old weathered piece of butternut with my 30 x 30 Longmill.
Used Vcarve Pro software.
Tools included 1/4 and 1/8 inch EM and 1/4 inch TBN (all from Sienci).
2 coats of clear coat.

Process and Lessons Learned:
Created a .stl file using a few .svg files in Blender. I used an old microphone, Olympic circles, 2020 and the Japanese letters for Tokyo to create a file which I brought into Vcarve and combined with a wreath from the software. I had one small challenge as I used a few end mills which needed to be zero based but after my roughing toolpass I lost the top of my workpiece and had to calculate each tool change using the high point of the model.
SVG I created to make .stl file
Olympic Mic 2020

4 Likes

@leafs4ever Welcome back, Jim. I’m sure that your niece will love it. :grinning: