Thanks very much for the analysis and suggestions. I’ve got a busy day of meetings (central time, USA) but I’ll try to get to this later today.
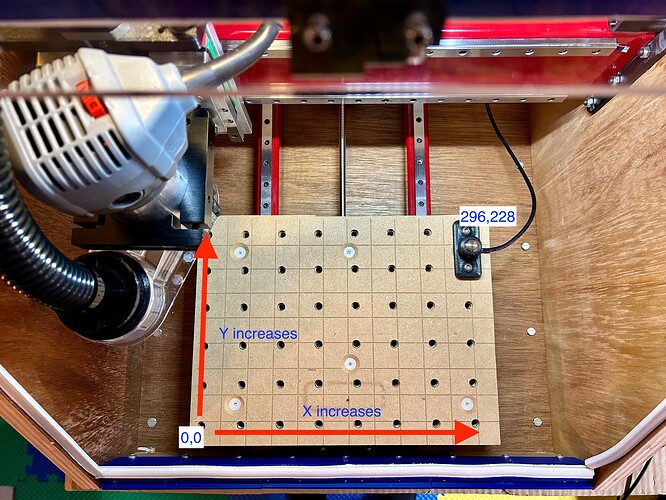
OK - bottom left for the machine, I had interpreted your earlier description as top left.
Either way, the new macro code should be more robust, even if the sign of the adjustment variables needs reversing as you did before.
I’ll have to grab the data, but wanted to quickly report that the recent XYZ probing macro worked perfectly!
[Edited to attach macro (no changes from what you provided) and output.]
Probe_XYZ_output-3Sep2024.txt (2.6 KB)
Probe_XYZ_Macro-3Sep2024.txt (3.7 KB)
Happy days!! Glad it’s working… this new macro is altogether a better bit of ‘code’ than the original
Have you figured out tool changes? Ideally I can start by setting tool length with the 3D Touch probe, and then move on to other tools from there. I plan to try the built-in fixed tool length setter, but wasn’t sure if there were better macros to use instead.
I’ve given this some thought, but not yet written anything. The process must be something like;
- go to a known, repeatable location that is not a workpiece and will never move
- probe Z here with whatever tool is in the spindle to establish a baseline
- go to your workpiece and probe Z as you normally would, do some work
- change the tool when prompted by gSender
- go back to the repeatable location and probe Z as a ‘delta to baseline’ action
- compute the delta and store this in Grbl’s tool length offset memory
- do some work without needing to re-probe Z
I need to read up on this to get a really clear understanding of the proper action sequence, and Grbl commands to commit these things into offsets memory, before the task of writing a macro.
It is conceivable that the 3D probe could be used as the ‘first tool’ in the process, the actual cutter tools being delta compared to this for offset compensation.
As a workflow this might make sense, as probing X0Y0 has the probe in place, whilst still in the machine, go to the reference location and probe Z. Then change the probe out for a cutter tool and measure that for offsetting.
There does seem to be a fair bit of information out there on tool changing. This is a fairly recent post. New to Tool Change, What's Missing?
Many notes tie back to @NeilFerreri macros – CNCjs-Macros/Initial & New Tool at master · cncjs/CNCjs-Macros · GitHub
And while I agree with the adage of “if it ain’t broke, don’t fix it” I do wonder if in the intervening 5 years and with the introduction of grblHAL if there are any desired modifications out there.
Anyone else care to chime in? Is this still the “Best Practice” for Tool Changing with gSender?
There’s certainly more available on the horizon - though the current workflow is what’s currently working the best. I’ve been working with a few individuals to continue improving the process and maybe early next year we’ll have some new things to share to enable faster and easier tool changing
As far as macros are concerned, I also wanted to chime in and now announce I’ve finally introduced a user-contributable Macro section of the gSender resources and instructions on how to submit your own. Would love feedback on if I can make the process clearer, and if anyone would like to submit their own then please feel free!
The PRB functionality added to gSender recently would make any probing ‘just a bit more accurate’, but is it an incremental benefit rather than transformative. @NeilFerreri macros do all of this already, perhaps except the PRB enhancement.
I’m watching with interest to see what Sienci have coming up on the horizon…
Possibly in the wrong place, so apologies in advance, but I’m having an issue accessing the params data when running gSender on a Raspberry pi. Any direct parameters (eg posx) work fine. Any ideas?
Macro:
%PROBE_Z=(params.PRB.z)
(Probe Z=[PROBE_Z])
%PROBE_X1=(params.PRB.x)
(Probe X=[PROBE_X1])
%CurX=posx
(Current X=[CurX])
%Cur53X=(params.G53.x)
(Current G53X=[Cur53X])
%average = function(v1, v2){return (v1+v2)/2}
(Average=[average(10,-20)])
Output
feeder (Probe Z=[PROBE_Z])
ok
feeder (Probe X=[PROBE_X1])
ok
feeder (Current X=422.25)
ok
feeder (Current G53X=[Cur53X])
ok
feeder (Average=-5)
Any parameter that references params simply returns the parameter name, but parameters looking for direct values work fine. ![]() .
.
Current version is 1.4.9, which I will upgrade, but as I have copied the macro parameter text direct from the sample code, this shouldn’t be the issue.
Is this because no probe event has happened to populate the PRB co-ordinates?
Thanks for looking at this.
Don’t think it is the issue though - firstly I’m pretty sure that it has, but also the Cur53X parameter should just return the global X location, so wouldn’t need the probe.
What system is the CNC running? Grbl or grblHAL? I vaguely recall PRB was a HAL introduction
Just GRBL - that could be it ![]() . Excuse to upgrade the controller though I suppose
. Excuse to upgrade the controller though I suppose ![]()
@daydreamer You need to query the parameters first.
Add
$#
%wait
to the beginning of your macro.
Should work on grbl just fine.
Many thanks Neil - all working now.
One further question - is the params namespace documented anywhere? I have tried clicking on the (https://esprima.org/) link, but to no avail.
There’s not much else to it.
It just allows you to use those $# values in your macro. It had nothing to do with esprima.
What are you trying to do? I’m sure @AndyCXL or I can help.
