It comes with a USB cable …. does that plug into the SLB’s probe port or do I need to make up some special cable? If I have to I can run the probing by hand if none of the Altmill probing routines work.
Never mind the bit about the USB c cable - turns out the probe has a USB-C port so there are only bare wires to connect this thing up.
This was/is new to me but I was looking at that probe just a month or so ago when there was another thread about probes. There are NPN-NC and NPN-NO versions. I’m pretty sure you linked the correct one.
I found an interesting thread on Inventables where @NeilFerreri explains how NPN circuits work and how to wire them. He’d be the guy to ask about this IMHO. If I remember correctly he mentioned that he teaches this stuff.
Take this with a grain of salt but I think the probing routines would work because the board is just looking for High vs Low voltage. I don’t think it matters what is triggering the change.
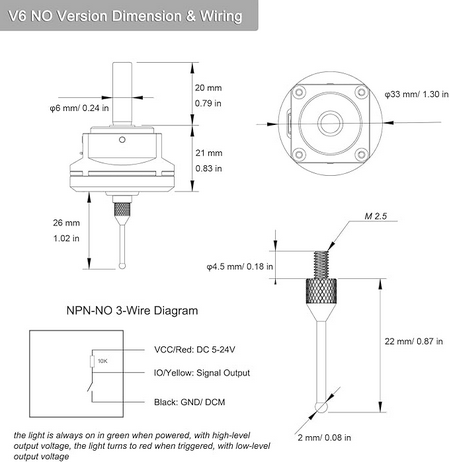
Now I remember it was the bit at the bottom about when the light is green and red and the voltage for that seemed backwards to me. That’s because I didn’t/don’t understand how the circuit works. I have the regular square block and it’s obvious that the circuit is closed when contact is made. My thinking was that the voltage must be low and then turns high when the circuit is closed. That assumption is false if I understand anything from the thread I linked. Pretty sure Neil said the pins voltage is held High by a pull up resistor and goes low when closed, not that I understand how a pull up resistor works. Then it makes sense that the light is green when High and red when Low.
Like Grant says, ‘This is outside my wheelhouse’ so keep that in mind.
i have that probe too, i fried a board with it, basically the probe switched between ground and signal. if not sure just use a relay in between
also, the probe pin is 2mm, but you have to set it to 1,9mm , reason is the it moves when it switches
hope it makes sense
You can learn what variables are available in gSender when you make a macro. There is a drop down menu. I wish I knew that when I started because I was just looking up stuff and using Neovim, my favorite text editor, and didn’t know about that til later.
And lastly here is the macro I wrote for probing a Z block in a fixed location. The surface of the block was probed and used to set Z to zero at the spoil board. It raises the Z jogs to the XY position of the block then probes Z and returns to XY zero. Notice the sections on saving and restoring modal state. I shamelessly copied those sections from one of @NeilFerreri’s macros. It’s important to leave things the way you found them to avoid surprises after the macro is run.
Good point to set the probe diameter a tad smaller. How did you determine the 0.1 mm reduction? Did you just take a wild guess or did you confirm the difference in position between when you made contact with the wall edge (with for example an electrical continuity test) and when the probe triggered?
Yeah, I am looking forward to playing. I got the ‘breaking’ part sorted too - I ordered a spare probe tip knowing that I am more than likely to *^$^ things up
Minor hickup …the PGFun probe has three wires (power, ground, signal). I was hoping that I could just use signal and ground if there are mechanical contacts in the probe but that doesn’t work. I was hoping power was only needed for the probe lights. Well, it would seem that the magic in the probe is transistor based and needs power.
Question to Altmill owners - where do you grab power from the Altmill controller? Suggestion to Sienci - make the probe connector a three terminal connector or provide a power output connection for those accessories requiring power.
Not an AltMill owner but I was looking at the AltMill docs and I think the SLB-EXT docs are sparse because they focus on the differences from the regular SLB.
I also found out that the ‘TLS’ connector is paralleled with the probe connector but adds a 5V pin so that is what I will use for my probe. I just got to find me a connector. Yes, Digikey has them but shipping costs for a tiny connector are a bit steep. I am currently trying alternate sources.
My bad on the schematics, it’s strange I can go the page and see a PDF but the link doesn’t work. Anyway I downloaded the PDF but it was a bit too big so I zipped it.
Go Linux! I have Ubuntu on my LongMill computer and Gentoo on my main computer.
EDIT: There was a thread not too long ago where someone was wanting to work on probe support in gSender. I got all excited and was looking at the probe you got. I’m looking forward to your thoughts on it after your up and running!
Thanks for this. I have been unable to look into the schematics at github for a few months now and never took the time to download them. I will now as soon as I get to my design pc.
Those are (I think) the schematics I found but they were not in a PDF format. In my PDF viewer I can oversize the file you linked and they are nice and readable - thanks.
As far as the probe is concerned, it appears to be excellent quality but there are a couple of negative points. The shaft on the probe is 6 mm but the collet I am using is 6.35 mm. Now one would think that this is well within the clamping range and it might be (it does clamp) but there was some eccentricity evident when I was turning the probe. The probe is apparently adjustable to remove any eccentricity in it’s build (I have not tried that yet) but at this point I do not know if the issue is the probe or the collet. Adjusting the probe will not help if the fault is in the collet. It might be advisable to get a (high quality) 6 mm collet. The eccentricity is very small but I have not yet measured it. It’s not significant for what I am currently doing with the probe.
The other thing is the fact that one needs to also purchase a connector - 3 pin, 3.81 mm pitch if one wants to connect this probe to an Altmill (don’t know about the other mills from Sience). I have currently cobbled up something that I dare not look at lest I upchuck at the sight of it but I am not buying 20 connectors from Amazon nor am I buying a $1.50 (or so) connector from Digikey and pay probably $15 (guess) freight to get it here. It’s put on the list for the day when I can place a large enough order and freight is free.
Anyway, to sum it up, I am very happy with this probe keeping in mind that I have never had the pleasure to work with a high end probe and might not realize that I am missing something.
If you want to know where the PDF came from it’s Sienci-Labs/SuperLongBoard for the GitHub repo and then “Project Outputs for Longboard_32bit/Longboard_32bit_Schematic_B4_FULL_PLACE.PDF" for the folder and file.
Thanks for your opinion on the probe. I know I wouldn’t be able to use my 1/4" Makita collet because the design isn’t as flexible as an ER collet. I did find 6mm collets online though. It’s not something I really need, at least until I need to surface map something.
I think a probe would more reliable and convenient than wrapping in tin foil but tin foil does work. When I had my Sainsmart 3018 that only came with a Z-only block I printed a block and glued tin foil with a soldered wire to it. It worked fine!
True enough, but a Sainsmart 3018 will flex if you give it a mean look so it was okay!
Yup, that’s why I think it would be great for surface mapping. Without a touch probe you have to find a way to make the surface conductive.
I think having to swap to 6mm just to do a regular probe would be more hassle than it’s worth unless the probe is more accurate and I needed that accuracy. For my woodworking I’m likely to sand off more than the difference in accuracy though.