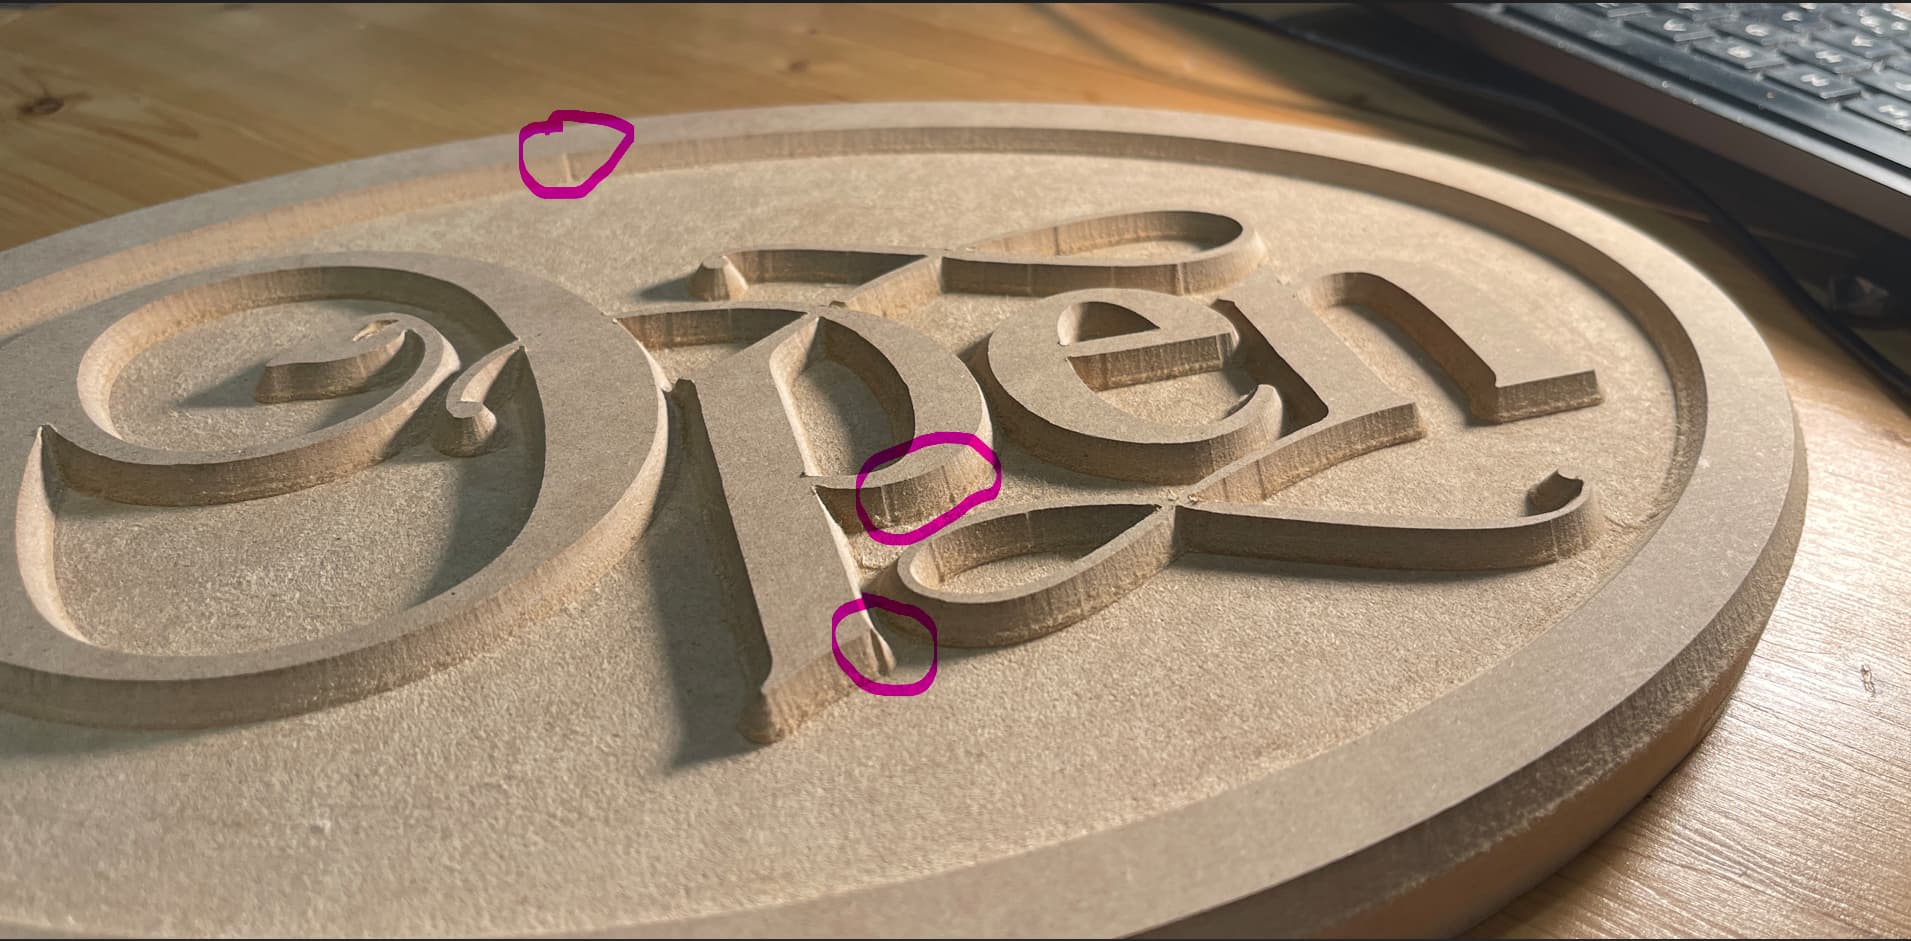
I am going through the Vectric projects one at a time and this cute little sign is proving to be problematic. (these projects include videos taking you through the entire project design) As you can see in the picture there are marks where the tool enters and exits the material. Please know that I am brand new to CNC.
Software is Vcarve Pro
Material is 3/4" MDF
Bit is 60Deg Vcarve bit from Sienci (from the starter pack
Longmill Mk2.5
I have tried:
Re drawing the file 4 times incase I missed something
Re squared the machine
I have repeatedly checked for anything loose or too tight mechanically
I have used the slider in Gsender to reduce the speed as low as 10% to see if its the quick moves that are causing the problem.
I am using the downloaded tool chart thing from Sienci in VCarve and used the recommended speed and feed settings as well as slowing things down
I tried to experiment with ramping as we suggested from FB but the Vcarve toolpath does not seem to have that option. I did enable it in the Pocket toolpath of course.
I circled the issue in the attached photo but not really hard to find LOL
I would be very grateful for any help you folks could provide
@Steve1 I’m attaching a screencap of the v-carve toolpath. It shows a ramping option.
One thing that I am confused about is that you mention a v-carve toolpath and a pocket toolpath. There should only be a v-carve toolpath for this project. You choose a v-bit and a clearance bit. You set a max depth and the software generates two toolpaths. One is clearing and one is v-carve.
Maybe I am misunderstanding your issue, though. Why did you choose to add a pocket toolpath?
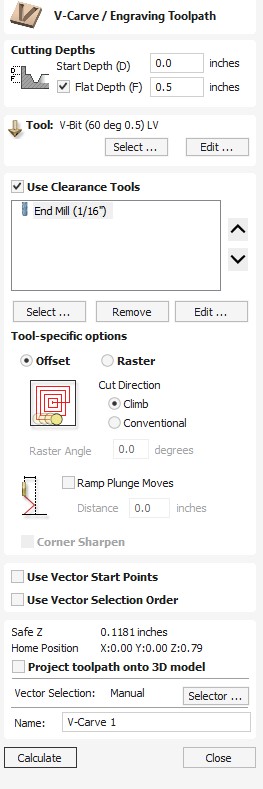
UGGG my apologies, your right, I got my terminology mixed up. The ramping seems to be only used in the PROFILE toolpath. When the Vcarve bit is used the machine plunges to the prescribed depth in one motion and is indeed not ramping.
So you are right of course in that the ramping is selectable with the V-Carve toolpath and I have set it to 2 inches (yes I know its extreme but I have tried 1/2" and others) The ramping is used when clearing and then during the last step cutting out (where the tabs are used) not at the first step where the vbit is used. Again I am new to this I appreciate your patience.
@Steve1 I just did a mock project and the ramp worked on the end mill clearing bit. It did not seem to work on the v-bit toolpath. In your pic, I didn’t see any circles showing the problem on the profile toolpath. I can see that the edge is not good. Use both ramps and leads with profile toolpaths.
Back to the v-carve toolpath, what is your pass depth on both your v-bit and whatever end mill you are using for clearance?
How deep is the “pocket”?
Hi Steve,
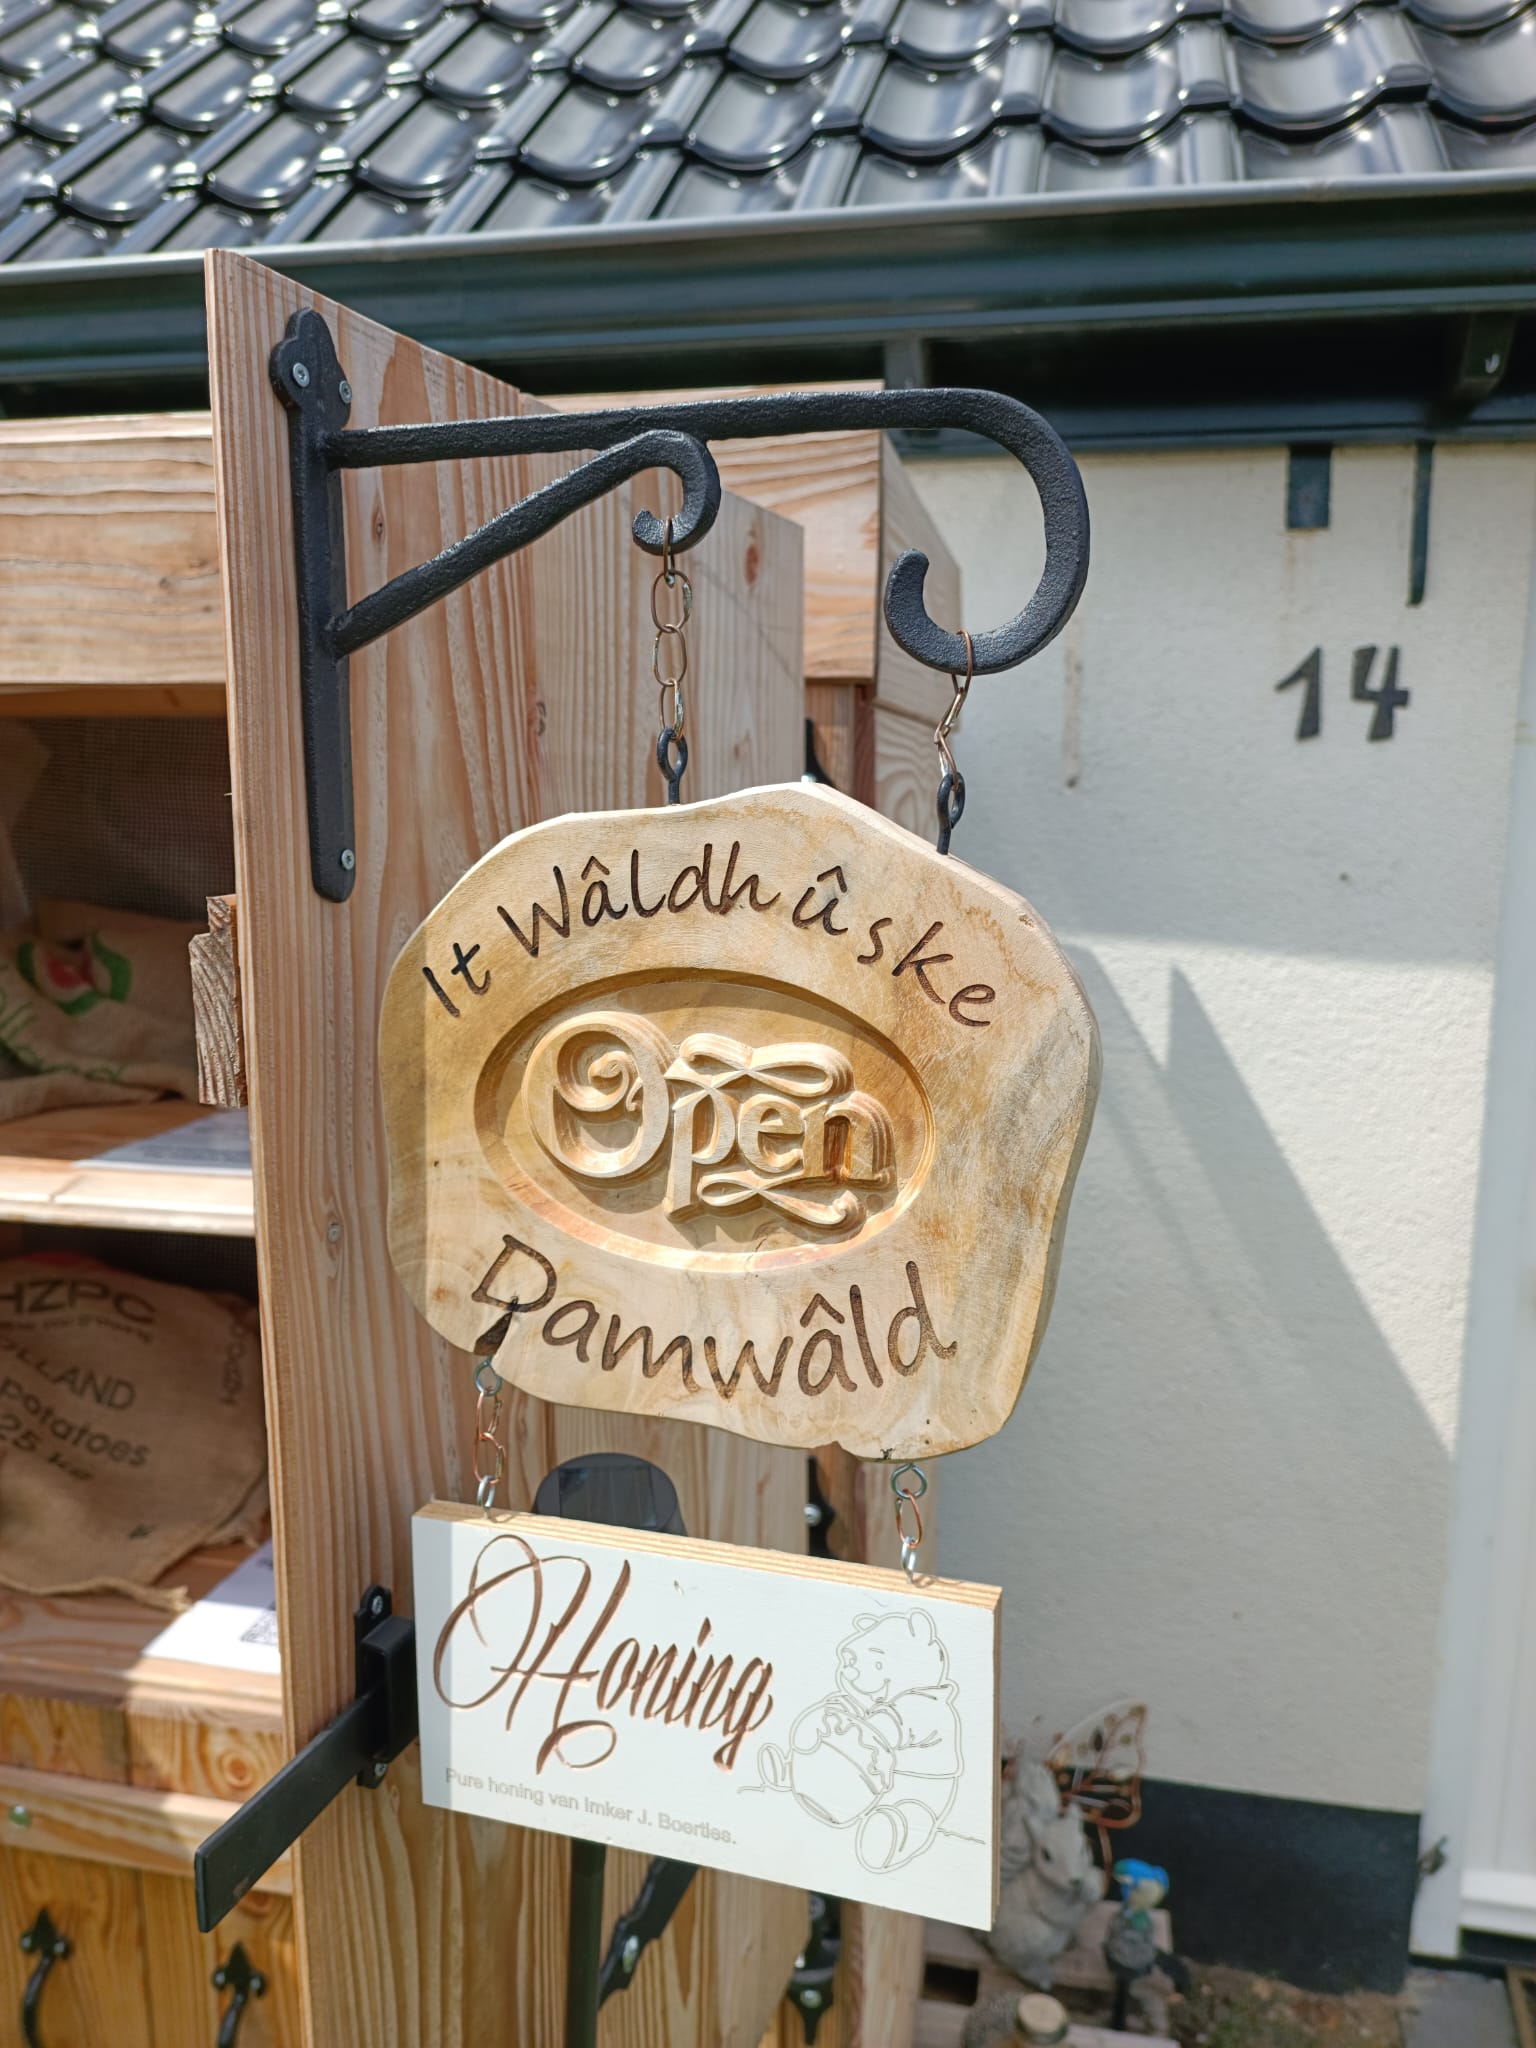
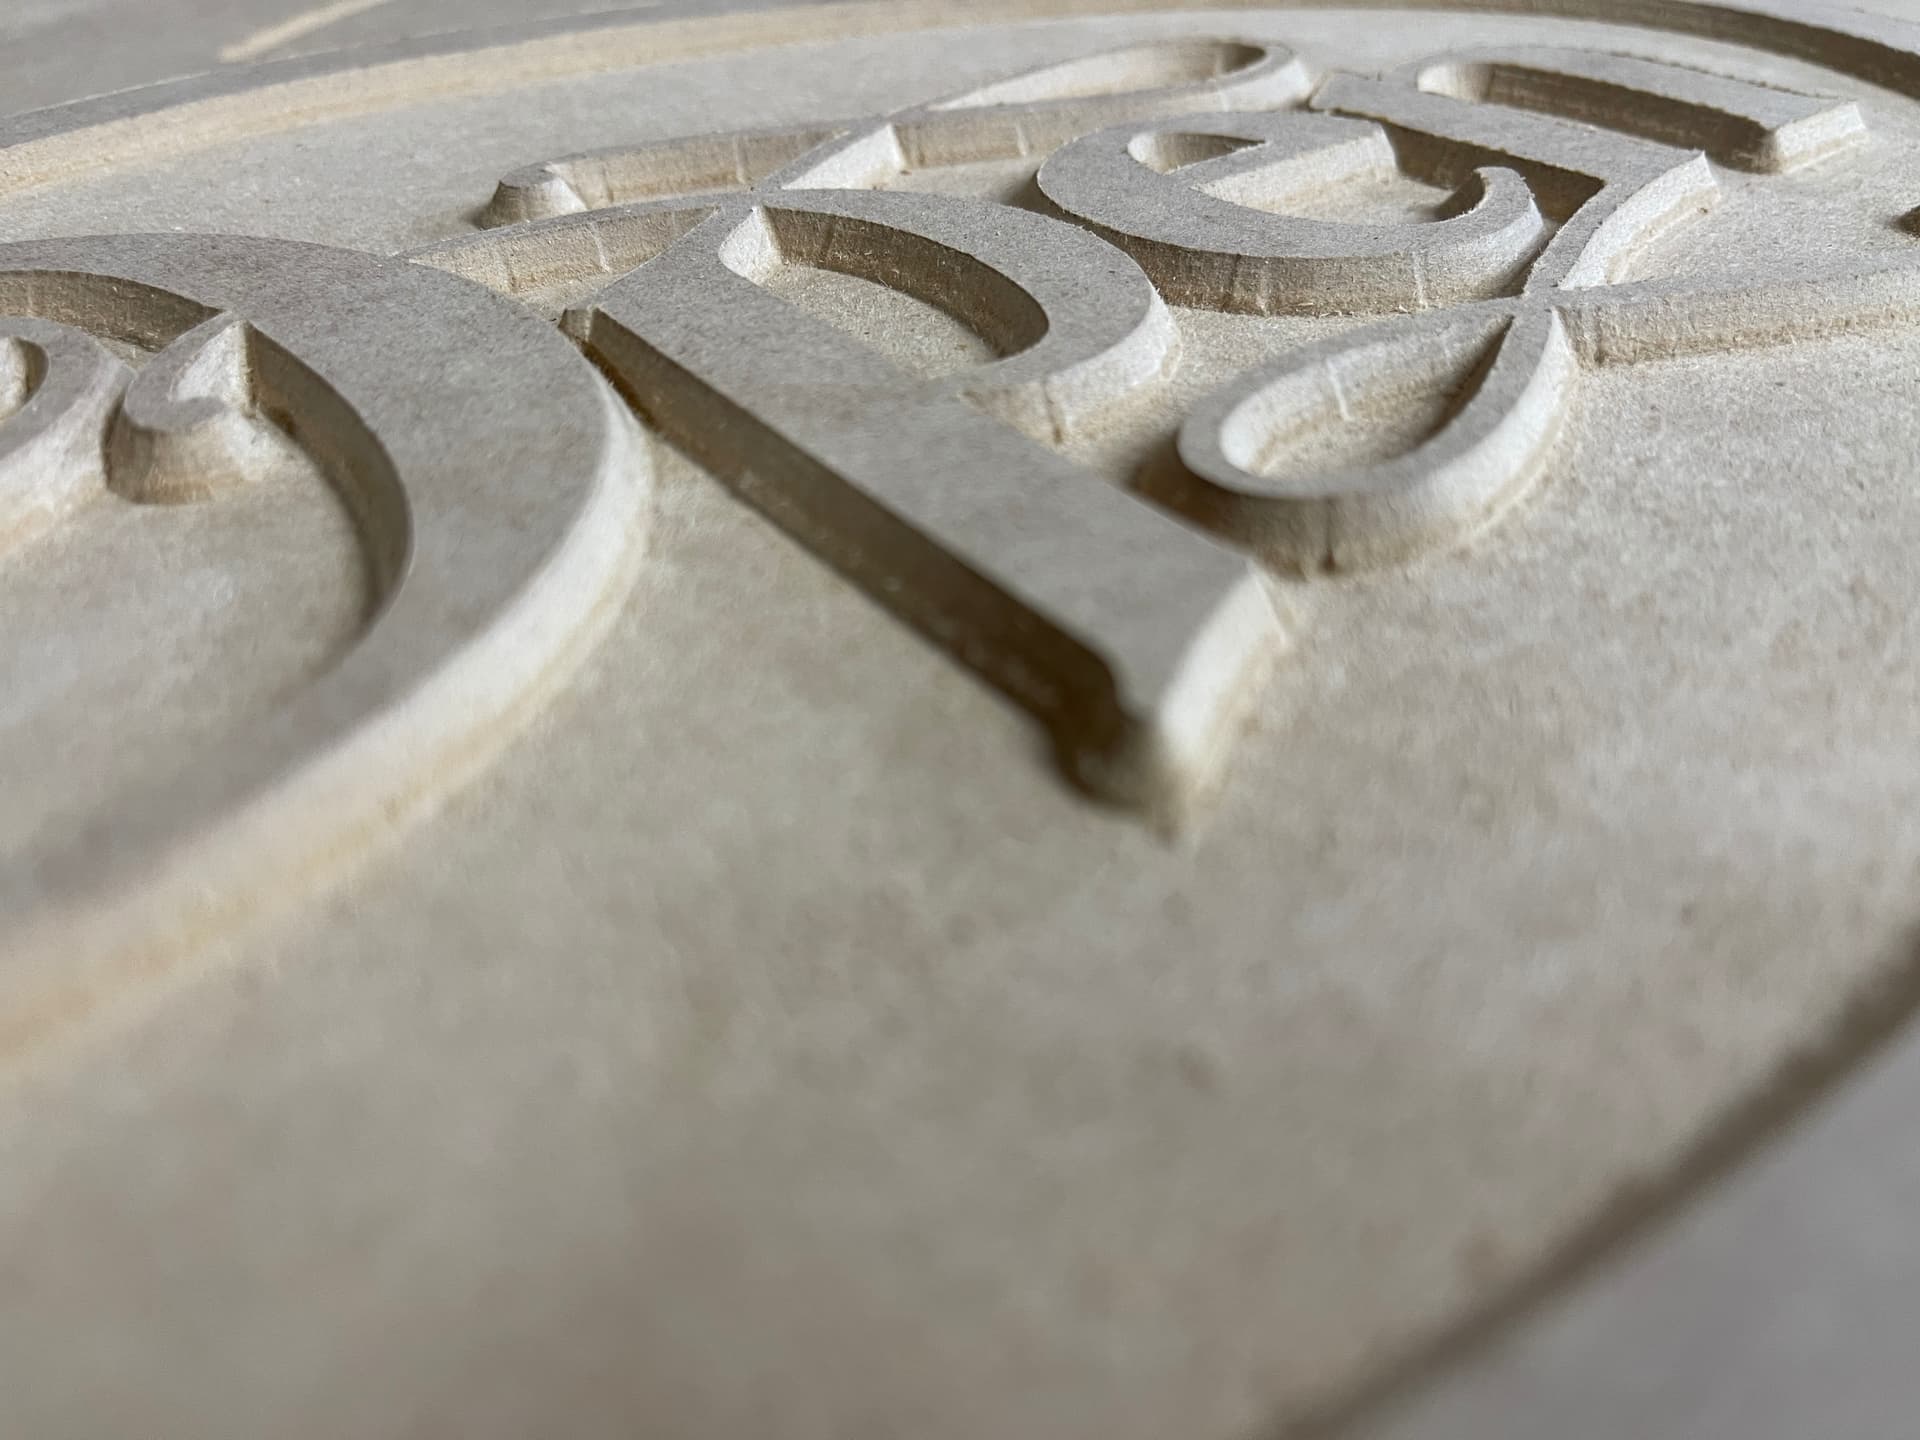
In a distant past, I made this same cute sign, but with a 90deg Vbit. Since projects get documented I can show mine having no such markings.
I know I did not do anything to this file cause it was pretty much my first carving project after working laserprojects only on my longmill.
However, lately I do see these entry markings and know that it’s caused by an ever so slight slob that has been introduced into my z over time and deflects my bits as soon as the plunge is done and the bit gets being fed up the toolpath.
You might be able to feel/see this by pulling the tip of whatever bit you have sitting in your router/spindle.
I don’t mind these markings much for mostly they get painted over and fade into something only I see and only I know is there. There are places I will not tolerate them though and that is on the outside of my cutouts. I mitigate them in cutouts by select spiral at plunge movement and to prevent the plunge to take waaay to long (the whole toolpath becomes the plunge) I edit the plunge feedrate to be the same as the normal cutting speed. Doing the cutout like this makes sure that the deflection rate is the same throughout the toolpath resulting on no visual markings. I have to say, that my cutouts are mostly smooth curved, and I have no idea how this would pan out with sharp cornered ones.
Anyhooo, to know the cause is to know where to look for a solution. My solutions are usualy bad fits for others. Finding where your deflection originates might be yours.
Here’s my cute sign in the wild, after sanding and laseretching.
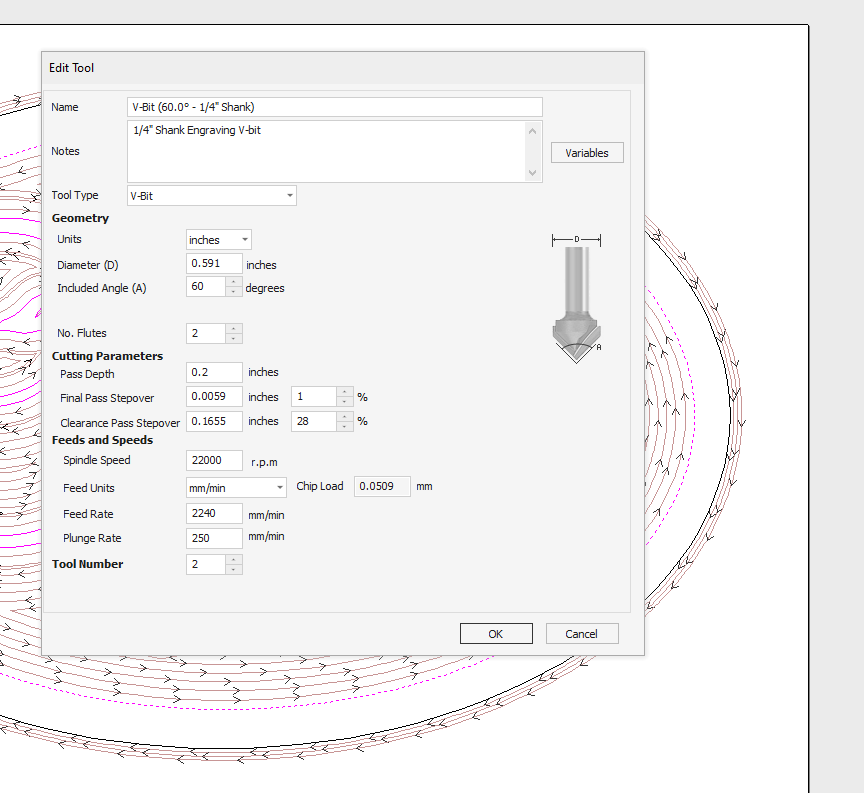
@gwilki My Plunge rate for the vbit is currently set to 0.2 this made a mess. The original setting (that I am trying to find and reset)was .42 something I believe. The 1/4" endmill I was using the pass depth was 0.161.
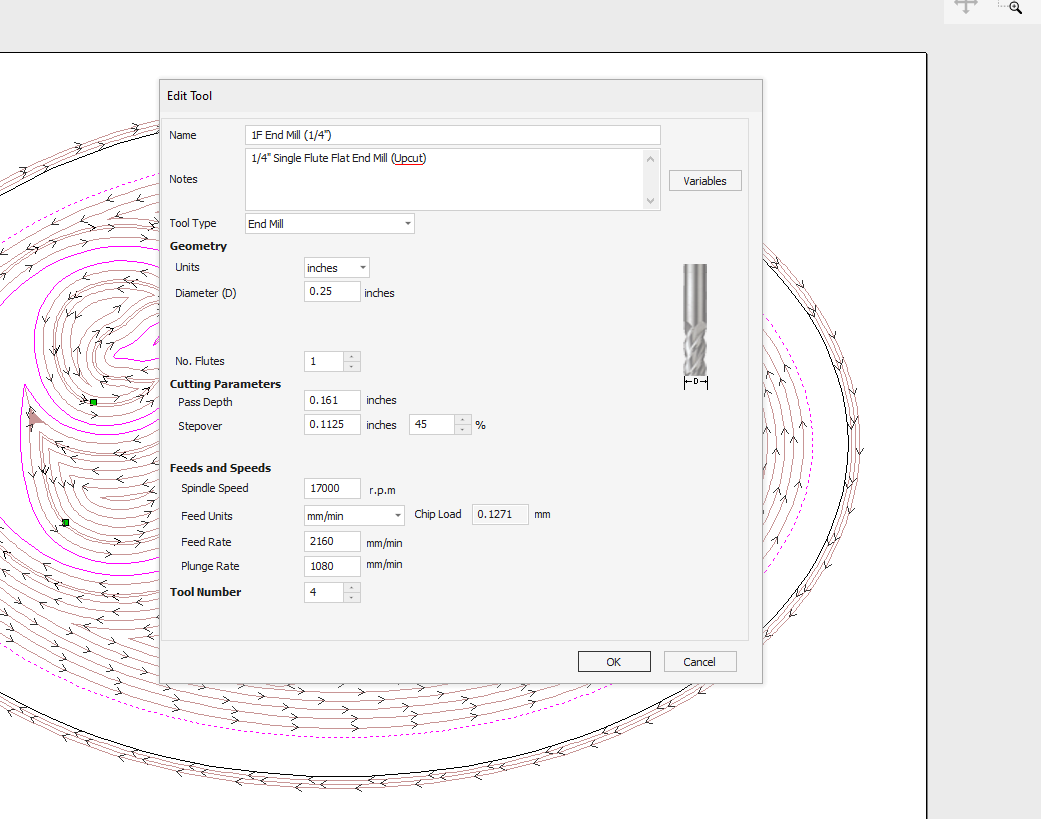
@Steve1 You may be confusing plunge rate and pass depth.
In the pics you attached, you have the plunge rate for the 1/4" end mill as 1080 mm/min and the pass depth as .161". I find it odd that you would combine metric and imperial, but that’s just me.
WRT to the 1/4" end mill, the feed and plunge are OK. If you are running a router, the speed is irrelevant. I would not run 17000rpm in MDF, but that’s very subjective. Your pass depth of .161" is too high, IMHO. I would go no more than half the diameter of the bit = .125".
WRT to the v-bit, you have the pass depth set to .2. I like shallower passes with v-bits. That’s your call, though. I would not go greater than .125 again. Your feed rate of 2240 is good. Your plunge rate is crazy slow. As with the end mill, you may want to set your plunge rate to 1/2 of your feed rate. In MDF, faster will work, too.
The other thing to consider when using the vcarve toolpath with a clearing bit is which bit to run first. If you ask 3 cnc users, you will get 4 different answers. I run the vbit first with the idea that both sides of the bit are supported by material. Since it has worked for me, I’ll continue to get that route.
@gwilki I really appreciate your help. I have reset everything you mentioned and used a drawing that I saved previous and will run that. Ill let you know the outcome.
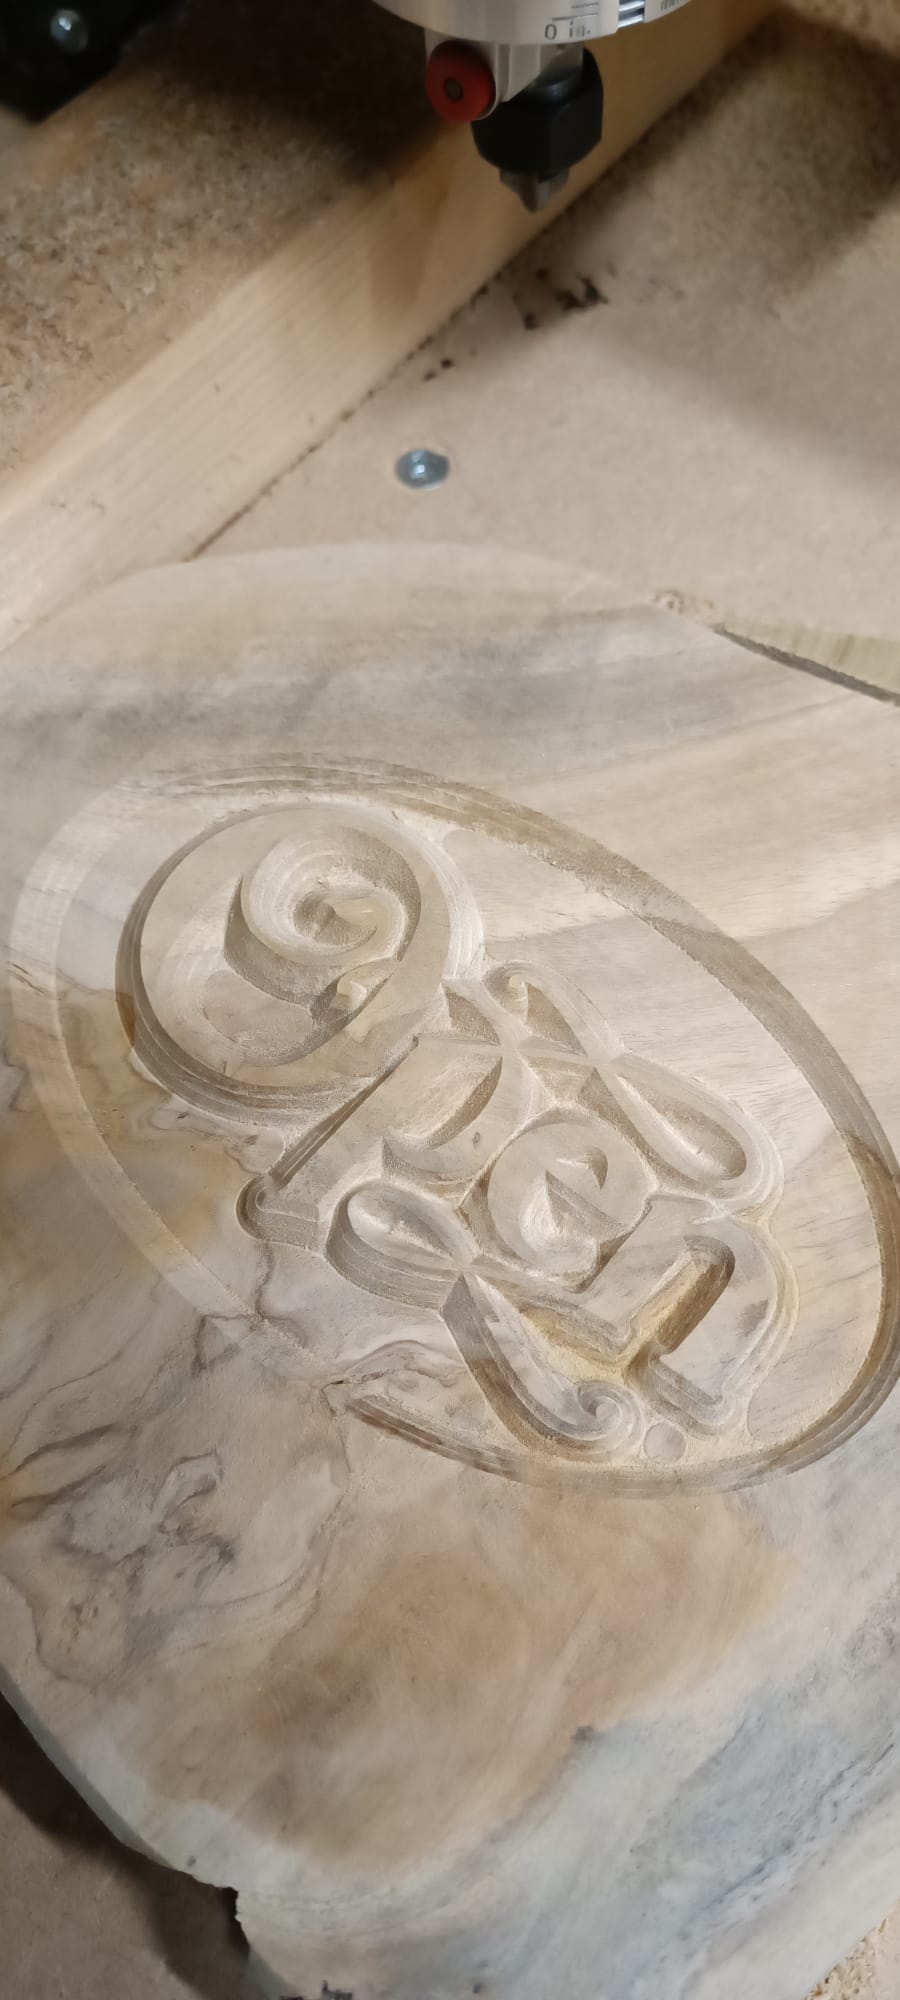
@gwilki I ran the new file and right off the bat the Clearing tool path is flawless I could not ask for better. The vertical markings were still there, indeed a little better but still there enough that if the project were to be sold I would reject it. The horizontal lines from each pass is a bit more noticeable, this is my 10th attempt at this project, I am wondering if the bit has had it. I changed all of my settings to the ones you mentioned as well
@Spamming_Eddie Thanks for your reply, Tomorrow I will look at the spiral setting and add it to the toolpath and see what happens
@Steve1 My apologies. I missed one of your settings. The stepover on your 1/4" end mill is 45%. I would try 30 - 35 if I were you. The vertical markings on the edges of the letters are tough. There are a couple of thing to try. I don’t have a sense of the size of this project, or more importantly, of the distance between letters. If a 1/8" end mill will fit everywhere, you may be better off using a 1/8 and a 1/4 downcut end mills with a pocket toolpath. You will not get the sharp inside corners that you get with a vcarve toolpath, but the edges will be cleaner.
Another way to go is to get a downcut v-bit. They give a lot cleaner cuts than the typical “scraper” v bits.
Don’t know if this helps or not, but I always run the vcarve first, then the clearance path second. I think it helps with tool deflection.