Newbie, 1st project. I am trying to turn a cone shape on the Vortex. The length of the settings seems to be right, but the A axis turning diameter is not correct. It only turns about a third way around the stock. I have all the dimensions correct in Vcarve and the preview simulation looks good. The 1st test I did on the rotary was an inlay. I gave up on it because it was doing the same thing. The length is fine, but the A axis diameter is too small. Is there a setting I am missing here?
@MikeMiller Welcome to the group, Mike.
More information would be helpful.
- What CNC machine are you running?
- What controller are you using with that machine?
- If you are using gSender, what version is it?
I am using the LongMill MK2 with the SLB controller. and the Vortex rotary axis. I think I may have found my problem. There are two machine configurations in Vcarve, one for the longmill mk2 and one for the longmill mk2 with rotary. I was on the wrong one. I need to switch back and forth depending on the project. That seemed to fix my a axis dimension issue. I wished there were more videos on Youtube of people showing how to use the rotary for making inlays. I can find absolutely none. I am a pool cue maker and bought the whole set up thinking this would a great way to do inlays, but the learning curve is high having to figure it all out by myself. I guess once I do, I’ll have to make my own videos.
@MikeMiller That’s interesting, Mike. Where did you see the two different machine configurations in Vcarve? I have the Vortex on a Mk1 LM with the SLB. I use the post processor supplied by Sienci. I don’t see anything specific on the Vectric site, but I am interested to see what it does specific to the Vortex.
Under the Machine, Machine configuration tabs I found “longmill benchtop cnc MK2 48x30 -rotary wrap Y”
@MikeMiller Tks for that, Mike. I had not seen that. It’s hard to know if it would do anything for me, running a Mk1, but since my current configuration works, I think that I’ll stick with it. What post processor are you using?
gsender. I am very new to this, so I am figuring it all out. Did my first project a week ago in Easy Create. It came out awesome. Then I built all my kitchen cabinets. I can’t believe how easy the longmill made that. Have you tried doing any Inlay work on the Vortex?
@MikeMiller Tks, Mike. I was asking about the post processor that you chose in VCarve to create your gcode. Sienci has supplied one with the Vortex, and that’s the one that I have been using. However, since you found a Vectric machine profile specific to the Vortex, I wondered what post processor options became open to you and which one you chose.
So far, I have done only two epoxy inlays. The first one was a bust. The second was acceptable. I’ve not tried to do a wood inlay. That is on my to-do list, though.
Well just to show how green I am, I don’t understand what you mean.![]() I don’t remember choosing any post processor options. Maybe that is something I am supposed to do? I am sitting at my computer now trying to figure this inlay stuff out. I created an inlay and to get the most detail I am trying to use an 1/8” tapered ball mill, but I can’t find that tool in the data base. I got the tool from Sienci, so you would think it would be on the list
I don’t remember choosing any post processor options. Maybe that is something I am supposed to do? I am sitting at my computer now trying to figure this inlay stuff out. I created an inlay and to get the most detail I am trying to use an 1/8” tapered ball mill, but I can’t find that tool in the data base. I got the tool from Sienci, so you would think it would be on the list
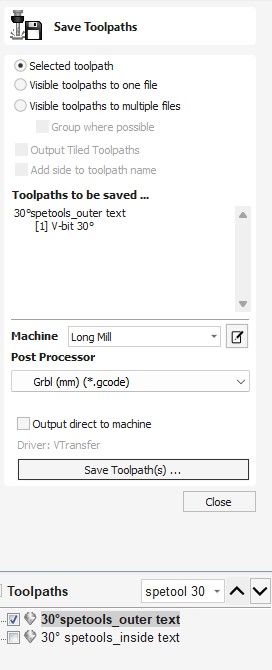
@MikeMiller In VCarve, after you create your toolpaths, you have to save them as gcode. That is the file that gSender reads. To create the gcode, you select a post processor. I’m attaching a screen cap of the window that you see to do that. You can see that, in this case, I am using grbl mm as my post processor. That is the post that I use for everything other than laser work or vortex work. What are you choosing?
As for inlay work, what version of VCarve do you have? In 12, they added a new vcarve inlay toolpath.
Ah ok, I see now. I am using GRBL as well but on the rotary, I am using GRBL WrapY2A. I am on V12.506. I am using the inlay tool paths for the female and male parts. I just change the machine config to default Longmill for the male parts, cut out of flat stock. Then to the rotary config for the female cuts on the round stock. I just cant get good detail because the tool i am using is not in the data base
@MikeMiller Tks again. I don’t get that post as an option. I assume that’s because I have chosen the Long Mill machine configuration. I’ll add the rotary machine and see how that post differs from the one that Sienci provided.
As to your inlay issues, the vcarve inlay toolpath can only use vbits. It is not designed to use tapered ball nose bits. There are hacks to get around that. Essentially, you cheat the software by entering a vbit with the tapered ball nose specs. You can’t follow the tutorials put out by Vectric or anyone else to create the project. Frankly, IMHO, if you are set on using a tapered ball nose, you would be better off to do the inlay using the methods that have been around for a long time - years before Vectric came out with the vcarve inlay toolpath.
As to your tapered ball nose not being in the vectric tool database, that is the same with any bit. It’s up to you to add it the the tool database. There are numerous tutorials out there showing how to do that if you don’t already know how.
With respect, you may want to try starting out with easier projects. Try some flat 2D toolpaths, try some 3D models on flat material. It’s your call, but you seem to be learning to swim by jumping off the dock into 30 feet of water.
Edit For giggles, I installed the Vectric Long Mill rotary machine on my test PC, and then I did have the option of the rotary post processor. I put it side by side with the one supplied by Sienci when they released the Vortex. With the exception that the Sienci post includes a line related to tool changing, where the Vectric one does not, they are identical. . I’m glad that you pointed this out to me, but since the posts are identical with that tool change exception, I may as well stay with the Sienci post.
1 Like