Installed new TLS per video and website. Set XYZ height via autozero fixture from here. Then run program, let the TLS probe the first tool, program starts and runs fine. When prompted for 2nd tool, replace, it probes on TLS then starts program. Problem is, second tool is ~ 1" above the cutting area when it’s running the program. Re-homed, setup locations again in config for probe. What am I missing? Warren
Just measured the tool when sent to z=0, it’s about 0.7 above actual zero of workpiece.
sadly I have the same problem…
Well - now the TLS will not even light up in the panel status lights when pressed. Got a ticket into the service department - maybe just a bad sensor. I was able to use the autozero block as a fixed TLS using the same macro as described in the setup routine. I placed the magnet from the autozero block on an exposed screw and was able to use the autoblock as the touchoff for the TLS routine. This time, the tool exchange worked correctly.
Double check if you have $13=1 enabled and disable it if so. The zero values get reconverted if it’s enabled on the firmware side.
I too am having issues. It is most likely operator error.
- I home.
- I move to XY of project
- Zero XY
- Using Z probe, I zero the Z axis.
- I open my design file.
- T1 is in the pop-up at the upper left of the workspace. T1 is a LONG 3" bit.
- I press Start.
- The tool-change popup displays
- The Autospin T1 retracts vertically.
- I press Run
- The AutoSpin moves over the TLS and lowers until it touches, then retracts.
- I press Next
- I press Run
- The job starts and finishes.
Now I want to do another cut with a different file with Tool #2 which is only 2" long.
I remove the long bit and install a shorter bit.
I assume since I am using a TLS, the original Zero for Tool#1 long bit is remembered , the retouch of the TLS with the shorter bit will make adjustments to Z zero for Tool#2.
- I open my design file.
- T2 is in the pop-up. T2 is only 2" long (T1 is a LONG 3" bit.)
- I press Start.
- The tool-change popup displays
- The Autospin retracts vertically.
- I press Run
- The AutoSpin moves over the TLS and lowers until it touches, then retracts.
- I press Next
- I press Run
- The job starts and finishes.
HOWEVER, the short bit floats above the material. The new Z zero for Tool#2 did not happen.
What am I doing wrong?
Or is my assumption of how the TLS works wrong?
Thank you,
Roland
Now I want to do another cut with a different file with Tool #2 which is only 2" long.
(THIS IS YOUR ISSUE )I remove the long bit and install a shorter bit.
I assume since I am using a TLS, the original Zero for Tool#1 long bit is remembered , the retouch of the TLS with the shorter bit will make adjustments to Z zero for Tool#2.
You should let the controller request the tool change before you change the bit, or else it will think the 3" bit is still in the spindle. This is based on my usage of the MASSO controller on the other brand of CNC.
I always start the program and the first order the system should do in request a bit change since the tool is needed. Also did you number your bits in the CAD program as this may be another cause of the workflow failure.
Sienci TLS Setup
NOTE: Must have gSender 1.6.2+ and homing sensors.
gSender:
Run HOME (this sets the machine XYY zero. This not the same as workspace XYZ zero)
Configuration Setting:
Select Tool Changing
gSender strategy: Fixed Tool Sensor
Fixed sensor Location: Set to the XY zero of your newly installed TLS.
(I positioned my TLS in the far back left corner where I HOME. 0,0,0)
First tool behavior: Prompt for first tool
Set tool change location: Enabled
Manual tool change location: (200mm, -600mm, 0mm)
(I have mine set to about 10” back from the front edge and 10” to the right of the left edge of the spoil board)
More Settings… (no changes)
Apply Settings
Vcarve Pro:
Machine Configuration:
Associated Post-Processors: Sienci Labs ATC (grblHal)(mm)
Design and Calculate as usual. (Note: Edit the Tool (aka bit) in each Toolpath and set it to a unique number).
When you Save Toolpath: you must choose "Visible toolpaths to one file”
Verify the Post Processor is Sienci Labs ATC
Save Toolpaths
As a double check, you can edit the toolpath.gcode file. Look for the M6 commands
Each tool should have a unique tool number. For example
M6 T1
…
M6 T2
…
M6 T3
Now back to gSender…
Now that the settings are done, this is where you will begin for each project.
-
First press HOME.
-
Move the spindle to a convenient location and install your first tool (eg T1)
-
Move the spindle to XY zero of the project and Zero XY and Z.
-
Load File: toolpath.gcode. Pop-ups will appear showing you the tools used in this job.
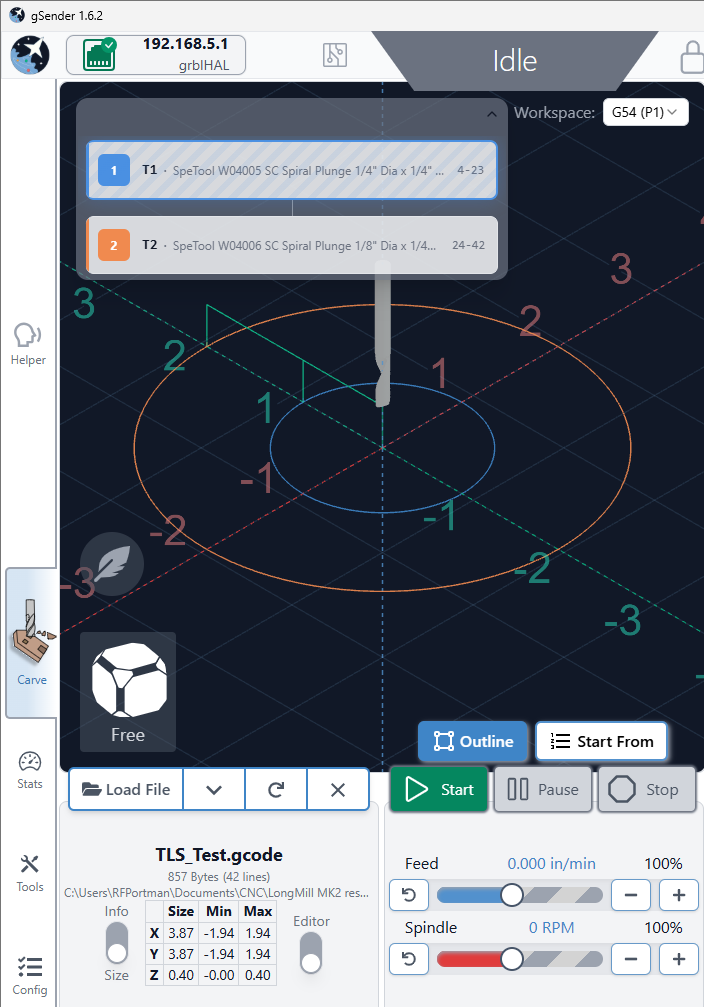
-
Press Start
-
I select (Only Probe Tool Length).
-
Press Run. The spindle will raise to the highest Z position (machine Z zero) and move over the TLS, then very slowly lower the bit to the touchplate.
-
Press Next. Press Run (resume). Spindle will move to the XY Zero of the workpiece and begin the cut for T1. When done it will raise the spindle to the highest Z position.
-
Popup: Change Tool. Press Run. Spindle will move to the Tool Change Location you set.
-
CHANGE YOUR TOOL (eg T2)
-
Press Next. Press Run (Probe Changed Tool). The spindle will move over the TLS, then very slowly lower the bit to the touchplate.
-
Press Next. Press Run (resume cutting). Spindle will move to the XY Zero of the workpiece and begin the cut for T2. When done it will raise the spindle to the highest Z position.
Steps 9 thru 12 will repeat for each subsequent tool in your toolpath file.
I hope you find this helpful. Comments and corrections greatly appreciated.
Thank you sylthecru for getting me on track.
Roland Portman
1 Like
Thank You KGN, that solved the problem.
1 Like
is there not a inch version? i downloaded the current postprocessors and only found a mm
You can design in Vectric using inches.
Post process using mm.
Then in gSender you can display measurements using inches.
Only the gcode is in mm.
Hope this helps.
Not sure what you are talking about there ??? That sets the machine in Inches (which is what I want)
I would never want my Gcode in mm period.