So i have been doing vcarve desktop pro for 7 months and my new laser will arrive in a couple days. Been watching the lightburn tutorials and playing around with some simple designs. I have questions about combining router and laser into same finished project.
A project that I have in mind is a US flag with pledge of allegiance on white stripes. I was thinking of doing pockets for white stripes and stars into pine, then deep burn on blue and medium burn on red and then full burn on pledge text. How would you line up your projects?
Vcarve has 2 file options i see, the vcarve project and the gcode. I don’t think lightburn can export to vcarve but it can import gcode. I didnt test whether lightburn imports to 0,0 or to cursor location, I should check that.
I saw that gsender can accept a laser offset. What makes it use that? Would it always offset when in laser mode?
I also see some people using vectric laser module. A couple others are setting up a tiny end mill or spindle tool and using rpm to comtrol laser power.
Anyone have some good tips for mixing router and laser in same piece and what softwares and workflows they follow? I am sure in a few weeks or months I’ll have a system down but was curious what others might be doing.
@Scotto I’m sure that there are as many ways to do these “hybrid” projects as there are users doing them. I have both VCarve Pro and Lightburn. For these projects, I used VCarve Pro exclusively. It just keeps things simpler for me.
Here is my approach:
I create the project to include both those components that will be routed and those that will be lasered.
I create the router tool paths using the appropriate bit(s). I save the tool paths using the grbl mm post processor. (Contrary to some information, you can design in inches - as I do - and use the mm post to save the gcode. This gives more accuracy than using the inch post.)
I then create the laser tool paths. I have set a “phoney” end mill as my laser. I choose it as the tool and use the Jtech post processor that they wrote for VCarve. It eliminates any Z moves, which is what I want for my laser paths.
In gSender, I set my XYZ0 for the router work and carve the tool paths.
I mount my laser (I do not have the Sienci laser.) and run a macro to move the laser dot to the XY0 position that I previously set for the router. (You can use the gSender offset function instead. I had these macros before that function was available and just stuck with them.)
I set $32=1 and $30=1000. (Most users likely use $30=255.) Again, this can now be done using a slider in gSender.
I focus the laser and run the tool paths created in VCarve.
Since XY0 are set in the same place for the router and laser paths, the laser paths run precisely where I want them. When I am finished, I reset $32 and $30.
You are correct in your assumptions about the laser offset, it is applied when in laser mode so that you don’t have to re-zero the X and Y. You just need to measure the difference between the laser dot and the router. I don’t use the offset because I take my laser on and off and am afraid that it won’t be in exactly the same place when I remount it. If you do use it my suggestion would be to zero the X and Y then make a small dot in your waste board or on a piece that you have secured to it. Then you jog the machine to place the laser dot on top of the router dot and you have your offset displayed in gSender. Or you have the negative of your offset, can’t remember which way it goes exactly.
As far as origin goes in Lightburn I have found it to be a bit finicky, in my opinion, and I almost always use the “Start from current position” way of doing it. There are two other ways in the options but I didn’t have good luck getting it to work for me. One of them sounds like it would work like gSender but like I said I couldn’t get it to work for me.
By the way I think the flag design sound cool. Here is a svg file I made. The Stars and Stripes were all laid out according to the flag specifications. It is missing a couple of straight lines because of the way that I burned mine but they are easy to add. Maybe you don’t need it but I figured I’d throw it out there. Hmm I see the svg in the preview, wasn’t expecting that! Adding a zip file with it in case you can’t grab the svg from the image.
EDIT: Reading @gwilki 's reply and I set my $30 to 1000 also. It makes it so that if you have to look at the G-Code you can tell the power of the laser by dividing by 10. Also you mentioned spindle speed, spindle speed is used to control the laser when in laser mode. Spindle speed set in the software, totally separate from router speed if you have a router and not a spindle.
I didn’t mean to conflate spindle and router speed. I have the makita router. Is spindle speed on your postprocessor rpm or percent? If its rpm do you have to keep a reference chart for 100% burn?
Do you give up much in lightburn previews and shading?
I already have a big question on how to bound a bitmap for reproduction. Vcarve has ways to let you cut bitmaps with vectors to focus the reproduction, all lightburn videos i have seen thus far consume the entire imported image. I do find lightburns ability to set thresholds more powerful and effective.
In lightburn I miss having a material size but their layer system is much easier than vectric …
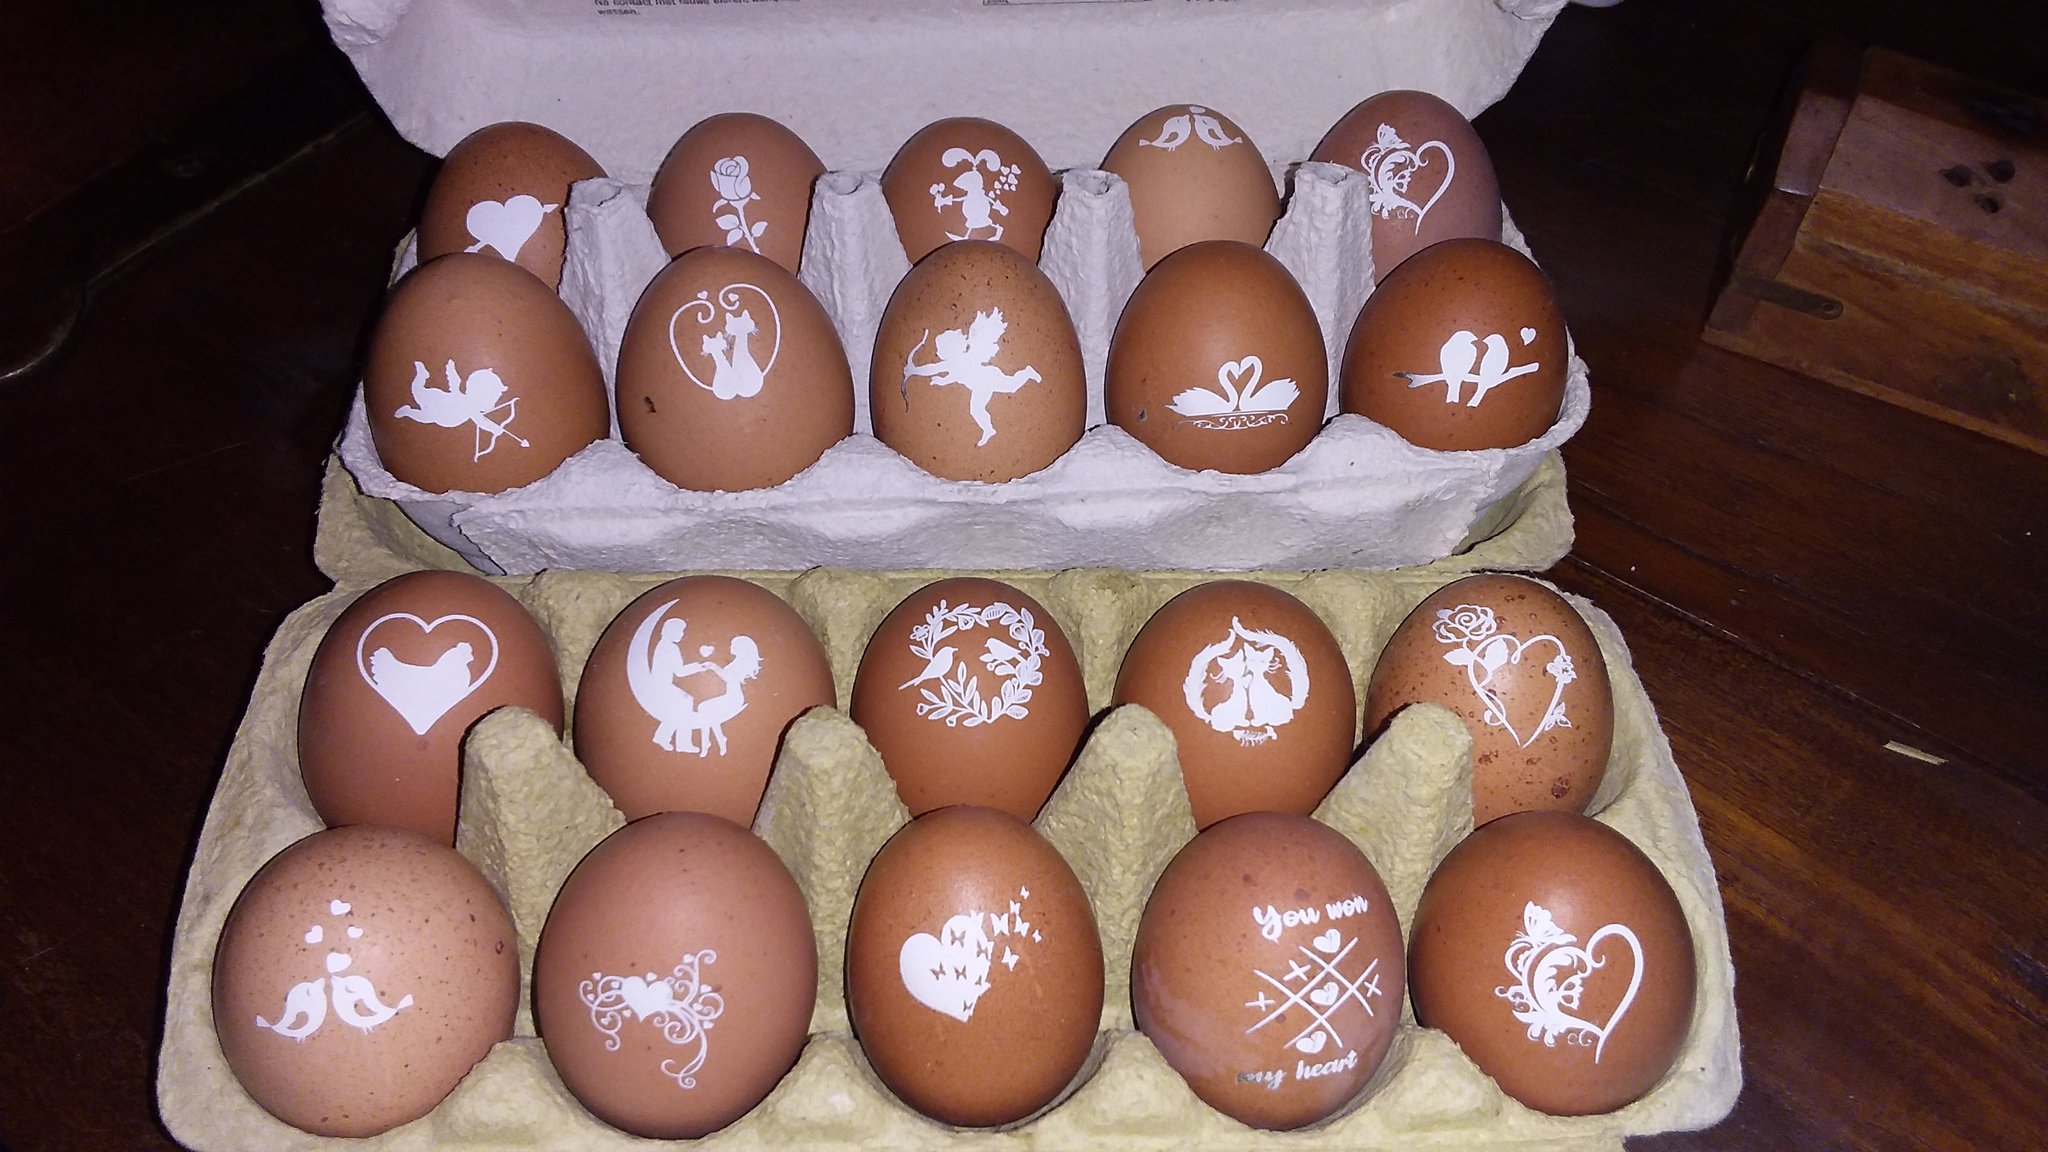
I got my Longmill 48x30 a few months ago and began experimenting with combined projects right away. First I was curious how much curve the laser could cover without needing a focus re-calibration. I wanted to do 3D carvings with laser etchings atop. Since my partner sells eggs at the door, I used quite a few to experiment laser etching on. After a bit of tinkering they came out nice and gave me an idea on the focus drift of the G2 lens.
Pine (Douglas) is not the best wood for laser etching. The difference in burning on the softer parts and hadrer parts is substantial. I did a flat etch on a slap of teak and that came out much more equal in darkness.
I stopped experimenting for I burned out my Makita router and need to focus on building the machine in its more permanent setup, including some safety features.
What I got out of my play time is that you can do some amazing stuff combining carving and etching. I am definitely going back there after my overhaul.
On the matter of zero setting the laser with the router-bit, it takes some effort. One bit is not the other and I fear that offsetting on the center of the bit wont cut it. I did it on a keen eye.
There is an option in Lichtburn to use a camera to place your design on the project using a live stream from you machine. I am going to get that option on my machine, for I think that is the quick fix for the -zeroing both projects to the same spot- problem.
I look forward to your results in combi projects. Their great fun.
Thanks, that looks very nice. I was only thinking about using cnc and laser as separate 2d decorations. Combining them such that the router cuts a 3d object then bringing the laser in for discreet shading is next level.
If decorating is the goal, you might like to look into activating power coating with your laser.
I am on the brink of that experiment. Got my primary colors in yesterday and a chrome and gold one.
I did an experiment on lettering in a flat etch and it worked magic. Being able to paint as precise as your laser can etch is a big plus.
But then again, I only did one experiment but you can take a look at others that did this on youtube.
I’ll look into that! For a few months now I have wondered why we cnc router, laser, 3d printer etc but no 3d painter. I have recently seen there is a hobby waterjet machine coming out, not my thing but interesting none the less.
When in spindle mode spindle speed is rpm. No surprise there. When in laser mode you can think of it as a percent of the maximum. That’s why I use Smax=1000 in Lightburn. Also in Vectric with the laser module there isn’t a way that I have found to set anything like Smax but it uses 1000. I know it uses 1000 because if you set the laser at 50% power in Vectric you will see S500 in the G-Code. If you set 25% power it writes S250 in the G-Code and so on. So it seems to me that $30, spindle max speed, needs to be at 1000 with the Vectric laser module to get accurate power. Also Smax in Lightburn defaulted to 1000 if I recall right so that’s what I use.
EDIT: As far as conflating spindle and router speed, I’m not sure you did. I just wanted to extra clear just in case and as a side note if your using a router spindle speed has no effect on that so you can just leave it at 1000. gSender used to have some bugs with switching between laser and spindle mode but that has been fixed and gSender will set $30-$32 when you use the button to switch modes if you set the values you want in the settings.
Just want to say something about the Vectric laser module. I have it and I use it when the project is router and laser, like @gwilki said it keeps it easier for me to have everything in one place. I use Lightburn for images always because it does a better job and is WAY faster. The laser module does this start, stop, pulse the laser, start, stop, pulse the laser… thing whereas Lightburn just modulates the power as it goes. Sometimes for laser only projects I will design in Vectric and export an svg that I import into Lightburn because I’m more comfortable designing in Vectric.
So that covers when I use what but the main reason for this response is just to say that I don’t think the Vectric laser module is worth the money. It really doesn’t offer anything that can’t be done with the post-processor that @gwilki uses. Those post processors were made by j-tech and I read there that they were the basis for the laser module. To top it off Vectric has not done anything to update or add functionality to the laser module since it came out.
Just my two cents, if I had to do it again I would try the j-tech post processors before buying the laser module. I didn’t know about the post-processors from j-tech when I got the laser module.
So it sounds like $30 is setting max and resolution of power at same time. If i set to 100 and then have vectric max at 100 it is 1 percent per click, while if I set it at 1k then each click is .1 percent. Is this accurate?
That being the case, scienci 7 watt laser having 255 power levels is very fine control.
Yup you are right about the percent per click. I just use 1000 because of the way the laser module works or I won’t get accurate power. It’s also is easy to look a code and understand a value. What is 22% of 255? But it’s easy for 1000!
EDIT:
I have not found a way to set max to 100 in Vectric. Not saying there isn’t one but I can’t find it if there is one.
@Scotto@_Michael It’s entirely likely that I am confused by your question, Scott.
IMHO, setting $30 to 1000 gives me as much control as setting it to 255. I know that 255 was chosen owing to what grbl and an 8 bit processor can really distinguish. In grbl pre version .9, grbl recommended using 255. Now, with version 1.1, they recommend 1000. Either will work. I’m with Michael in that I can look at the gcode speed setting and see easily what the laser power is.
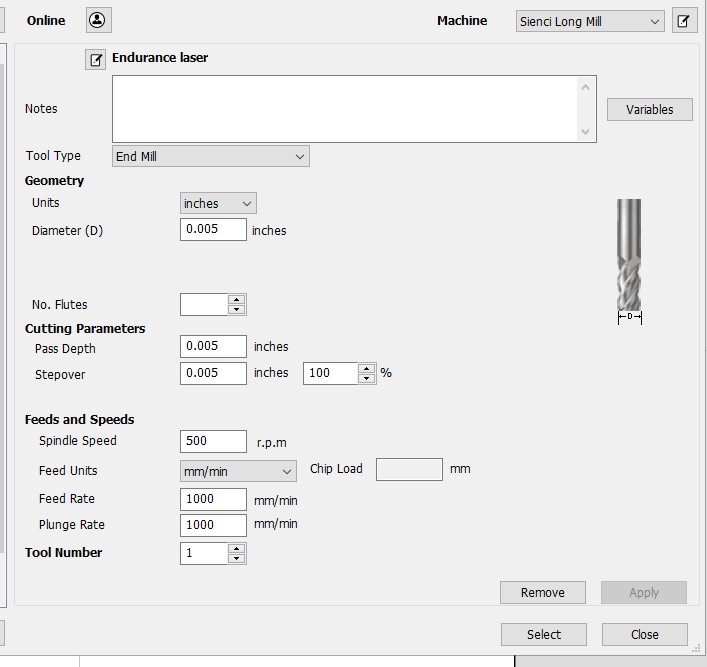
In terms of setting speed/power in Vectric, it’s a function of the tool you create. In my case, I created a dummy end mill. I set the size based on the spot size of my laser - in my case .005". One of the settings in the tool data base is “spindle speed”. When dealing with a laser, this equates to power. So, for example, since I have set $30 to 1000, 100% power in my tool database is 1000 rpm If I want the laser to burn at 50% power, I simply set the speed to 500 rpm.
If this has simply confused the issue, feel free to say so and I’ll delete the post.
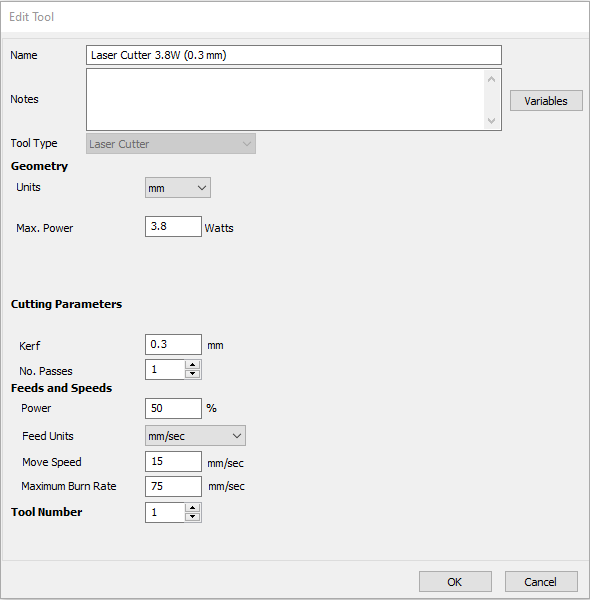
I am attaching a screen cap of my laser “tool” just fyi.
And here I had just ordered a Rolio set of mica for some discreet epoxy pours I was planning … very interesting ideas in this rabbit hole. Laser 911 was a suggested video next to this that was a little better production but he left out using mica instead of powder coat. We shall see how the mica works with his method.
How do you get vectric to export SVG? All I see are vcarve abd vcarve template… Then I find the export button. Silly to have save as and export imo.
I think I am definitely gonna try to use vectric exclusively but I do see some areas where lightburn is better. Can’t believe lb doesn’t have material sheet size settings or way to distribute parts across a sheet like vectric, maybe lb isn’t ready for my 30x48 bed size.
@Scotto I use the Jtech post processors. They are written for VCarve.
I’m attaching the inch and the mm posts. I had to change the file extension to .txt to upload them. After you download them, change the file extension to .pp. Then, in VCarve you can install them.
Thanks guys! I’ll let you know how it goes tomorrow. UPS estimates it arriving tomorrow and I took tomorrow and Friday off in preparation. UPS is normally 2PM (Mountain) or so, enough time to rewire and test before laser beam live tomorrow night on youtube, Ikenna is very helpful in the live chat if you’ve never watched.