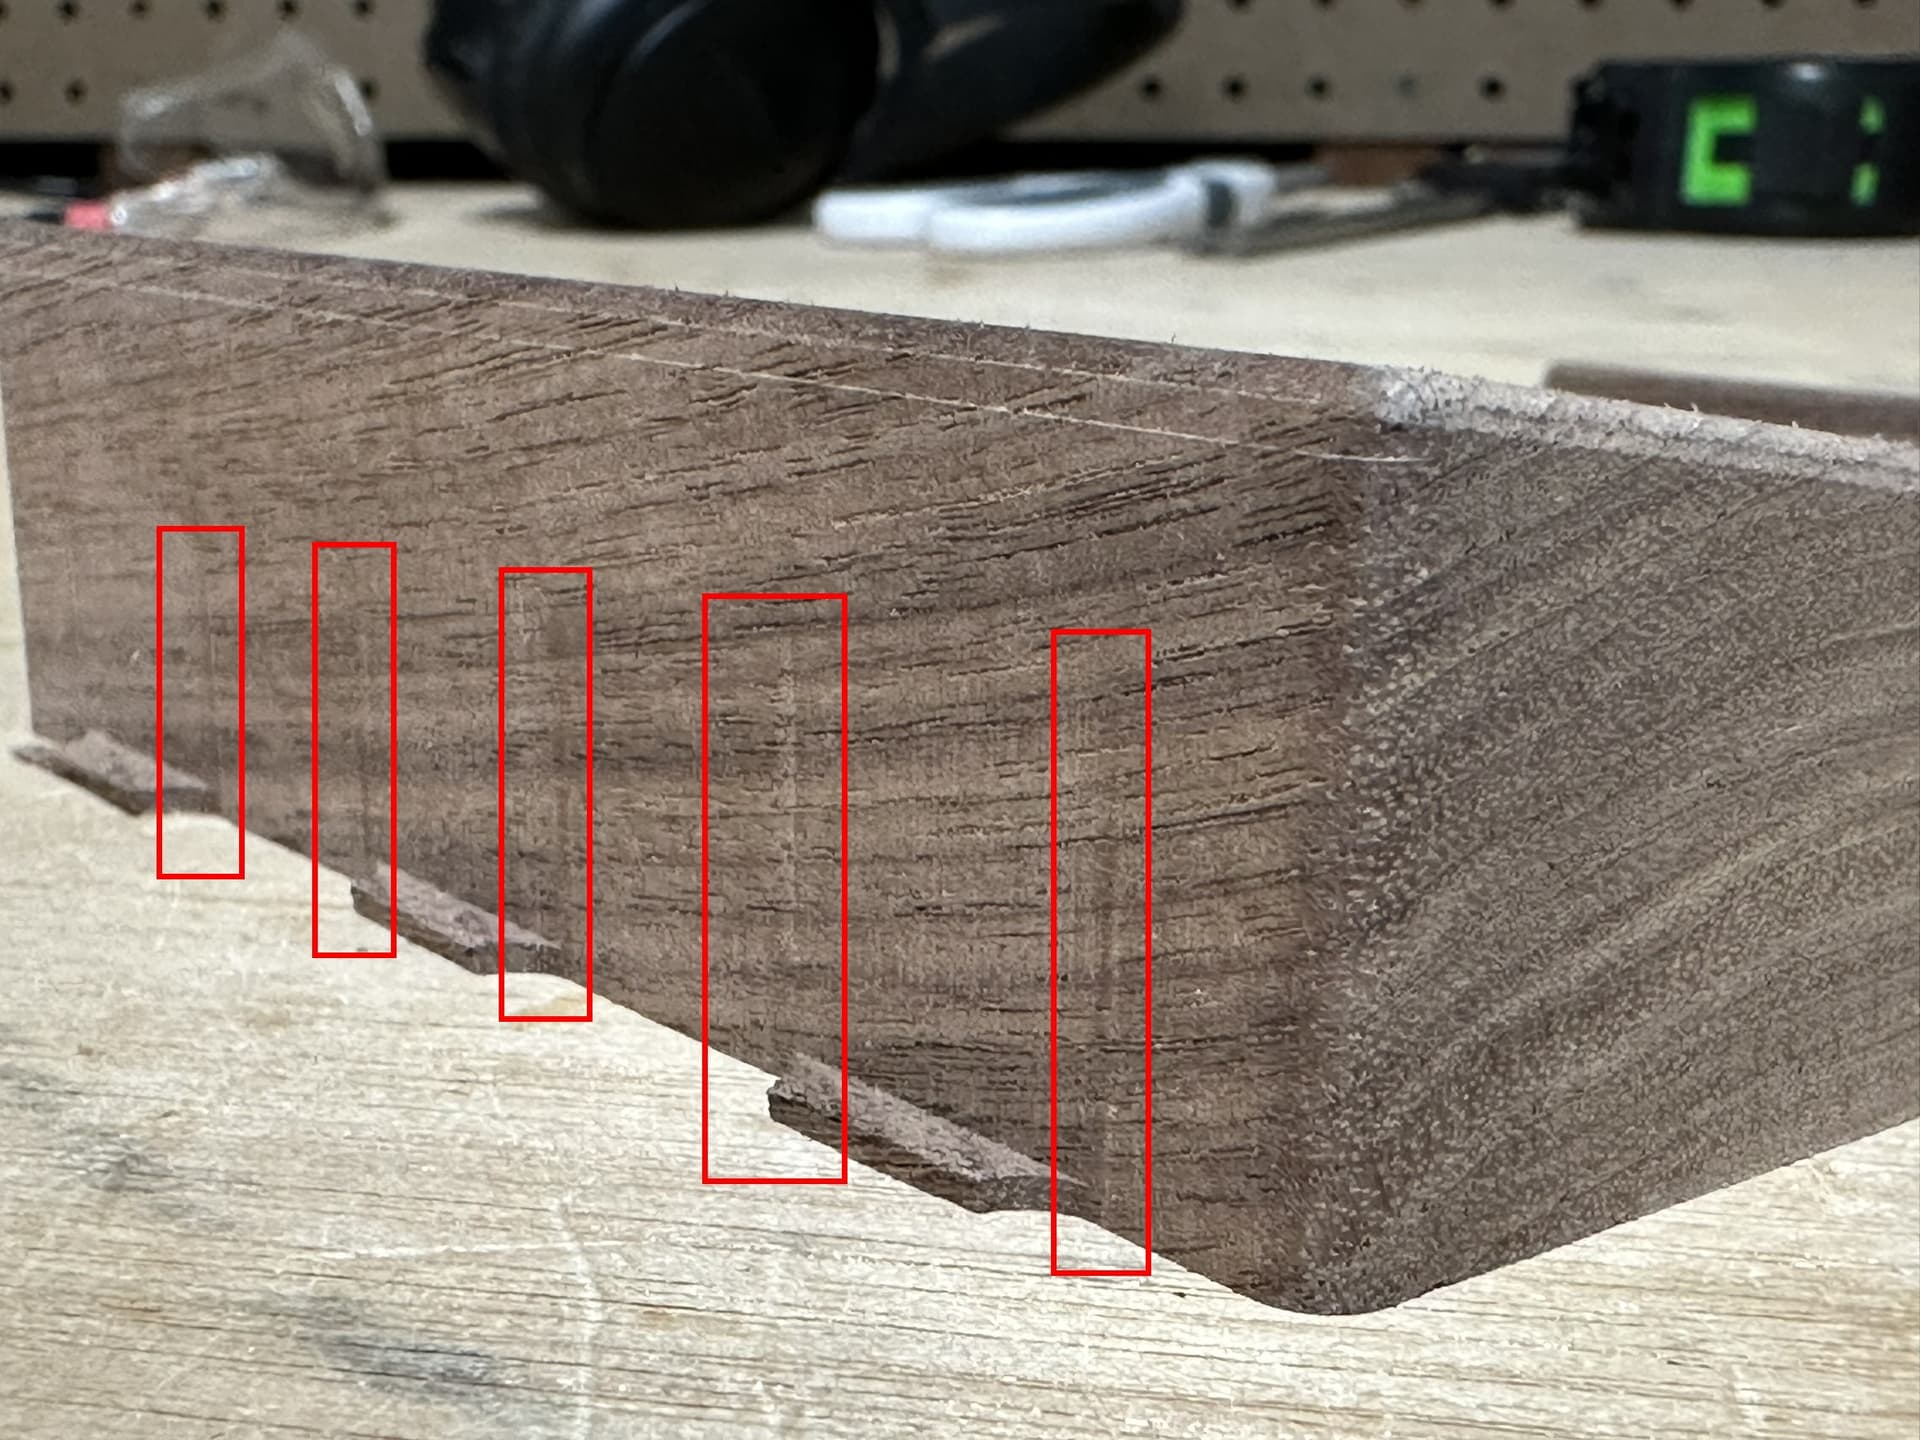
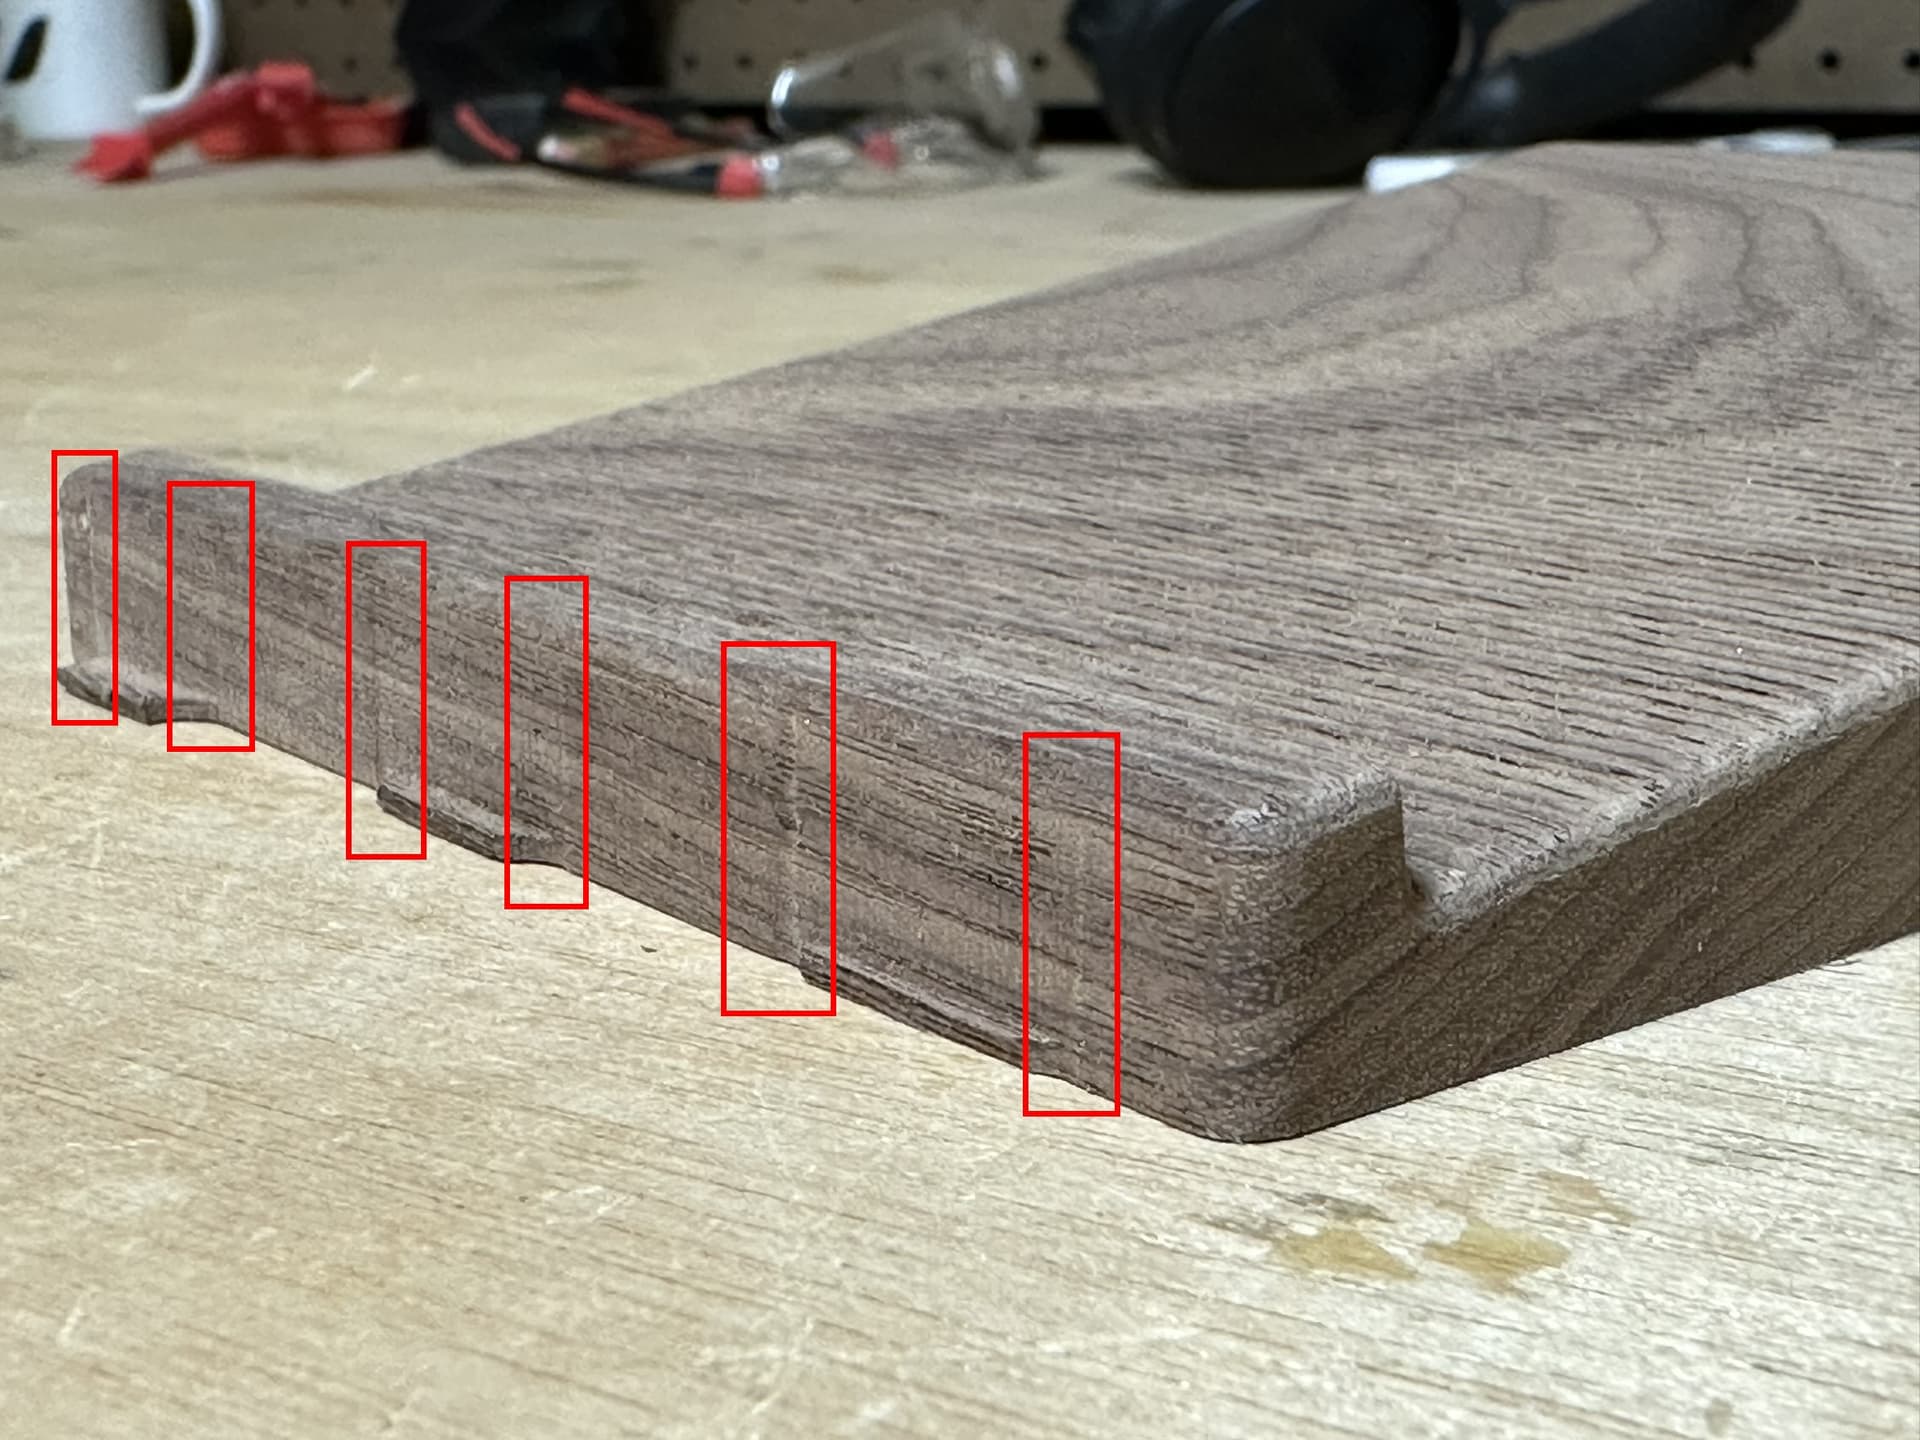
My LongMill MK2 cuts beautifully, but one issue I keep running into are vertical grooves left on the side walls at points where the bit enters for a contour tool path and also at the areas before and after tab locations where the bit moves up and down to continue the contour. It wouldn’t be so bad if they weren’t so difficult to sand out. Any ideas what is causing this? I’m using Fusion 360 for creating my toolpaths. Does this look like a software toolpath issue or possibly bit deflection at these points? Any help would be appreciated.
Those seem to coincide with the moves away from and back into the work for the supporting tabs - do you find it does that at general bit entry / exit points, or only for the tab locations?
Generally the bit should deflect away from the work, but I could see a case being made that in a particular direction (climb vs conventional cutting) that the bit might drive itself into the work just that little amount at the time of direction changes like that.
Things I might try:
Use the opposite direction for your final pass (the one that leaves the tabs behind)
See if you can rearrange or relocate your tabs. I know I tended to overdo tabs at first, but have reduced them fairly aggressively.
Use two sided tape, or the masking tape and CYA glue method to hold the work down to eliminate tabs.
Instead of tabs, leave a full 1mm (or less) the length of the part, that you can easily trim off with a knife.
I use Fusion 360 too, and the number of toolpaths and types available can be really overwhelming. Another thing you might try is having your passes leave a small amount (0.5mm?) that gets removed in a final-final pass.
Let us know what you find, I’m sure you’re not the only one seeing this. I’m pretty sure I may have experienced it and just committed to more sanding, or somewhat naturally started to move my tabs and entry / exit points around. My go-to now is adaptive clearing for all the roughing, and then a final skim pass, and I do try to avoid tabs.
I just experienced this also, I’m using vcarve pro and the software showed it in the preview so I’ve been avoiding the cut until I figure it out.
Up to now, I haven’t had this issue before. I tried changing my direction and it did reduce the number and size but it didn’t go away. Im not using tabs and I changed the ramping to smooth ramp. So far that seems to have made the most difference.
I know that Vectric posted a video about it and how to fix it, but for the life of me I can’t remember what it’s called
@Parkey@elbarsal@JDre357 I don’t use Fusion, so my solution may not apply. Since Dave mentioned that he uses VCarve, I’ll throw out the way I avoid these. In VCarve, use either both ramps and leads or just leads. With leads, the bit is moving up and down away from the profile pass. By the time the bit gets to its destination, it is at the pass depth and moving in the correct direction. A final light pass can also work, but I found that sometimes I still had these dwell marks. Using ramps and leads, I have absolutely none.
I don’t use tabs very much, but when I do - again in VCarve - I always choose the 3D tab option, That way, the bit is not stopping, rising up a small amount, creating the tab, then lowering again. With 3D tabs, the bit does not stop. It angles up, then angles down.
@gwilki Thank you. I didn’t even think of the leads or using 3D tabs. If I understand you correctly, I just need to keep the bit moving with 3D tabs or use leads for vertical plunges???
Man!!! So simple and not even a thought. Your the man, Thank you.
@Parkey As far as tabs go, Dave, the design of the 3D tabs is sort of a pyramid. So, the bit just goes up one side and down the other. Unlike with “normal” tabs where the bit stops, rises up, moves the length of the tab, stops, lowers down, then continues.
As for leads, they are the real solution to this, I believe. I tried using last pass. I tried ramps. Nothing works as well as leads. It does mean, though, that you need to have waste material where the ramp will start and end.
@elbarsal@Parkey@gwilki Thank you all so much for the advice! I’ll give these different options a try and see which one is most effective. Not sure if Fusion has the 3D tab option but that would be great if it does. If not, hopefully playing around with the leads will solve it.
To avoid the dwell marks when I don’t have the room for a lead in/out I have used a spiral ramp (in VCarve Pro) that ramps to the bottom of the cut across the whole length of the vector (a ramp with a length equal to the vector) for the pass depth and then does it again until it reaches the cut depth. Once it first reaches the cut depth it does one more pass at that depth and then rises). The only dwell would be at the end of the cut (I haven’t noticed any issues with dwell marks then).
When doing the spiral cut the feed rate is limited to the plunge rate for the tool for the whole cut, except the last pass which runs at the full feed rate. Disconcerting to see the feed rate increase dramatically for the last pass.
Wanted to give an update on the status of these lines on the side of my parts. I took the advice from everyone here and made changes to my programs, and voila, the lines are gone! I did make all of the changes at once, so I’m not sure if it was any one change or all of them together. I’d have to test going back through turning the changes on and off. In summary, here are the changes I made:
Switched to the pyramid tabs (“triangular” in fusion) for my roughing pass.
Split up the contour passes into distinct roughing and finishing toolpaths. For roughing, I machine with multiple depths to the bottom of my part with slight stock to leave. For the finishing pass, I skim the surface in one pass from the top of my part to just above the top of the tabs. What is left at the bottom gets cleaned up when I remove the tabs on the router table.
Adjusted to a 45 deg lead in on my roughing and finishing passes, instead of the default 90 deg, to make the entry a little more gentle.
Added a ramp on the roughing pass.
So much happier with how the parts look coming off the CNC and this has probably cut my sanding time in half since I no longer have to sand out the lines. Thanks to everyone for the suggestions! Hopefully these fixes will help anyone else running into this issue.