Y axis issue on fairly new machine

Hi,

I’m still having a bunch of issues, hopefully I can get some help here.

When moving the machine on Y axis, the left side is getting “stuck” and not moving at the same rate as the right side. Therefore, it’s never perfectly perpendicular to the X and all the long cuts are off.
I checked the wheels to make sure they were not too tight, I can move them with some effort. I feel that the Y axis gantry can be slightly lifted from the bottom on the left, but not on the right. I tried to tighten the screws but this actually made it worse.

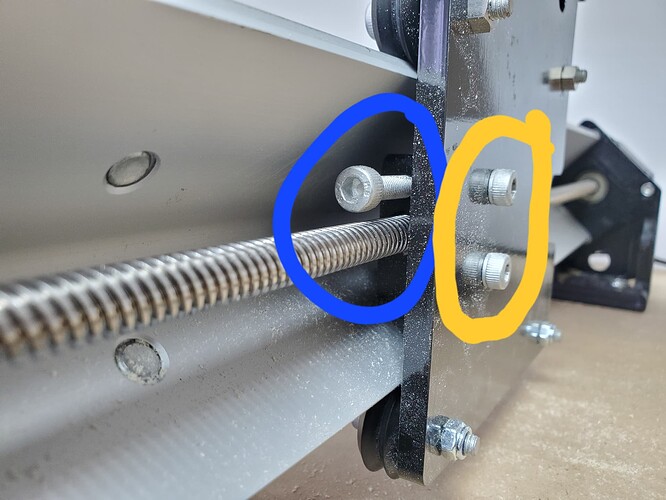
Should the yellow items be fully tightened? And what is the blue bolt for?

Not sure what to do, could it be the stepper motors as well, could it be faulty?

If you can lift the wheels at all that sounds like the escentric nut isn’t tight and your wheels are probably super lose. Mine are tight enough that they barely move with finger strength. All 4 on each side should be roughly the same taughtness.

Ok, so what I noticed is that the right side moves easily when I go back and forward. The right side doesn’t move immediately, it has a slight delay.

Is there something too tight on the left side possibly?

1 Like

@Bizbrar The cap screw in the blue circle is the adjustment for the anti-backlash nut. Back it off all the way, then tighten it in very small increments until there is no forward and back play in the gantry. Do the same for each side.

The yellow nuts hold the anti-backlash nut to the gantry plate. They should be tight. However, you may want to loosen them, loosen the “blue” cap screw, then run the Mill all the way forward and all they way back. Then, tighten the “yellow” nuts, then adjust the anti-backlash “blue” cap screws.

1 Like

Thanks so much let me try that.

Let me explain better what’s happening. As I jog the machine forward, the it moves well and evening it seems, some times when I want to move the machine back, the right side is fluid, and the left seems like it has a slight delay or is catching, which makes the X on a slight slant (up to a half inch), so the carves will never be accurate.

Also, what is the purpose of the anti-backlash nut? As you tighten it, what happens (does it restrict or allow movement) on the Y?

One more slightly unrelated question, the locking hex nut with set screws system seems to have a flaw, it gets loose over time, and as I tighten the set screws they don’t tighten anymore, it’s like the thread strips. Is there any other better system that I can use, because I’ll have to buy a set now and am worried about not having maintenance parts in the future.

I was also thinking, what other maintenance parts do you think I should buy based on your experience, so I’m never left in the dark and waiting around.

Thanks a ton!!

@Bizbrar Let me preface my replies by stressing that I am not a tech support guy for Sienci. I am just the mod here, trying to make sure the forum stays a friendly place to be. That said, I’ve had my Mill since the Kickstarter days, I’m put many hours on it, and I’ve read about almost every issue that can come up on this forum.

OK, so know that I’ve set out the “don’t blame me” rules, here goes. :grinning:

The anti-backlash nuts are there to make our Mill more precise. When you thread a bolt - or rod in our case - into a nut of any kind, there will always be back and forth movement between the two, owing to machine tolerances in the thread. In a normal bolt and nut situation, when you fully tighten the nut, the back lash goes away. Since we are not tightening the lead screw in the nut, we need a way to take up the slack or back lash. The set screw in the anti-backlash nut spreads the “fingers” on the nut, pushing the internal threads in the nut against the external threads on the lead screw. In this way, it sort of mimics tightening the bolt all the way in a nut. Adjusting the anti-backlash nut more than needed to take out the lash puts more friction between the internal and external threads. This can cause the axis to run slow and does wear out the nut prematurely. Clear as mud??

The hex nut on the end of the lead screws should be tight against the washer on the bearing. This prevents the lead screw from wobbling. I tend to hold the lead screw in a pair of pliers on a spot where it will never contact the anti-backlash nut, and tighten the nut snuggly. Then, I tighten the set screw. I’ve never had a nut loosen. I suggest that you remove the nut and set screw and make sure that the threads on the nut that the set screw screws into are not stripped. If they are fine, you may not be tightening the set screw enough. If they are stripped you will need to contact Sienci for a replacement. You should not need to really reef on that set screw. In fact, do not do that. You can break it.

In terms of “consumables”, there are not many. I tend to go overboard, so keep that in mind when you read my list:

  1. Delrin wheels
  2. Anti-backlash nuts
  3. Bearings for the lead screws
  4. On a Mk1, the Z axis belt

I can’t count the number of hours that I have on my Mill and I have yet to replace the Z axis belt or any of the anti-backlash nuts. I have replaced 2 bearings and a set of delrin wheels. So, you can decide how many of these you want to have on hand “just in case”.

I’m sure that others here will join in this discussion and will be able to add to what I have set out here. There are many members here with more hours and experience on the Mill than I have. I’m still learning from them.

After you’ve made the adjustments that I mentioned previously, post your results and the group can go from there.
1 Like

Great job on the disclaimer, you’re not at risk!

This info is golden, appreciate it!

I’m going to go ahead and order those items, although the locking hex should probably be covered under warranty, but I’ll buy a few extra just in case.

One more question, when I carve I notice the area that’s been carved you can see the bit step over, ie it’s not perfectly smooth, I was hoping to carve and not see all the step overs on the base (ie the carved area). If you have any tips, rather than having to continuously sanding, that would be great, because some areas will be hard to sand.

Appreciate the time and effort you have put into the response, it makes total sense.

@Bizbrar What are you using for your CAD/CAM work?

I use VCarvePro. In that, in the set up for my bits, I can choose the stepover. For rough passes, I usually use about 40%, since it will be carved again anyway. For finish passes, I use somewhere around 8%. This makes the cuts take longer, but I’m too lazy to sand, and this does away with about 90% of the sanding.

Experiment a bit since this will vary with the material, the bit, the feeds and speeds, etc.

Maybe I’m a little off base here, but I put 3in1 oil on the lead screws, and ran a break-in program from Garrett Fromme, when I got my LM up and running for the first time. Just say’in.

@ozguzzi Oiling the lead screws is not the best idea. The sawdust will stick to that oil and you will have something of a mess. If you want to lube them use a dry lube like teflon.

1 Like

Thank. I use Carbide Create by the way.

One more thing (maybe more) but what sort of maintenance do you do on the machine over time, do things get loose? And how often should I do the maintenance you may suggest.

Again, thanks a bunch!

@Bizbrar I have not used CC at all, but I’ve seen on screenshots that you can set the step over size for your bits. I would suggest that, for finishing passes, you go with something equal to about 8% of the bit’s diameter at the tip. This is not etched in stone, so play with it. Take a look at some of the threads here that talk about ridges in pockets, etc. You will find good info on how to get better results, particularly if you are using down cut end mills.

As to maintenance, again look on the forum. Much depends on how much you use your Mill and what you are using it for. I guess that can be said of any machine. I’m likely not as scrupulous about maintaining my Mill as some others here. That said, I do go around checking all the nuts and bolts that can and do come loose over use. I’ve been a hobbyist woodworker for a long time and like to think that I take good care of all my machines and tools, but I don’t fixate on it.

To answer your direct question, things do come loose. I suggest that, at the outset, the main things to look at frequently are the delrin wheels since they wear over time, and the anti-backlash nuts for the same reason. As for the rest of the many bolts and screws, check them at some frequency that you will remember. I realize that this is not very exacting advice, but I’m sure you will settle into some sort of routine.

At the risk of bringing on all kinds of shots, don’t go nuts, particularly if you bought the Mill as a hobbyist. Have fun with it.

Yes dry lube would be better. I don’t use oil much, but for the first time it was OK. I always have a strong shop vac running when cutting, and have never had a problem with saw dust buildup on the leadscrews.

1 Like

I had a similar issue while setting up my MK2. If you cannot find a mechanical issue, watch the operation of your servo motors for the Y axis to make sure they are both moving the same direction. I had a loose connection that would cause one of the servos to intermittently run the wrong direction.