New to CNC, noticing small imperfections when making circles in multiple materials. My immediate thought is that its a tramming issue, however surfacing my waste board doesn’t show anything off. Any ideas are greatly appreciated.
Additional Info:
Cad and CAM done in Fusion360, Cut on an altmill 4x2, 1.5kw spindle with a 1/4 Downcut.
@JaredC48 Depth of cut is 1/4"? That might be too much. I don’t have enough experience for the feeds and speeds yet. I usually go with what Vectric recommends for the material and the bit. But I’d start by reducing the cut depth.
I read somewhere that half the diameter of the bit is a good rule of thumb for pass depth. Having a LongMill Mk1 I stay around a third of the diameter in order to get a half decent chip load without missing steps or having the bit chatter.
I know the AltMill is much stiffer with more power but if it was me I’d start shallow and gradually increase if things are going okay.
I have had the same issue with cutting rounds. I’ve explored multiple passes at the perimeter of the circle, as well as a rough plus a finish pass. The key here is that I’ve experienced failure when just removing a millimetre or two during the finish pass. For the most part, these were with a 1/4” endmill with a DOC of 1/4” on plywood. I am on an AltMill. Maybe too aggressive? I’ve now switched to 1/8” DOC, so we’ll see how that goes.
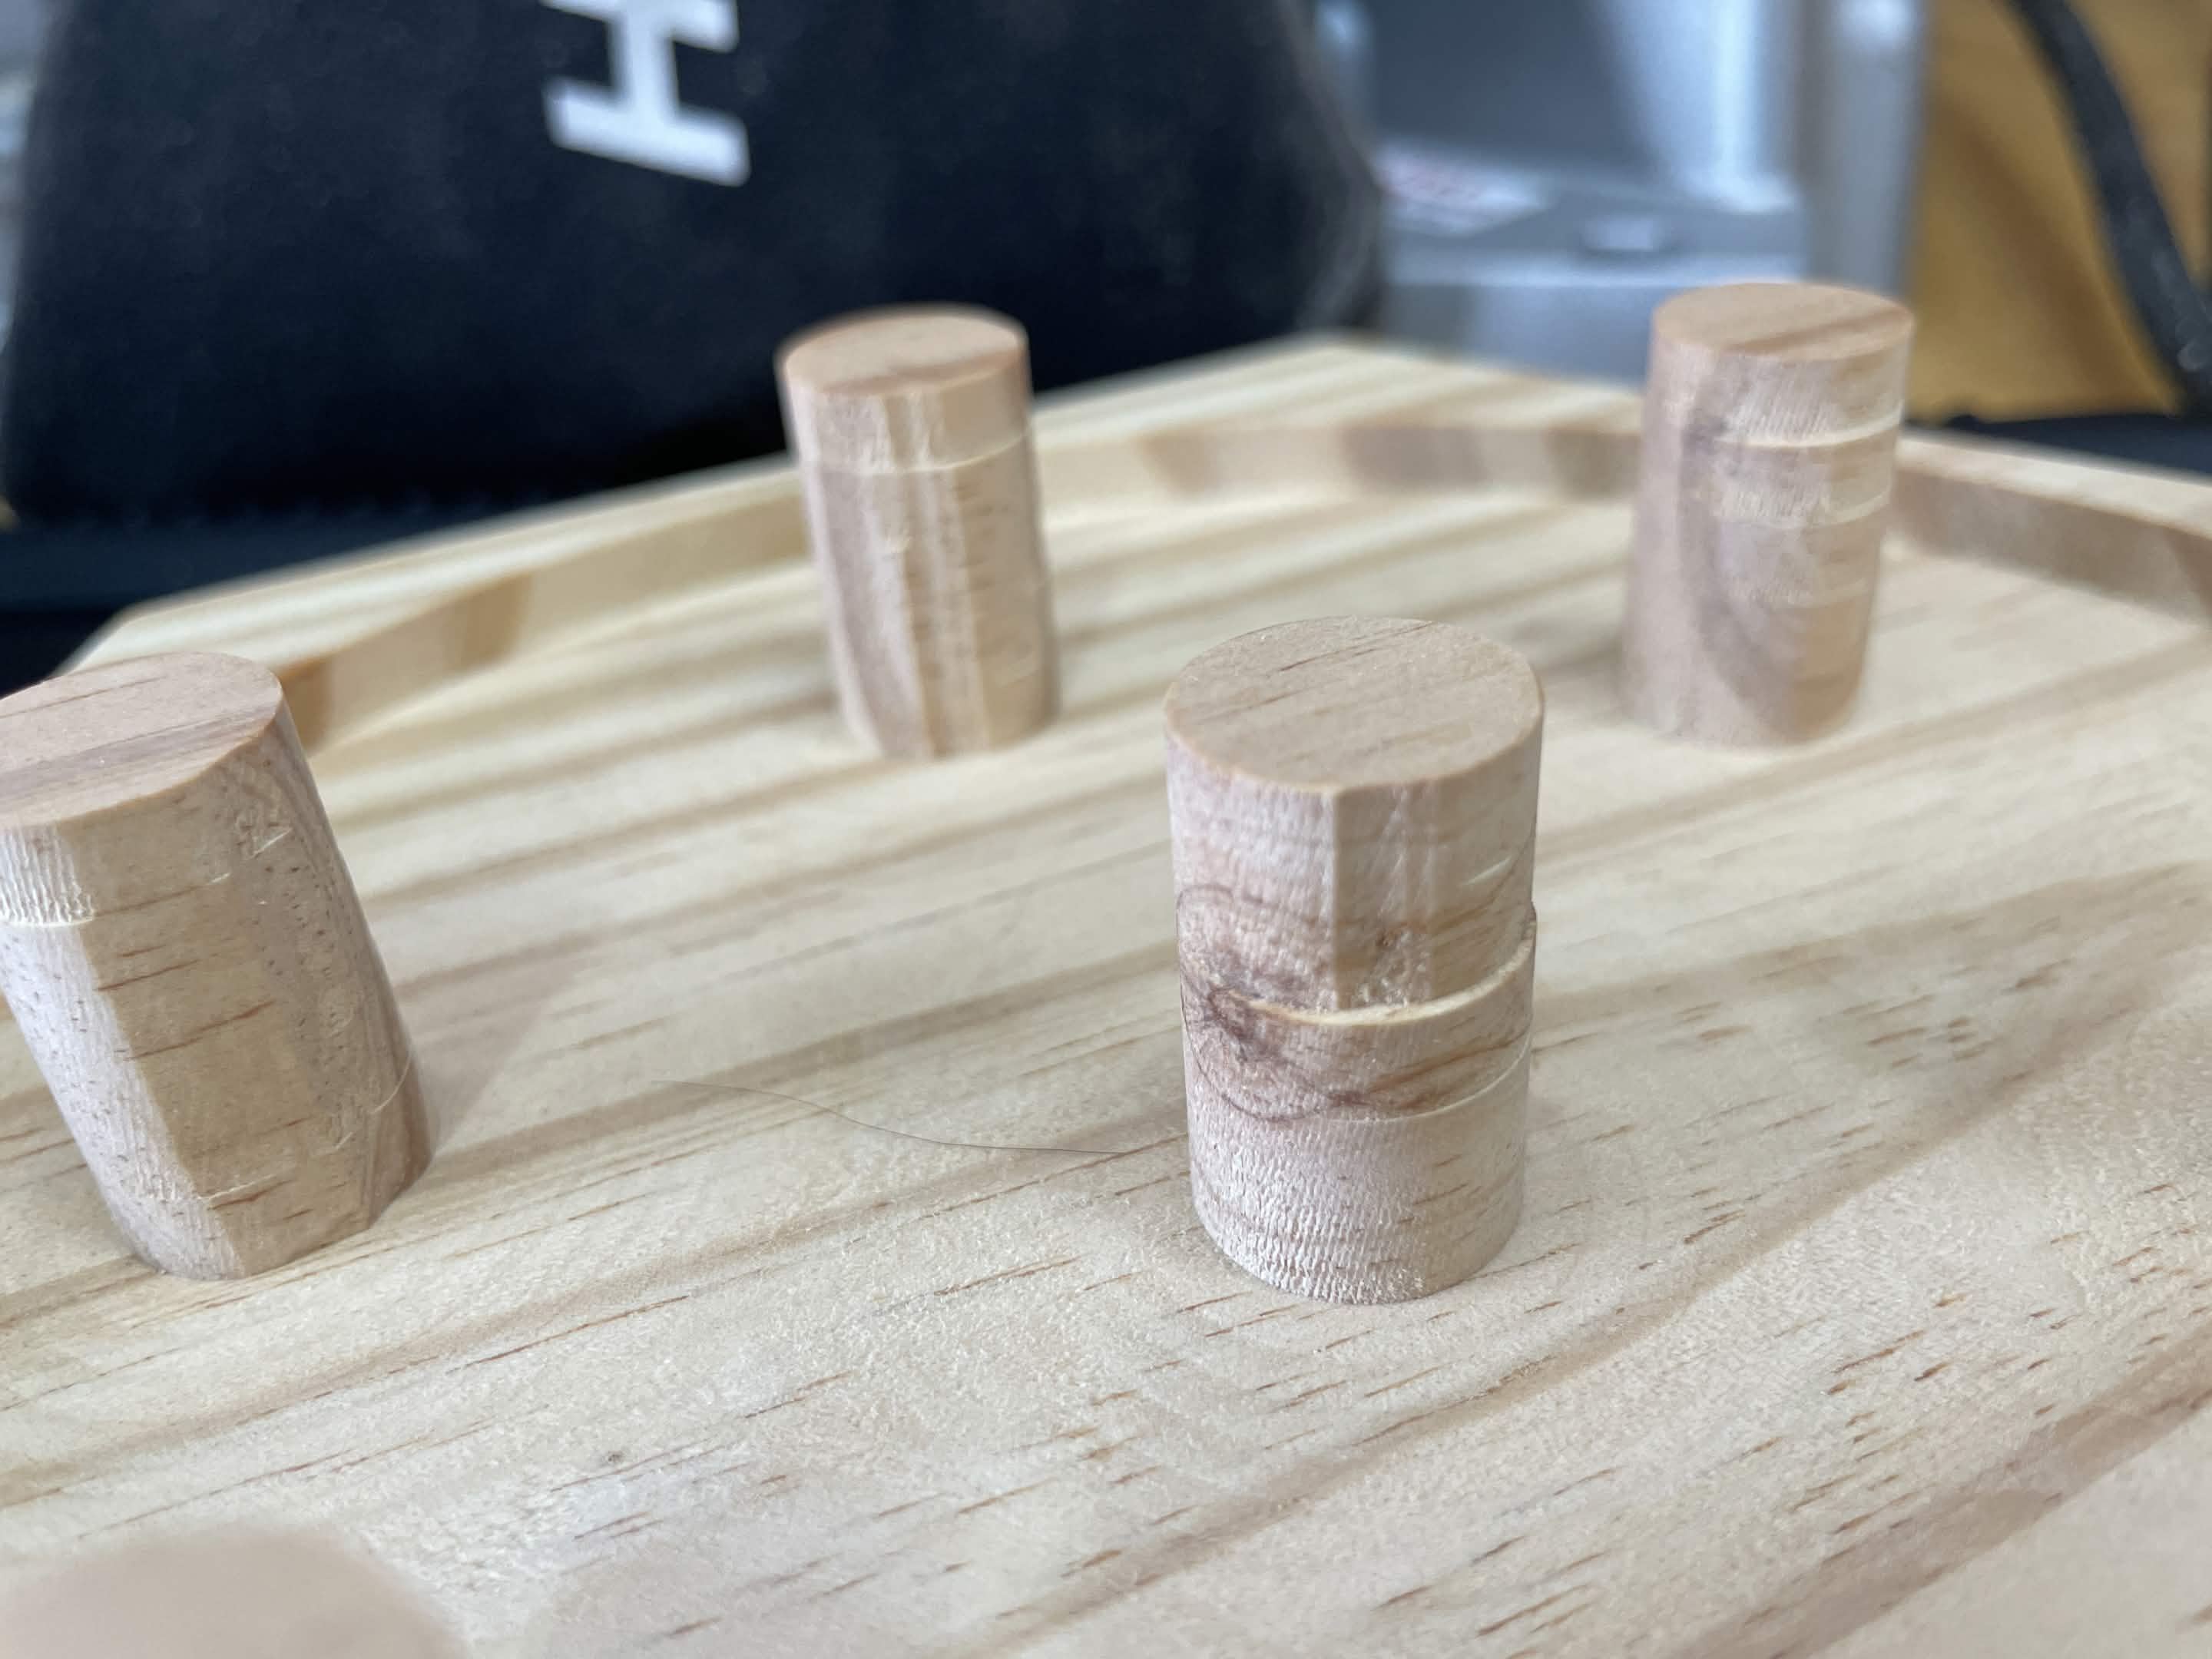
I think these are caused by the deflection of the bit while cutting (you can see certain stripes at the pillars aswell.) It can be lessened by using roughing and finishing toolpaths, stiffer (shorter)bits, or include happy sanding time.
Experiments to try and reduce sanding time are the most fun experiments.
I would be more concerned with the load put onto the wood pillar. I can’t believe that a carbide endmill would deflect that much. What strikes me as odd is that it looks like the sides of the pillars that are turned away do not have that step.
I would try going to 1/8" DOC. Are you climb milling? If so you might want to try conventional milling to see if that makes a difference.
The surface seems quite rough - are you using an upcut, downcut, compression or straight cut bit? Is it relatively new (sharp)? Are you cutting the circumference of the pillar first before clearing the remaining area? I would do an adaptive clearing first followed by a pass to get the pillars to the right size. Lastly, how much of the endmill is sticking out below the collet? The endmill should be inserted into the collet to pretty close to where the flutes start.
BTW, when you leave material from the adaptive clearing, leave only about 0.2 mm and you should be able to do the final cut much deeper.
Late edit: how is the stock held? If there is glue involved it is possible that the stock is moving a bit.
I agree with those suggesting decreasing the DOC. Were you using any ramping in your toolpaths? That can help reduce any deflection you might be getting. On some projects, when I want a really clean cut, I’ll drop my DOC down to around 0.05". That may be a bit overkill, but it gets the job done. If it’s a cut I’ll be doing often, I’ll dial it in by gradually increasing that DOC until the results start to degrade.
Also, you might want to experiment with climb vs. conventional cutting.
Climb cutting
Better finish
More tool engagement
Can highlight backlash or flex issues
Conventional cutting
Slightly rougher finish
More stable / forgiving
Can help mask small mechanical issues
I used to get small bumps or problem spots when cutting circles, but reducing my DOC, adding ramping and lead-ins, and trying both climb and conventional cutting helped clean that up.
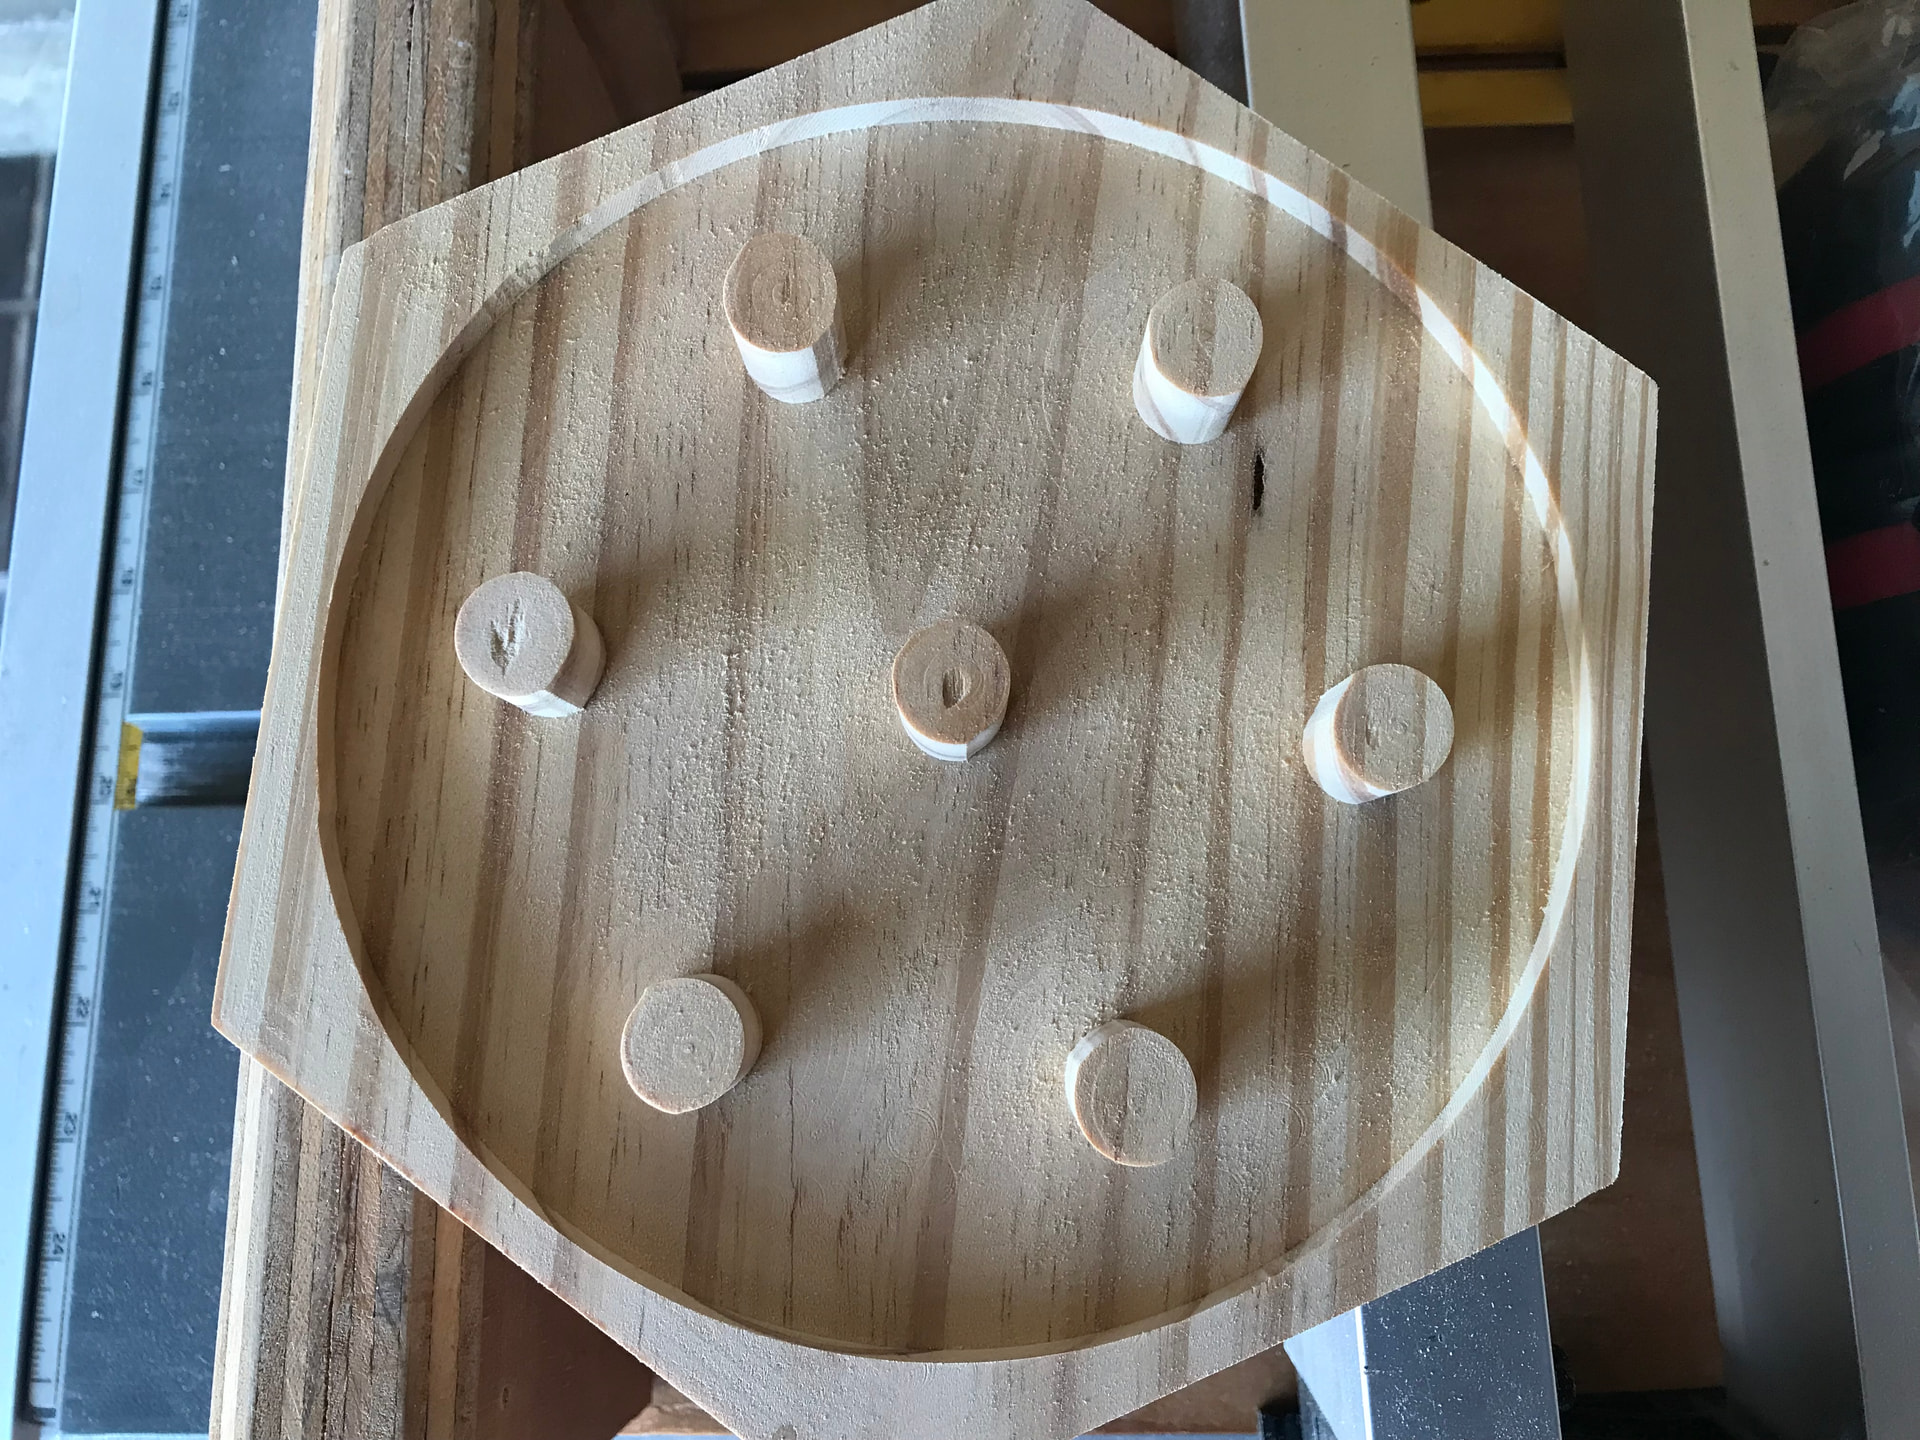
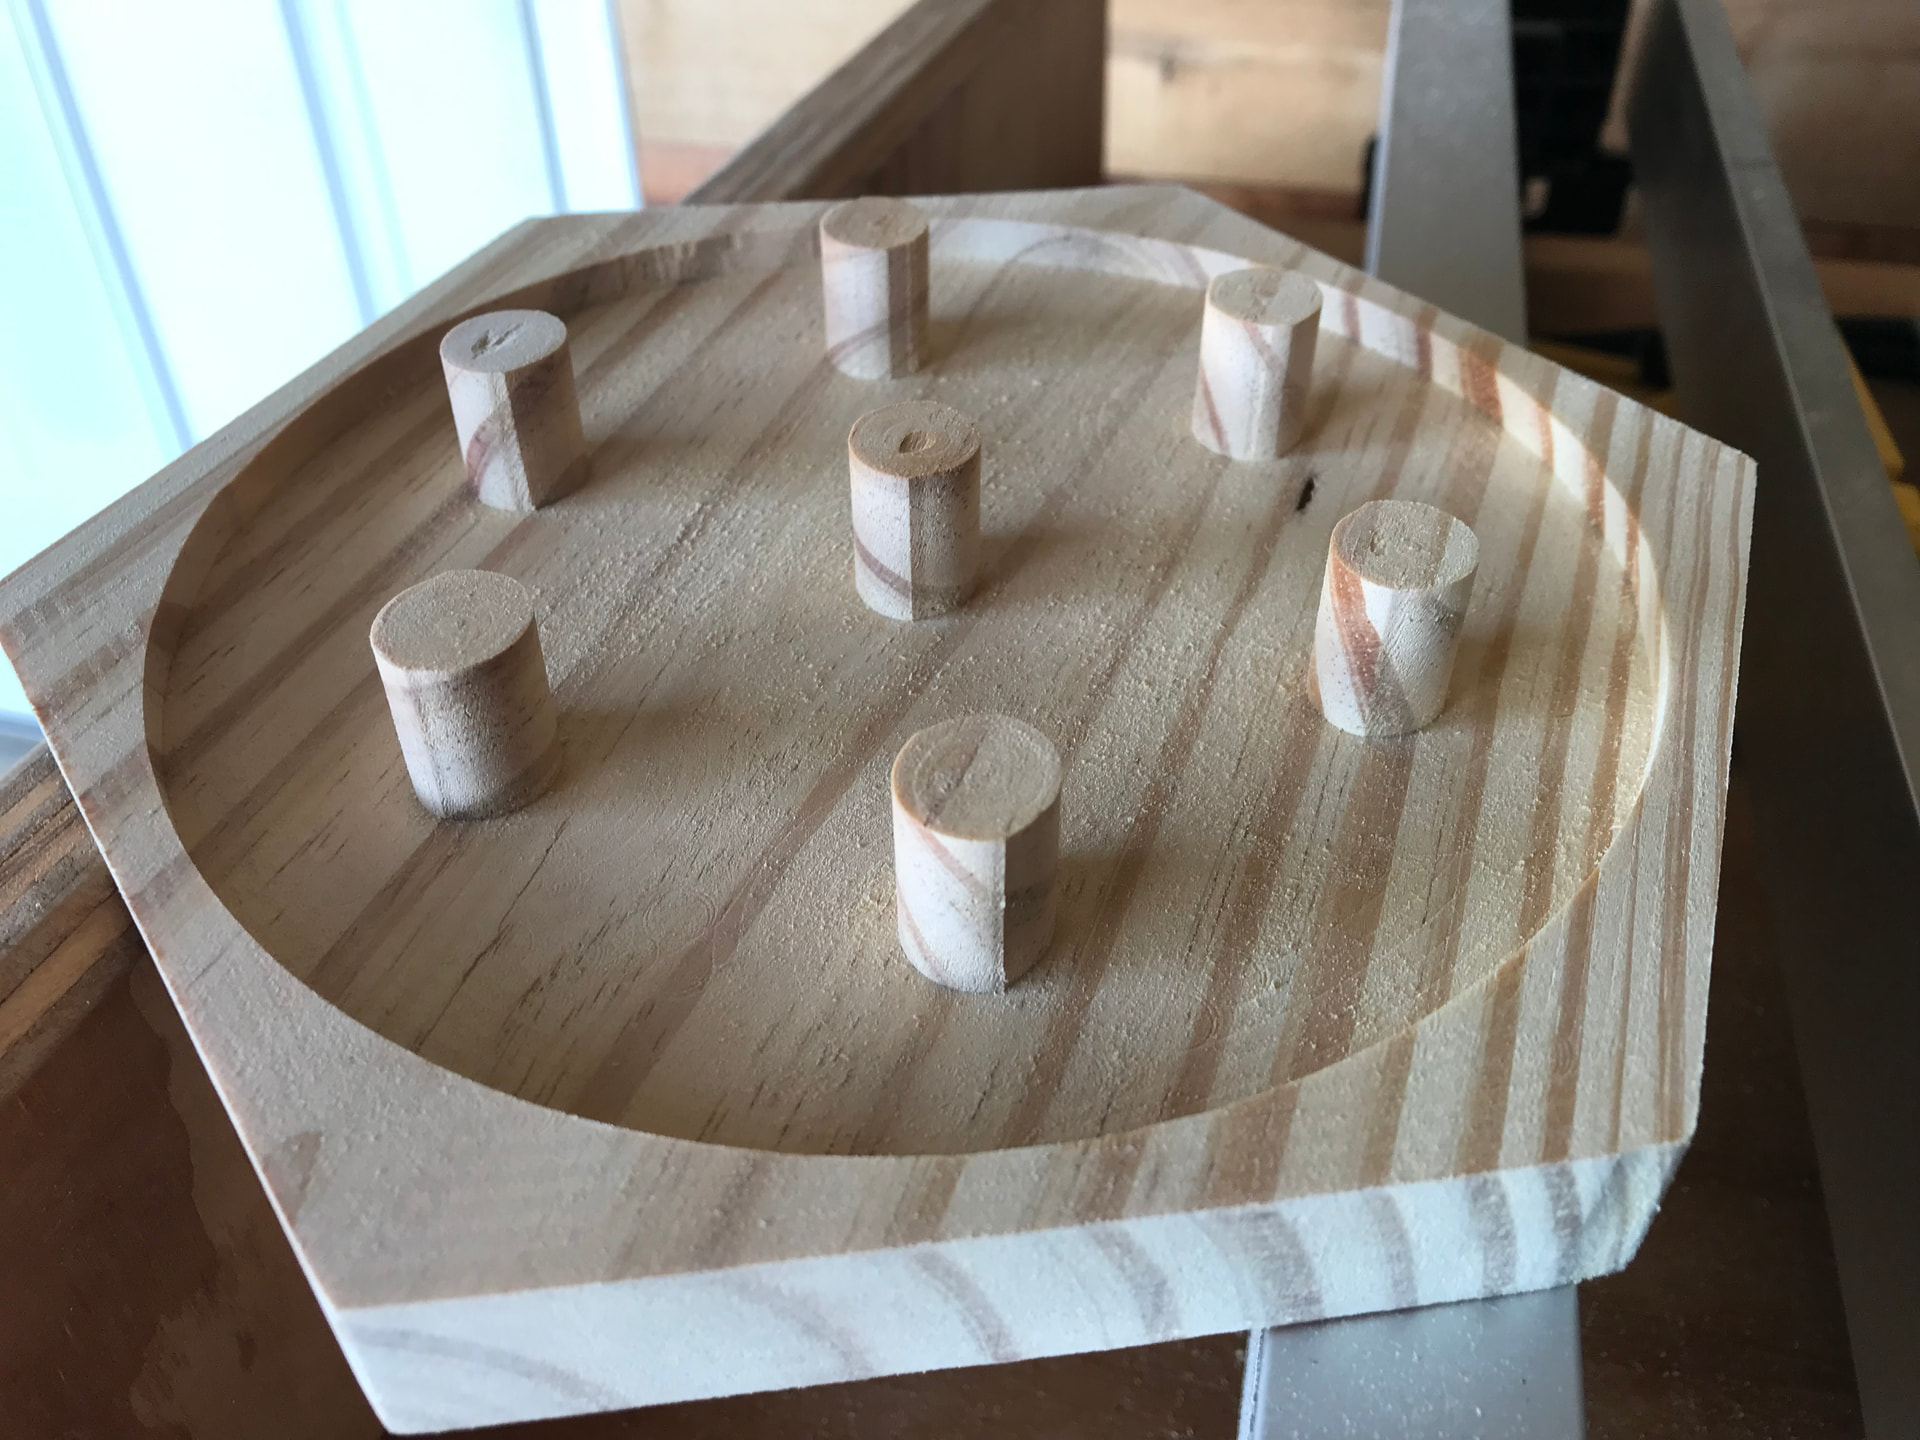
Update: Did as you all suggested and decreased depth of cut to 1/8, no longer seeing severe step marks. I do believe the piece moved slightly on the last attempt causing it to be drastic. I am still seeing slight ovals and vertical lines up the sides of the cylinders. I believe another finishing pass of some sort would fix that issue. Quality of the cuts have definitely visibly improved.
@JaredC48 Another thing to keep in mind when you remove a lot of material. Internal stresses in the wood could cause the work piece to deform as you’re taking away material. Proper hold down methods would help with that.
And yes on the finishing pass. Probably a good idea to do the roughing pass slightly oversized around those cylinders.
The Altmill is capable of doing perfect circles. It all comes down to technique.
Update #2: did some looking online along with some ai tools to narrow down possibilities. Ended up checking the screws on the Y axis Plates holding the X axis up. Turns out the 4 screws on each side attaching the plates to the ballscrew were loose by a noticeable amount. Ive only done a little bit of testing to see if this fixed the circle issues but the results are promising. @KNS id do a sanity check on all of the screws to make sure theyre tight tight. hopefully its a similar case.
@DavidB No loctite. I guess that’s my mistake. That said, my machine is part of the first batch, meaning that’s a lot of time for the screws to vibrate loose, especially given that the right side is less accessible for cursory maintenance checks.
Edit: I stand corrected, the screws had locktite, I just didn’t add any third-party compound.
A lot of the fasteners have a single blue dot on the threads - that is loctite. I don’t know about the particular bolts that we are talking about here.
@Jens Nearly all of my screws had pre-applied loctite as well which is why I was wondering if I’ll need to apply better coating of it at some point especially for those that had to be unscrewed again.
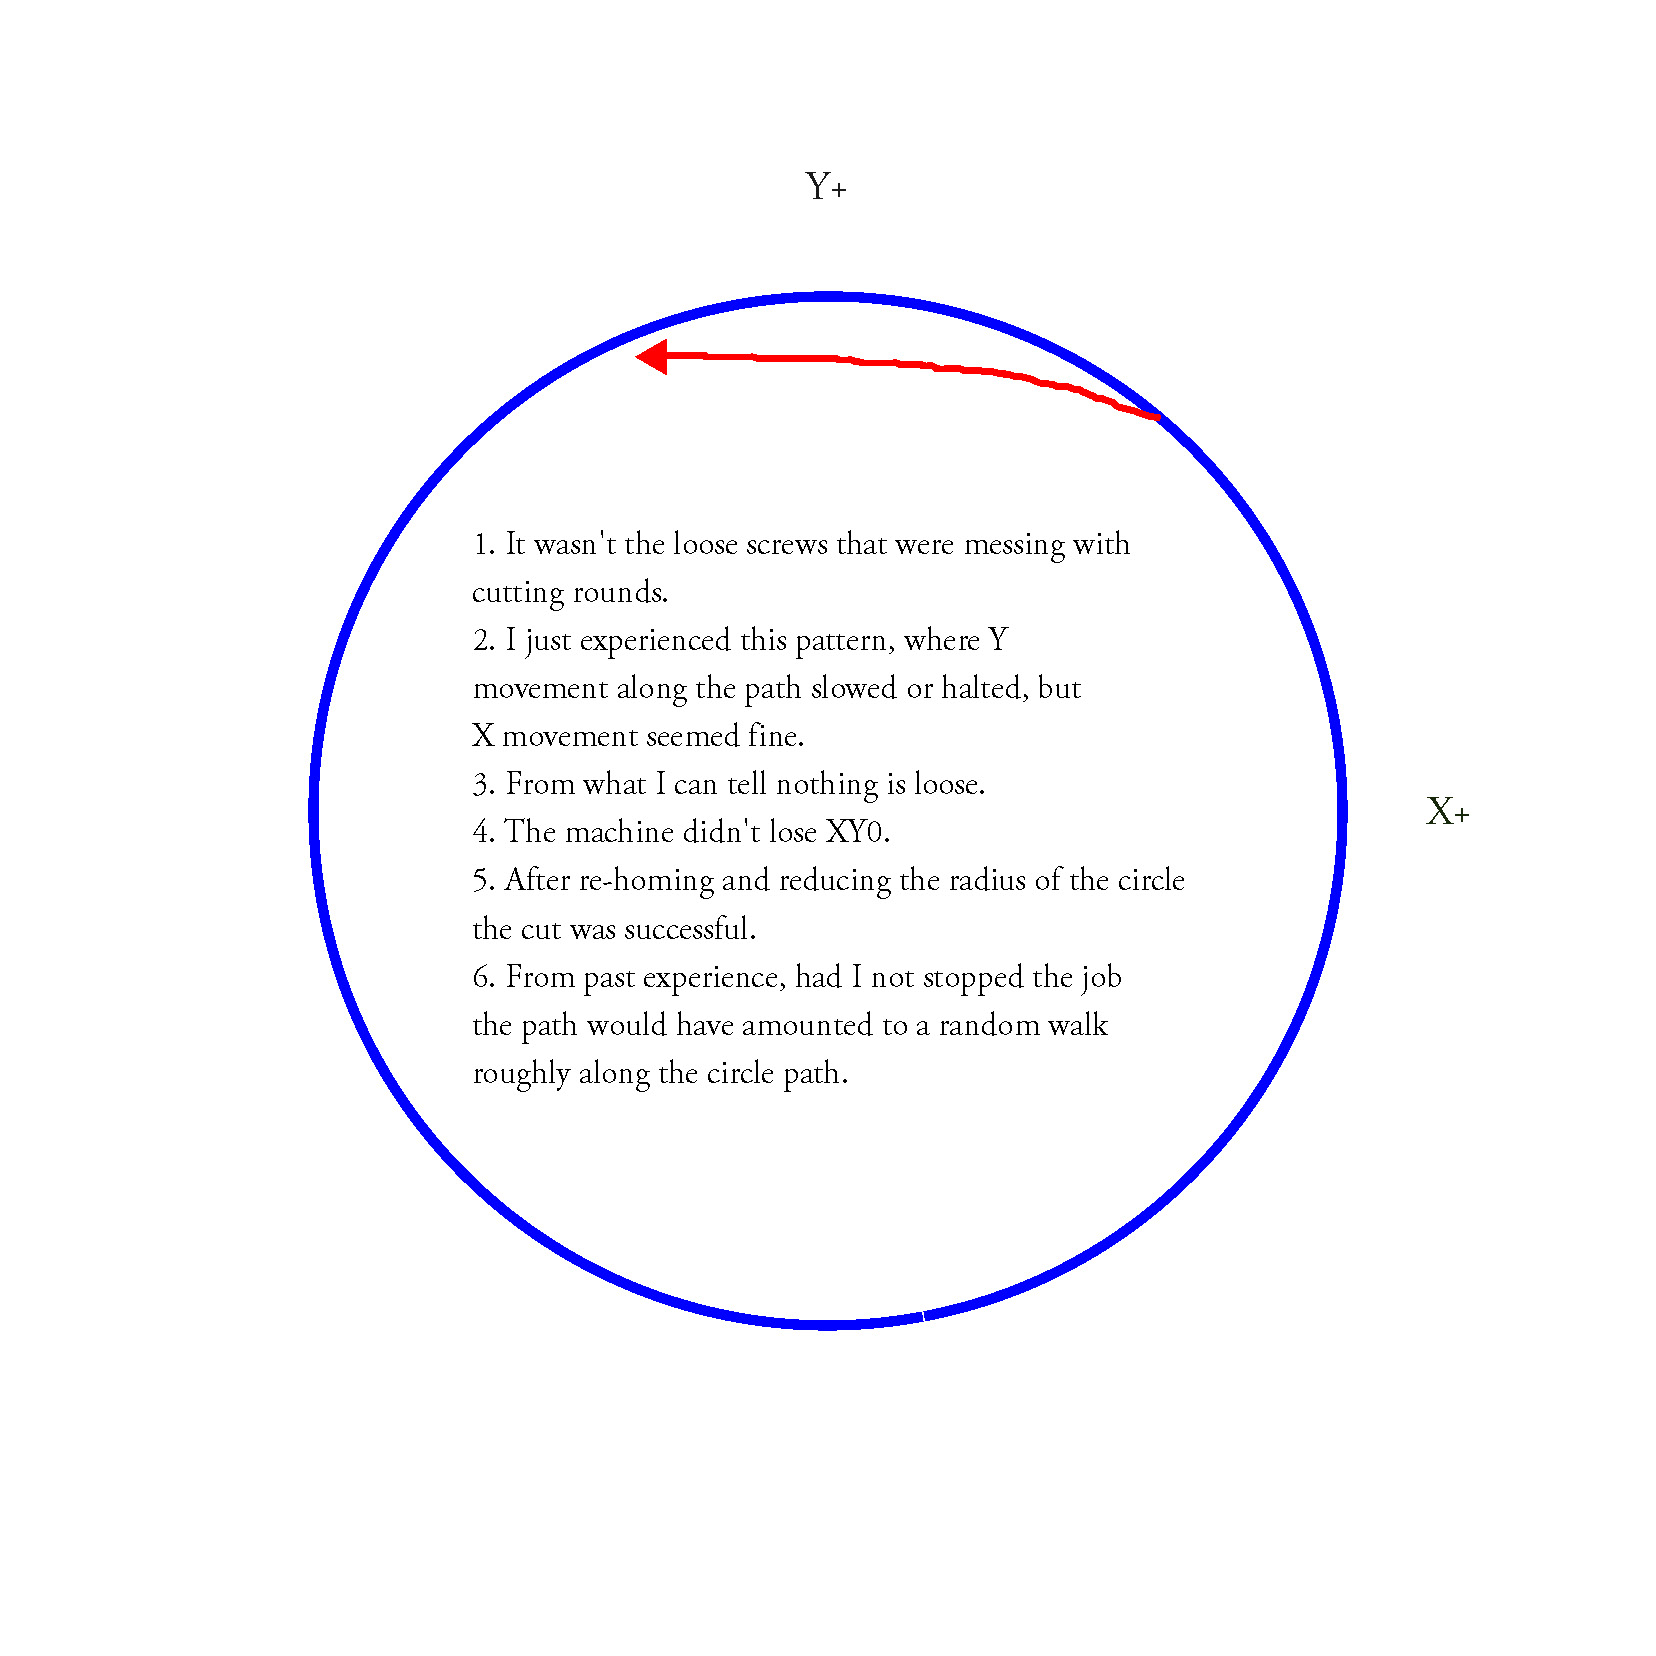
Well, it doesn’t look like the loose screws were the issue in my case. See the attached for the most recent failure while cutting a bevel on a circular model. Right now, I am naively assuming the issue is with the Y motors.