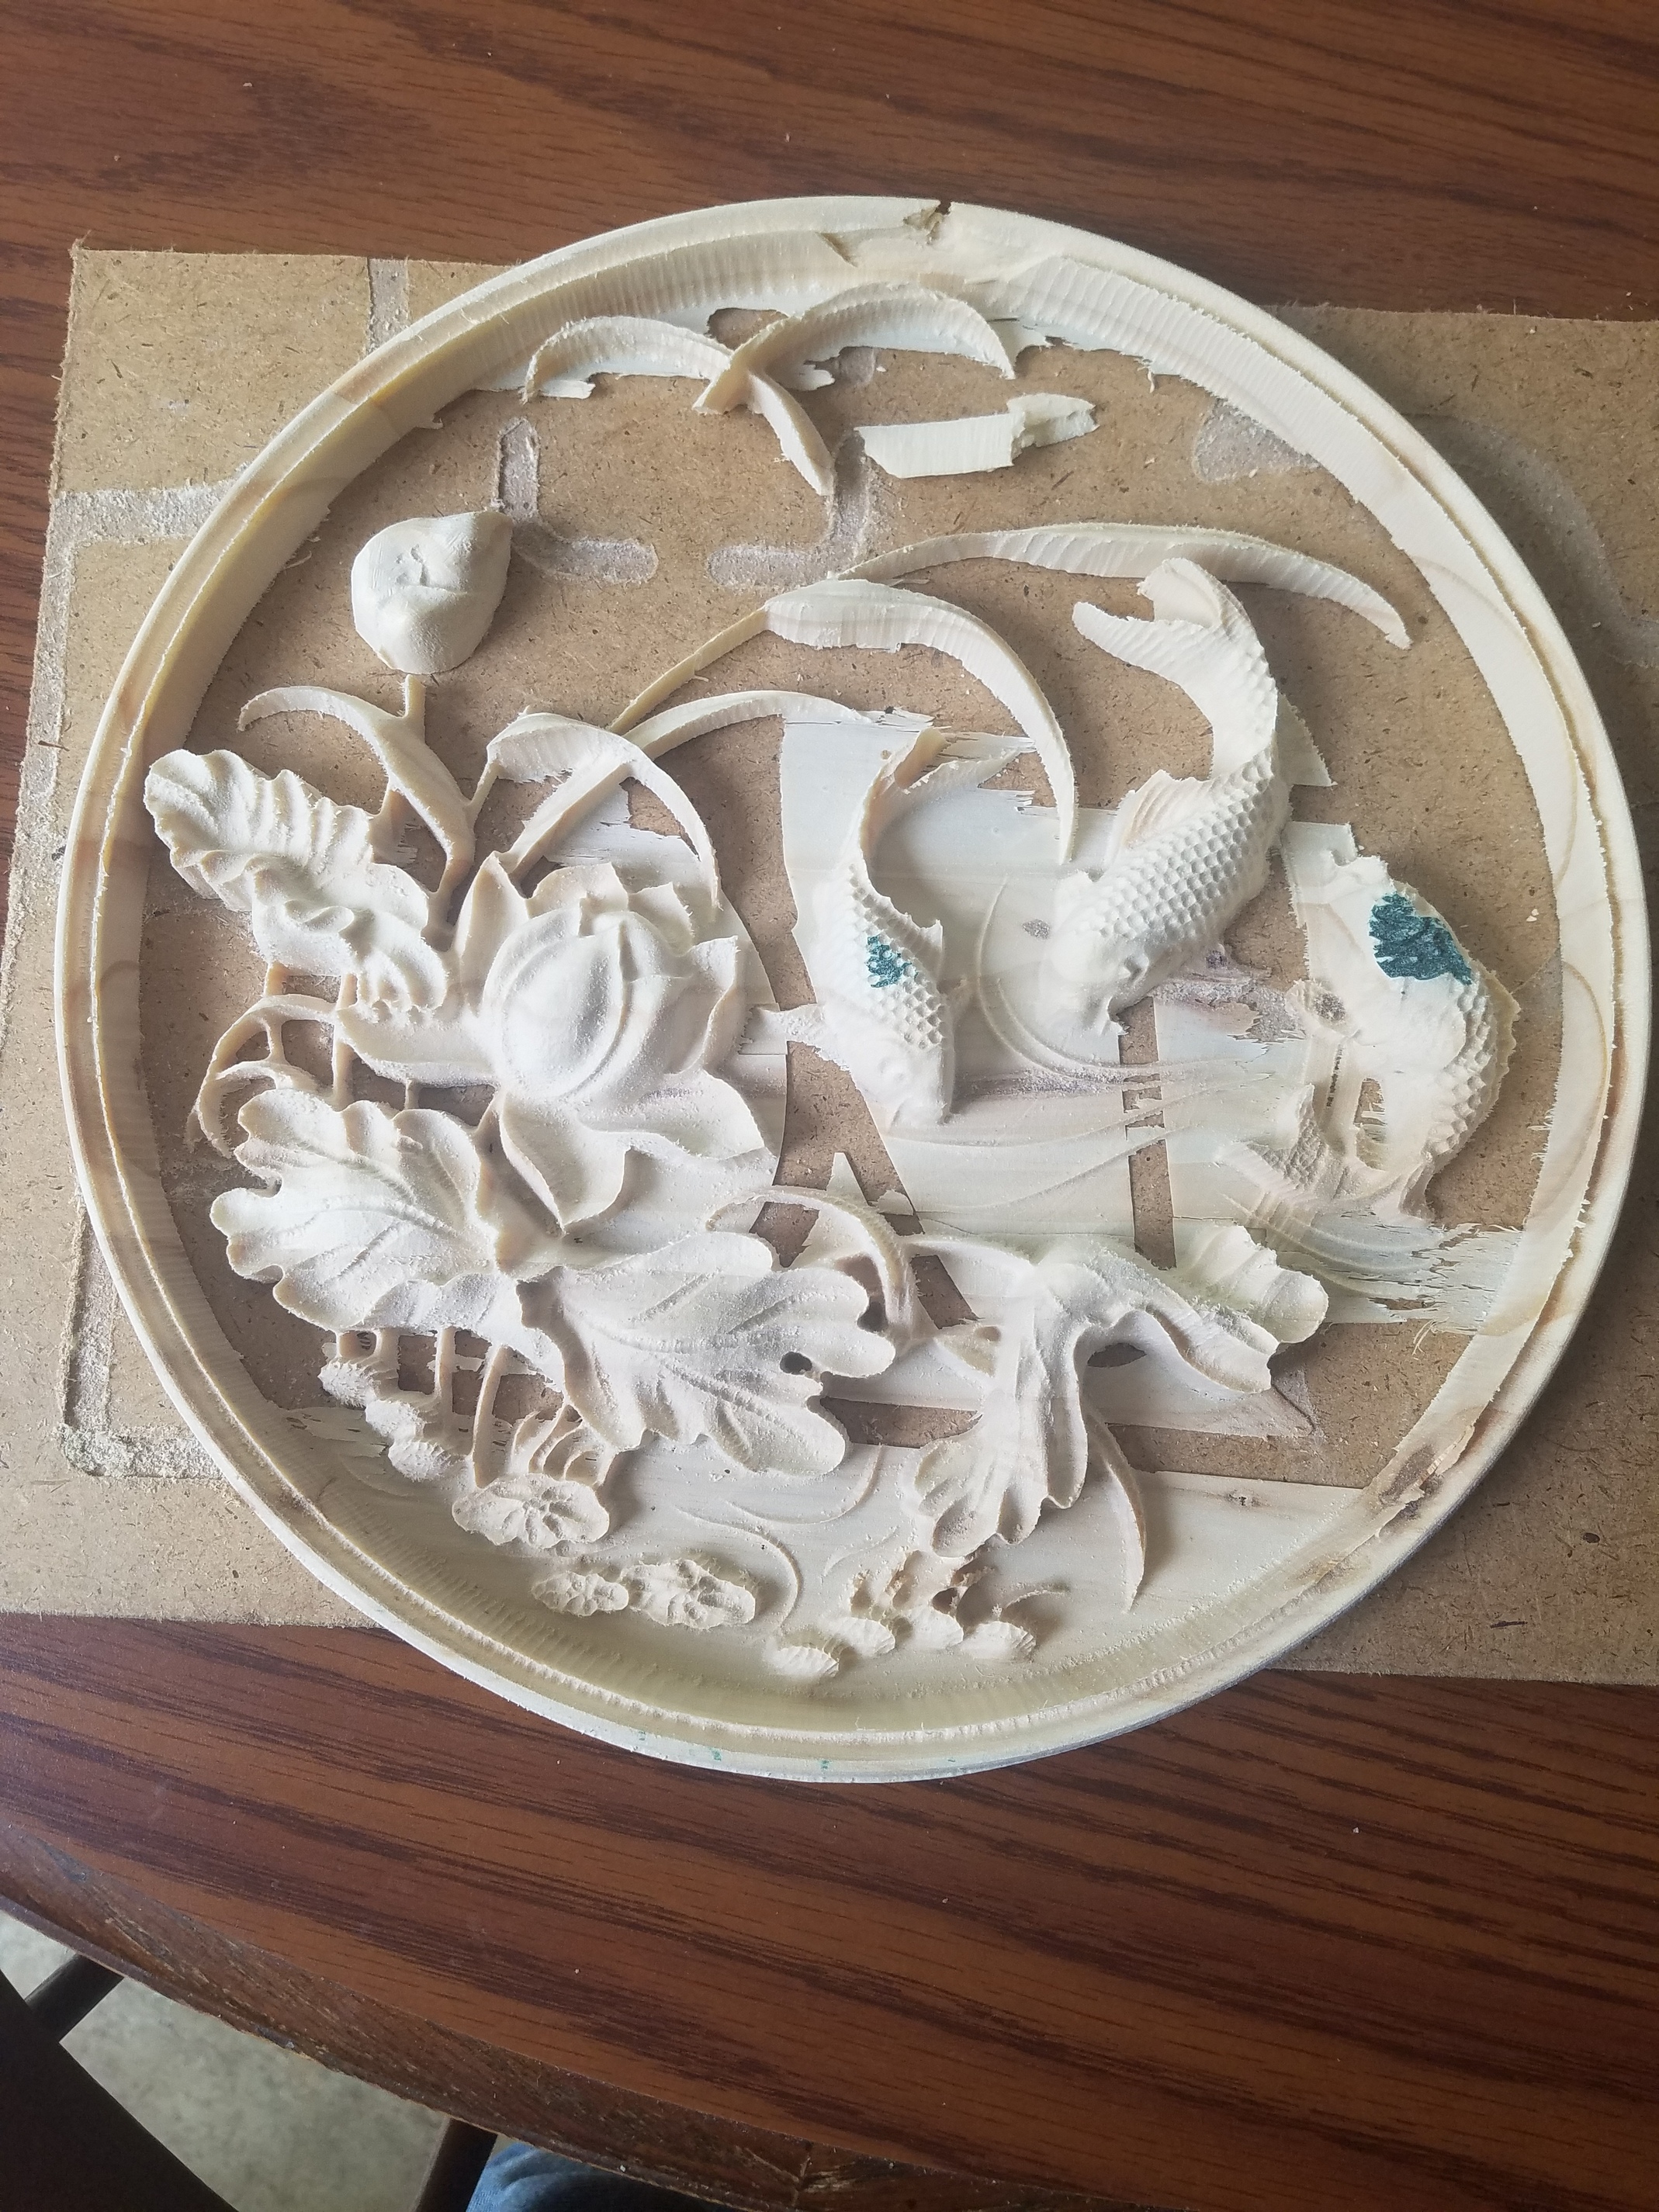
Just in case anybody is interested I have been testing different gcode senders. Some I have discounted because they didn’t work right, were online web programs, too difficult to operate or I just didn’t like them. I narrowed it down to CNCjs. I have been using CNCjs for about 2 weeks now. So far it has not faltered in anything I have tried to do. Jogging is right on with no delays or ignored key taps. Has not failed (except user error) in any way. Yesterday I cut a fairly detailed 12" in diameter 3D project that was very intense. Roughing with a 1/4" end mill took about 1 hour 20 minutes. Finishing with a 1mm tapered ball nose took about 7 hours 30 minutes - 1,407,000 lines of code. No stalls, no hiccups. Except for my lack of knowledge on cut depth it came out very very good. Unfortunately I cut too deep and cut out most of the base which in turn caused a few pieces to break off. I did have to write a few macros for the touch probe. CNCjs has probing but only 1 axis at a time. The macros I wrote were so I could use the touch probe to find X, Y and Z at the same time just like UGS. If anybody is getting fed up with UGS give CNCjs a try. Ignore the green spots. I used a piece of scrap pine that had some paint on it.
I’m just getting my machine up and running and while machining the spoil board today it just stopped about 40% of the way through the file. I know a number of people have had this issue and for some it just mysteriously went away. Could this be an issue with UGS? I was very very careful during assembly to make sure everything moved smoothly and all the connections were secure. I was even going to shield the router cable but my router came with a ferite core on the cable so I didn’t bother. Switching to CNCjs would be fairly easy at this point I assume.
@CRD Claude, it’s pretty much just like UGS. It has some predefined widgets but you can turn on or off depending on whether you want them or not. Connects just like UGS. Loads gcode files, has same type buttons for jogging control. Obviously it doesn’t look exactly the same but it pretty much does the same thing. I do think the visualizer works a little better. You can zoom in and out and pan your object. Switch between mm and inches. It’s more informative than UGS in what it shows. I’m not saying it’s perfect but I like it so far.
@Heyward43 Putting aside the discussion of code senders for a moment, H, that is a heck of a carving. It’s too bad that it went too deep, but the detail, nonetheless, is remarkable. Well done!
@Heyward43 I might give CNCjs a shot. What CAD software are you using for your 3D models?
Thanks Grant. I am still trying to salvage it. I spent a couple of hours yesterday cutting out the paper thin left over wood. I’m going to glue the pieces on a backing board and get my daughters artist friend to make some recommendations on acrylic paint and/or fill. I finally figured out how to correct my mistakes in vcarve pro so going to try again soon.
@Jammer. Jeff, I use VCarve Pro and pull in .STL files. Give CNCjs a shot. You might like it better.
Heyward, I’ve been using cncjs too, not because I dislike UGS, or because it hosed me, but cncjs is a nice clean layout - although I keep losing the buttons to zero the axes - and as you said it works very well. It also has a cool function for autolevelling that I’m starting to test with a homemade depth probe. And by the way, cncjs does do 3-axis zero setting with both flat and holed touch plates, can set initial and additional tool zeros, and can re-zero like the bitsetter in Carbide3D’s Carbide Motion. See here for the macros - https://github.com/cncjs/CNCjs-Macros
Thanks Bill. I was beginning to think I was the only longmiller running CNCjs. I originally copied the probing commands from the UGS console after running the XYZ probe and used them for the CNCjs macro. Then I found the page you sent. So I incorrectly stated I created the macros, my mistake. I did use those and made 3 versions. One each for 1/16, 1/8 and 1/4 bit sizes so I don’t have to modify the macros bit diameter each time I switch bits. I was referring to the probe widget that appears to only probe one axis at a time when I said no XYZ probing. I do use the probe widget for resetting Z when switching bits midstream. I like the visualizer showing you the object view where it’s sitting in relation to the material. UGS just shows the object sizes. And being able to view from different angles. I know UGS has panning but it’s not the same. Please correct me if I’m misstating anything since I’ve only been using CNCjs for a short time.
That is a beautiful carving. I would love to make something like that. I am new to this and researching the UGS versus CNCjs and would like to know where is UGS not working? I would just as soon go straight to the best software to use versus running into a limitation if there is a cure already known. What hardware are you using, or does this make a difference? I am planning on a Rasberry Pi 3 B+. I ordered a Longmill but probably still a month away from receiving it.
@nuc_65 - Thanks, even though I cut too deep I am going to try to salvage it. You can make things like this too. Just get a little experience under your belt doing 2d/2.5d first. Makes it easier to advance to 3d. As for the gcode senders, I started off with UGS but due to some buggy issues with the release I was using I decided to try CNCjs. So far it has worked out great for me. I do know there is a newer version of UGS out now that has corrected some or all of the issues it had when I started using it. But I had already switched to CNCjs and didn’t want to keep jumping back and forth. I run Windows 10 on a small Lenovo desktop computer. I don’t think it really makes a difference as long as the computer you are using is supported and has USB ports. Both UGS and CNCjs will run on the RPi I do believe. Search on this forum for Rasberry and you’ll find more information. Happy cutting!
I loaded and opened CNCjs on a rasberry pi so it looks ok so far. No experience and no machine but having fun learning.
@nuc_65 - I thought it would. If you have a spare arduino uno you can set it up with some flashing lights so you can test some of your gcode. Lights don’t really tell you so much but just interesting to watch. Of course you can see what’s going on with CNCjs visualizer. Go to the sienci web site and download and install the grbl code that will match your longmill. I think the instructions for wiring the arduino uno are somewhere on this forum or if not on the facebook group page. It helped me understand CNCjs much better before my longmill arrived. I’ll see if I can round up the wiring diagram.
I found the original post by Bill Korn called “Getting ready for your new LongMill” in the General Banter category. No diagrams but written instructions for wiring up the arduino.
I finally finished setting up the Longmill, but in CNCjs when I set home position G28.3 x0 y0 z0 I get error unsupported command. Do you by any chance have any ideas?
I believe that is not supported by GRBL. Do a google search on G28.3 x0 y0 z0 for explanations.
Is it not supported or just disabled when you don’t have homing enabled? I would think that if you added homing switches this would need to work so the homing cycle would be able to set zero.
As I don’t currently have homing switches on my cnc I am not sure if you are correct or not. It sounds reasonable though. You can try turning on homing and see if you can test it. I plan on adding them in the future as I would like to use the work coordinate system for positioning repeatable work projects. Keep us posted if you try it please.
I answered the question in regards to homing but now I started a small project and a new issue. I get a server has stopped responding error. This has happened numerous times. I’ve tried rearranging power and signal cables but not change the error cropped up at different points. Google says this may not be a CNCjs error but an issue with the firmware on the Arduino. Not sure but I’m going to read some more tonight.
@Heyward43
Just getting my Longmill 30x30 setup and for our use case the CNCjs running on a RPi 3B interfacing with a laptop seems the best.
Do you have your macros saved somewhere like github that you are willing to share?
Any other advice?
Thank you.
@blats - Brent, the only macros I have set up are the XYZ touch probe ones. CNCjs does have a probe gadget but only probes one axis at a time so I copied the 3-way macros off of github and set up 3 of them. I have one setup for 3 different bit shank sizes, 1/16, 1/8 and 1/4 inch. The parameter is specified in millimeters so mine are equivalent in inches. Just copy the below text and add a new macro in your CNCjs. Then change the %endmill_diameter parameter as needed. I have already changed the XYZ for the Sienci probe. Be sure to execute a “Return To Zero” after removing the touch probe.
(start with the end mill 15mm ABOVE the plate, about 15mm or less from bottom left corner.)
; Set user-defined variables
%ENDMILL_DIAMETER = 3.175 ;in millimeters
; 1.5875mm = 1/16"
; 3.175mm = 1/8"
; 6.35mm = 1/4"
%PROBE_BLOCK_Z = 15;Thickness of 3-axis probe in Z direction
%PROBE_BLOCK_Y = 10 ;Thickness of 3-axis probe in Y direction
%PROBE_BLOCK_X = 10 ;Thickness of 3-axis probe in X direction
G21 ;make sure we’re in mm
G91 ;Incremental mode
G38.2 Z-25 F75 ;Probe Z
G0 Z2 ;lift 2mm
G38.2 Z-25 F45 ;Probe Z
G4 P0.1
G10 L20 P1 Z[PROBE_BLOCK_Z] ;Set Current Z as plate thickness
G4 P0.1
G0 Z3 ;lift Z 3mm
G0 X-25 ;Move left 25mm
G0 Z-10 ;Move down 10mm, should be 7mm below probe surface
G38.2 X25 F75 ;Probe X to the right 25mm
G0 X-2
G38.2 X25 F45 ;Probe X to the right 25mm
G4 P0.1
G10 L20 P1 X[-ENDMILL_DIAMETER/2 -PROBE_BLOCK_X] ;Set current X location as negative half the bit diameter
G4 P0.1
G0 X-10 ;Move left 10mm
G0 Y-25 ;Move forward 25mm
G90 G0 X5 ;Move to X5 (absolute) - will put you 5mm to the right of left edge of stock
G91 ;incremental
G38.2 Y25 F75 ;Probe Y
G0 Y-2
G38.2 Y25 F45 ;Probe Y
G4 P0.1
G10 L20 P1 Y[-ENDMILL_DIAMETER/2 -PROBE_BLOCK_Y] ;Set current Y location as negative half the bit diameter - 7mm thickness
G4 P0.1
G0 Y-10 ;Move Y-10
G0 Z10 ;Move Z up 10mm, should be 3mm above probe plate
G90
G0 X0Y0 ;Go to X0Y0