Won’t go too far into the weeds hopefully. But from our end as a shipper… All the “ground” services state that they don’t have brokerage included. The “express” services (FedEx Econ/Pri/First, UPS Worldwide Express/Express Plus/Express Saver/Expedited) all have brokerage included.
USPS from our side depends on where you’re shipping from if you can trust it. Last few times we gave them a chance, all with tracked packages, they lost about 5% of all outgoing. Not really workable. Plus with as much as they increased their pricing didn’t make much sense for us anyway.
I don’t know the details on it. But I remember that Canada also passed a law saying that the carriers had to give you the right to self-clear. I believe you have to contact the carrier with the tracking but that’s all I really remember.
You are correct that Canadians have the legal right (good thing I am NOT a lawyer) to self-clear an item shipped from US. The process is: one must cross the border into USA, pick up the package, drive back into Canada, declaring package, of course.
I have done it twice, to pick up items my daughter ordered for her baby - anything for my grandchild. In my specific situation, border is one hour (50 miles) away, then, when asked by US Border and Customs Protection how long I will be staying in the US, I have to keep a straight face and say “about 15 minutes - enough time to go to UPS store and pick up pkg”. After paying bridge toll and paying UPS pickup fee (about $10-20), I then have to drive back to Canada, bridge toll again, and when asked by Canada Border Services Agency how long I have been in the US, again, with a straight face, must tell them “about 15 minutes - enough time to go to UPS store and pick up pkg”. They then ask for item description and value, and depending on their discretion, I may have to go into their office and pay GST, and duties. I will leave it up to you to decide if you think this is a worthwhile undertaking.
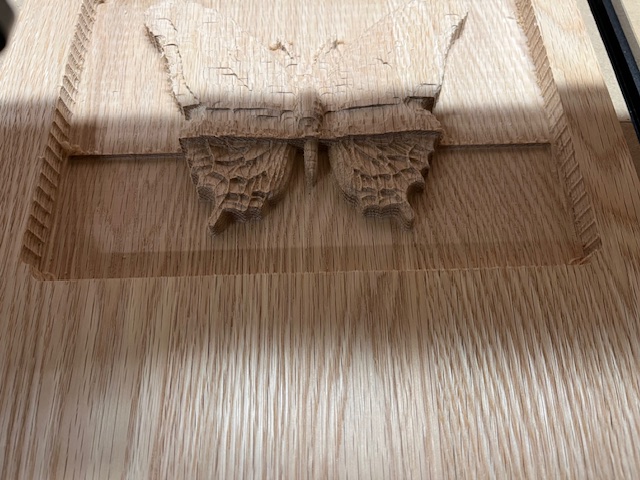
Received new Makita router from Sienci (cannot say enough about their support). Also new collet/nut, of course, and bought a new cutter (same 1/4” tapered BN). Set up same butterfly job, in same material. Roughing no problem. Finishing, same issue as before.
Cutter rated at 150 ipm. I started at 130, and when I saw the cut deepening, I backed off to 100, however, no visible improvement. Cutter rated at 0.7” max DOC - my model under 0.5”. Stopped job part way through and verified slipping cutter when XYZ back to zeros. Am contemplating next steps - probably will try to restart job at about 1/4” DOC to skim off the top of the model as a first pass, and then second pass at prescribed depth. All when I have the time/inclination. Comments/suggestions most welcome.
@Retiree You cannot run a 1/4” tapered ball nose in the Makita router. For the tapered ball nose to be 1/4” at the tip, it would have to have a shank size larger than the Makita can handle.
I suspect that you are running a 1/16” TBN, most of which have shank size of 1/4”. If that is the case, I don’t know where you are getting those “rated” values. A small tipped TBN is a finishing mill. Running it with a depth of cut of 1/2” is, IMHO, ill-advised. I suspect that is why you are having your continued problems.
Let me provide more information: I am using the Sienci 1/4” D1/16”, Tapered Ball Nose End Mill for finishing a 2.5D model of a butterfly. Feeds, Speeds from Sienci Web site, for hardwood for that mill. Roughing the model is at 0.4598” max depth. Finishing at 0.4998, and there is no slippage on the “flat” part of the project. The model protrudes from the base by a bit less that .5”, but I am using this dimension as approximate. The slipping starts when the mill encounters the (less that .5”) sidewall of the model. At that instant, as the mill moves vertically, I believe the engagement of the mill is pretty close to 0.5” with the wood, but I stand to be corrected. I believe it was you, in the early stages of this post, who suggested that since the mill is upcut, cutting puts pressure on the mill to pull it out of the collet, and the evidence seems to support this. Someone else suggested several passes, so I am thinking about setting the Z “0”, at about 1/4” above the actual material.
@Retiree Understood - I think. What is the stepover value for the 1/16” end mill when it is doing the finishing toolpath?
I was one of those suggesting more than one pass. However, setting the Z0 the way that you suggest is not the way to go. As I said previously, in VCarve, you cannot have more than one finishing pass, but you can have more than one roughing pass. Also, you can set a depth of cut on the end mills doing the roughing passes so that roughing is done in more than one pass. Finishing is ALWAYS done in one pass. The depth of cut in the tool database for the mill that is used for the finishing toolpath is ignored.
So you can do a roughing pass with a comparatively larger mill, then do another with a comparatively smaller end mill. Then you do one finishing pass with the TBN.
Thanks for comments and questions. I am using 7% SO.
Understand that VCarve cannot program more than one finishing path, but I believe I can run the same finishing program, say twice, but at different depths, by setting the mill above the wood, and setting this as Z “0”. My thinking is that this will reduce the vertical contact area for the TBN. Not saying I like this approach, but trying to think of options. Also very time-consuming, of course.
Have you seen the Sienci video using that TBN? IMO, they are doing far more aggressive cutting than I am, but it is in marine plywood.
In my situation, I used a 1/4” roughing mill, set at 0.3” DOC, so it took 2 passes to reach the depth. Understand comment about using finer bits for roughing, however, this will not solve the problem, IMO. Roughing cuts leave vertical edges on my model, near as I can tell. The TBN is tapered, and is programmed to cut inside the roughing cut, so I think it will still have to engage about .5” of wood vertically, even if momentarily on each pass of the raster. I agree that finer roughing cuts will result in less material removal for the TBN. Am OK with doing some experimentation, however, need reliable cutting - have more projects I want to get at.
@Retiree are you sure it’s the bit that’s pulling out of the collet and not the wood piece moving up?
Did you measure how much the bit extends out of the collet before and after the cut? A mark on the shank done with a Sharpie could also give you an indication of slippage instead of measuring.
Wood piece not moving up. Sharpie mark a good approach, however, I watch the edge of the roughing cut vs finishing cut as it is finish cutting. Verification of slippage is returning to all “0”, and instead of the TBN sitting just touching the wood surface (paper method), the mill goes into the material. Today, after I stopped the job at about the 1/3 mark, the mill cut about 1/8” deep into the material at the Z “0” position.
@Retiree I think it’s best that we simply agree to disagree. With luck, someone will come up with a solution. FWIW, I do not believe that your problem is the router.
@Retiree that doesn’t mean that the TBN is slipping. The tip of the TBN might be at zero but the wood piece could have moved up, you stepper could have lost a step or two (for a Long Mill), the gantry or table may have flexed, etc.
Only way to determine if you have bit slippage is to measure the bit extension before and after a cut.
@Retiree Questions: Are you using the modelling toolpaths to cut the outline of the butterfly? Are those outside “walls” the deep cuts that you are talking about?
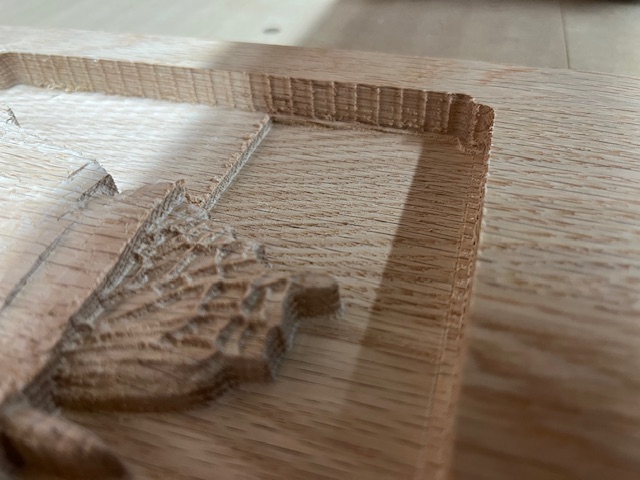
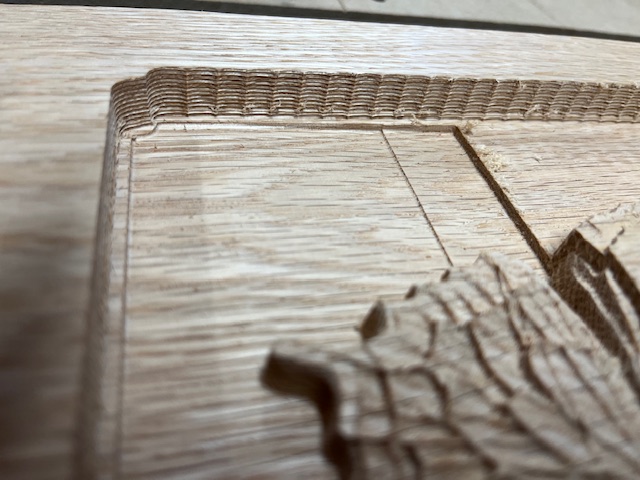
Pics best. STL file. Boundary of cuts from inside vector. Outer edges of wing and inner body are the 1/2” “walls” I was referring to. Side pic where can see the deepening of the finishing cut once body of butterfly is contacted.
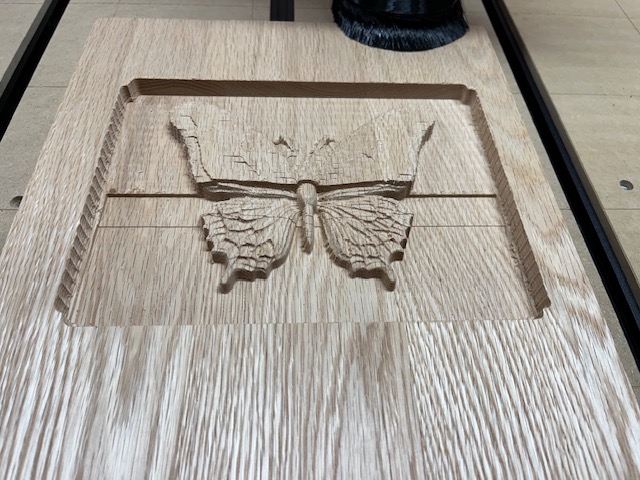
After the above, ran a 1/8” roughing mill, and as expected, far more detail than the 1/4” mill, especially in the tight spaces such as the antennae, however, the vertical “walls” of the model did not change.
Thanks, Grant. Glad the pic’s helped. I still need a practical solution, he said, hopefully…
My plan:
try the next inch or so of finish cut with the TBN now that I have completed the 1/8” roughing mill cut (0.02” machining allowance as opposed to 0.04” allowance for 1/4” mill). I do not expect a difference, however, since the workpiece is already ruined, might as well try it.
try two passes with TBN, first at half depth and then at full depth
My analysis (yes, I am an engineer), is that the Makita collet hold is not strong enough for the downforce developed by the TBN with the type of cuts I am doing, so objective is reduce the downforce by halving the DOC. More experimentation…
I am perplexed that I seem to be the only person encountering this issue. Have requested a chat with a knowledgeable person at Sienci.
The picture in post 11: Cutter slipping from collet - #11 by Retiree , who did that? It shows a similar bevel of the bottom plane. Could it be the model you are using? How much slippage did your Sharpie test indicate (although a measurement would have been more accurate) ?