I was running a job this evening when my laptop crashed after a minute or two of carving. When I rebooted laptop it kept the zero positions, but I accidentally hit Zero Y instead of go to zero.
Is there anyway to find the zero positions of the last job run? I’m hoping I didn’t ruin this board.
@nearingc Welcome back, although clearly it could have been under better circumstances.
I don’t believe there is any way to retrieve the previous Y0. How did you set it? If you used the touch plate, you can simply reset it using the touch plate and start the program from the beginning.
Thanks for the replies. I didn’t think I could, but it’s a nice piece of live edge I’d like to salvage. I did mark the zero with pencil, so I’ll try to line it up as much as I can.
@nearingc@saskia@CrookedWoodTex There is a sort of “do over” that you can use in gSender. This will not undo your current problem, but will help in the future until, maybe, some kind of undo can be built into gS.
I am assuming that you are working in the default workspace - G54 - in gS. If not, you can just change my numbers to whatever you are using.
After you set all your zeros in G54, select G55 and set them again without moving your Mill in any axis.
Return to G54 and run your program.
If, while in G54, you goof and reset a 0 when you wanted to return to that 0, simply select G55 and return that axis/those axes to 0. Don’t click on set 0 again. Click on go to 0. Your original zeroes will be retained in G55 regardless of what you did in G54.
Now that your Mill is back to where you want it to be, re-select G54 and set your zeroes there again.
Nice. haven’t played with workspaces, but setting a zero is sort of defining a new workspace. saving a last zeroing to the bottom of the workspace menu would do the job and avoid new interface clutter
I have found that no matter how many times I move my XYZ during a job (usually by accident.)I can always reset it with the touch plate as long as I have not moved the work piece. Then restart the job from there after resetting zero. I also have found that using CA glue works best for insuring a project does not move while cutting.
Mahalo, Bill
Only a tangent thought, but I’m wondering if a small UPS, which would also filter surges, might worth investing in as part of my setup. Not to power the router, just protect the controller and screen.
Here’s a thread that I started on another forum about my setup with an uninterruptible power supply (UPS). I use them everywhere I have electronics, including my Shapeoko CNC.
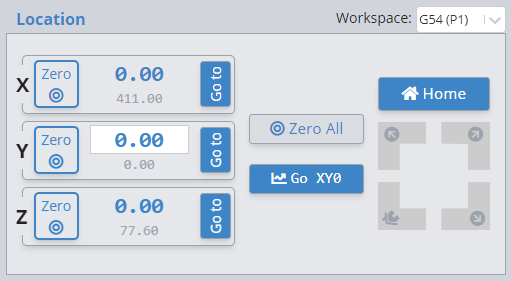
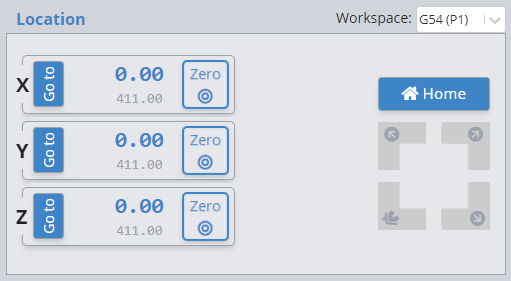
The next build should have a slightly different layout for the location widget which should both more clearly organize the DRO and axis functionalities and better separate zeroing and go to functionalities.
We’re still iterating on final design since there’s a few other concerns (we’re not a fan of the hanging Zero All/Go XY 0 buttons, and we want a design that could support more than 3 axes), but will be similar to the following.
I’m not sure how related this is to the original power cycling issue. Generally, our opinion is that confirmations are a little too obtrusive - if a user is prompted every time they perform a relatively common action, it quickly becomes a burden or annoyance.
Undo has some technical limitations (mostly GRBL firmware related - once a zero is set using G92, in order to undo we’d have to do some calculations using machine positions that wouldn’t be accurate if the board was reset/powered off in the meantime). It’s just a question if the juice is worth the squeeze for the vast majority of users. If it’s still problematic after a redesign, we can revisit it.
I think this will help. What about saving the previous zero locations at the bottom of the workspace drop-down? Anytime there is a zeroing just save the XYZ differences between the old coordinates and those established by homing. In the meantime I will always zero two workspaces so I can recover, but it would be nice if it was done for me