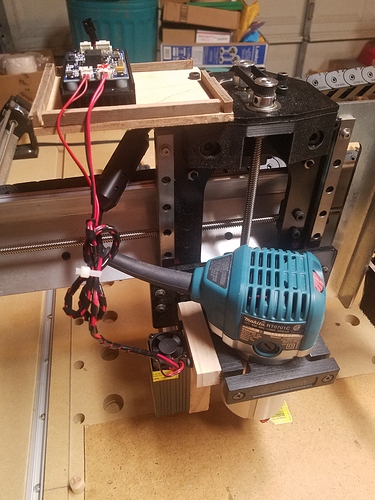
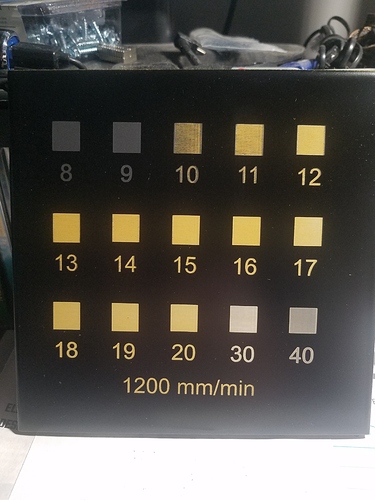
WOW! The more I test out this laser, albeit a cheapy, the more impressed I am with its capabilities. I have been watching a lot of videos to try to understand how it works and how to use it. One picture is how I set it up on the longmill, plain and simple. The other picture is a “Test Print” on a piece of 6x6 white tile. I first painted it a bright yellow followed by satin black. I then tried the lightburn sample test pattern. The squares are burned starting at 8% power through 20% power and then 30% and 40%. All at a speed of 1200mm/min (47.24in/min). As you can see you get varying shades of yellow up through 20%. 30% is pretty close back to white and 40% was overburned to a greyish. I may make more of these samples using different colors so I can more easily select for different projects. I’m Lovin’ it.
@Heyward43 No pics, H.
@gwilki Sorry about that. Got distracted while posting.
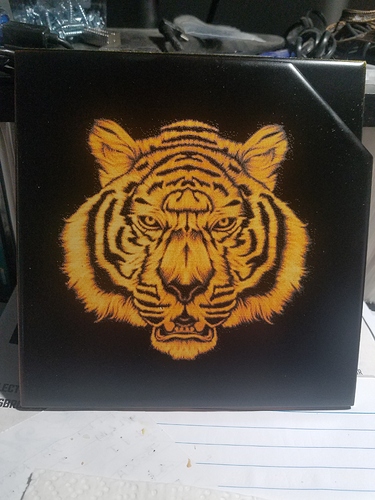
@paullarson @stevendq @gwilki @SteveFossey @djgrant181 - First, Grant, I posted the 2 original pictures back a page or so. This is the latest test. I’m amazed to say the least. This tile was painted orange then black. I forgot I had this picture but glad I found it. I had to turn it into a negative to get it to burn the colors correctly. This was burned at 1200mm/min (47.24in/min) at 20% power. Took an hour and 15 minutes. I am totally sold on lasering. I’m going to see if I can speed it up even more somehow. Just have to experiment. And this is fairly cheap to play with. A 4x4 tile for around $0.15 US apiece. Can’t be more than $0.10 US for paint each. And what ever time you spend building your picture.
I was just watching a video last night on this technique, but yours is the first actual picture I have seen. Looks Amazing!
Question on your “tray” for the laser controller - do you only have it attached with one bolt?
My controller, and others here I think, has a fan on the bottom, so I would need to mount it on it’s side, or use spacers.
@stevendq - Yes sir, One bolt. It’s the bolt that holds the steel plate to the plastic mount. The tray and controller are very light so didn’t take much to anchor it. This controller has a fan on the bottom too but with the fairly tall heat sink fins there is plenty of air moving. So far I have not felt it getting hot at all. The tiger ran for over an hour and the only thing that got warm was the longmill controller and motors.
@Heyward43 Well done, H! Did you use the Vectric laser module again? My version of VCarve is much too old, but I’m having reasonable results using LightBurn.
@Heyward43 Good to know. I haven’t looked at the heat sink that closely.
@gwilki On the video I watched on this technique the guy used GIMP with a $30 plug in that basically prepped the picture to be laser ready - reversed image, gray scale, sized, whatever. Then he dumped that resulting JPG into Lightburn.
I am back and forth on V-Carve Desktop with the Laser module addon…$400ish…first gotta get my x-axis working again.
@gwilki I was going to but the vcarve laser module in the trial won’t let me save anything but their samples. So I used lightburn and it worked great as you can see. This was a .jpg picture that I got somewhere. The only thing I did to it was turn it into a negative. No contrast or brightening adjustments at all. I’m kind of torn between the vcarve laser module and lightburn. Since I already have 10.5 of vcarve I can see instances where I can use both. Using vcarve laser module will make it easier to get alignment right when carving and lasering a piece. Lightburn is more convenient for more or less freeform projects where I don’t have to worry too much about lining things up except picture to material. Once I figured out, like you, how setting origin worked things started to move along much smoother. I may end up licensing both since they don’t cost too much.
@stevendq Tks, Steve. I have an old version of photoshop and of paint shop pro, so I can play with the images in them to get them ready for LB. For me to go to the latest version of VCarvePro with the laser module, I’m looking at almost $1000 Cdn. - way out of my snack bracket.
@Heyward43 Like you, I’ve gotten used to the origin setting quirks of LB and have had good luck doing burns in LB, then cutting out in VcP. I bought the LB licence. They were really good about extending the trial when my laser was dead. Vectric, by contrast, did not reply to my request for help when I was trying out the VcP v10 trial.
@stevendq - I have GIMP but don’t use it very much. I checked out the plugin but really didn’t see that I needed it. I used to be a wedding photographer and have done thousands of picture adjustments in color so adjusting black and white pictures is a snap. I use Adobe’s Lightroom for adjustments and it has all of the editing features that are needed for this stuff. I started out with VCarve Desktop and recently upgraded to Pro so I’m trialing the laser module now. The tiger was done in LightBurn which I am also trialing because Vcarve wouldn’t let me burn anything except their samples.
Do you have to have VCarve Pro to get the laser module or can you get it with Desktop, too?
I know you and @gwilki have the positioning with LightBurn figured out, but I tell you what I figured out and you can fact check me. LightBurn seems to reference to the Home position. You can set X and Y and Z zeroes, but LightBurn doesn’t pay attention to them. Unless you’ve added homing switches/function the home position is where ever X, Y and Z are when you turn the Longmill on. So, what I do is position the laser where I want the X, Y and Z zeroes to be and then I click the orange plug icon to disconnect UGS from the Longmill. Then I click it again and you reset the home position to where X, Y and Z currently are. Before I figured this out I was turning the Longboard off and on.
@paullarson You can buy the laser module with Desktop. You need the latest version of Desktop.
The way I work with LB, is that I set the job origin to where ever I set it in VcP. More of than not, that is the centre of the project. Then, I set the “start from” to “current position”. I jog the laser so that it is over the centre of the material and then run the job. I don’t worry about setting xyz0 at all. (I tried that at first and failed miserably.) My current method works every time. The key is to tell LB to start at the current position and jog to where you set your origin in VCarve (centre or lower left, likely) before you run LB.
I’ve not played with the “allow Z axis” yet. @Heyward43 Have you, H? Also, H, for your tiger, what “image mode” did you use. I’ve not played with them yet, either. So far, I’ve only used “dither”.
@paullarson - Yes, I have VCarve Pro for real. But to trial the laser module you have to download the trial versions of either Aspire, VCarve Pro/Desktop or Cut2D Pro/Desktop. I chose VCarve Desktop. When I say I have figured out LightBurn origins that’s tongue in cheek I think. I don’t know about @gwilki but I do something similar to what you described. I know my material size so I turn on the focusing light and set it in the upper left corner of the material. I then do what you did and restart/reconnect UGS to set zero. Then I run the square/round frame pass to adjust the material position based on picture size. To use my method I set “Start From” to Current Position and Job Origin to upper left corner. Those settings are on the right side panel right below the start, stop, pause buttons.
@gwilki - Grant I turned the Z option on but have not done anything to use it yet. The only purpose I can see is for cutting in multiple passes or 3D projects. I guess I’ll have to try it some day. As for the tiger I seem to like greyscale much better. I’m sure dither is good but I haven’t tried it yet. Whenever I preview before I burn I always go with greyscale.
I’m ready to add my laser but I can’t find the file for the T shaped mount. I hate reinventing the wheel. Does anyone have a file to cut one out of acrylic?
@Eddie203 - You can use whatever you want for material. It’s just a simple T shaped mount with 4 screw holes. Here it is - https://forum.sienci.com/uploads/short-url/xsBRpHmWts3kWYLJfj5oetYbT65.dxf
Thanks. Not sure how I overlooked it.
Get lightburn software it gives you better control of the laser when burning and is only 40 dollars. I was using grbl laser at first I like lightburn a lot better. You can download it and use it for 30 days free to see if you like it and there are plenty of forums and YouTube videos to help figure it all out
Thanks Chris. I have about a week left on both LightBurn and Vectrics laser module. I’m in a pickle as I like both of them, lol.


