Looking for some troubleshooting help with a piece I’m working on.
I’m making a wooden sign for a friends business. I prototyped the design on some plywood successfully, and have now tried cutting the design on the final material (cedar) twice. Both times, in the same area, the cut depth is slightly deeper than it should be. This didn’t happen on the test plywood. It happens after changing the tool bit from 1/4" to 1/8".
I’m not sure if the machine is cutting deeper on these sections, or the material has lifted up during the cut only at these sections. I would think the cut depth would be universal according to the design, so that would indicate the material is the problem. However, I’ve tried everything I can think of to make sure the piece is as flat as can be.
As a new user I can’t upload too much at a time. I’ll try replying with pictures/ info.
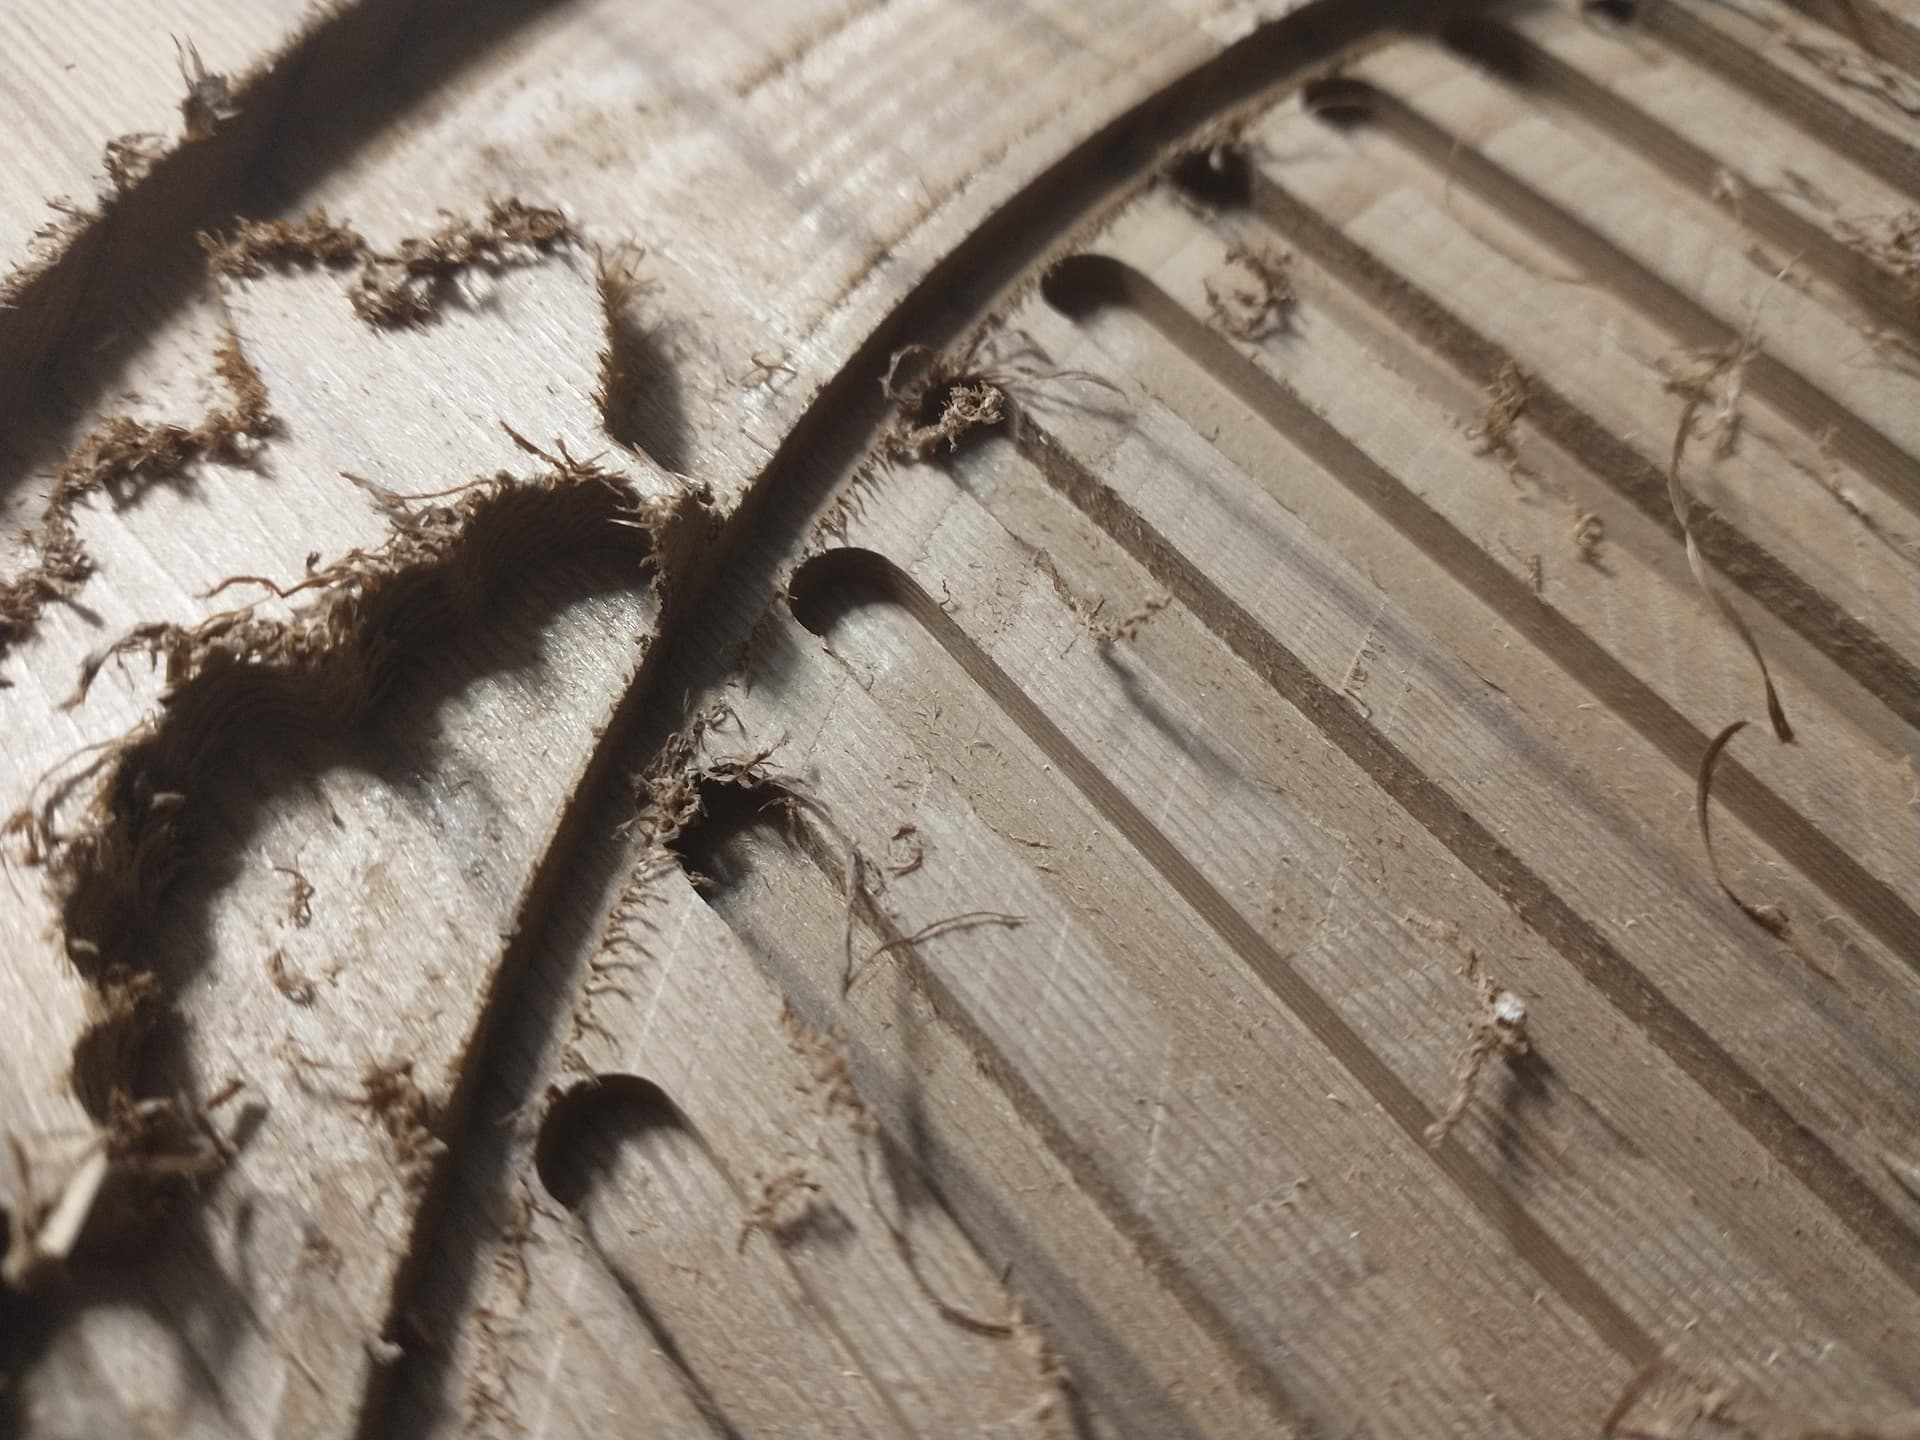
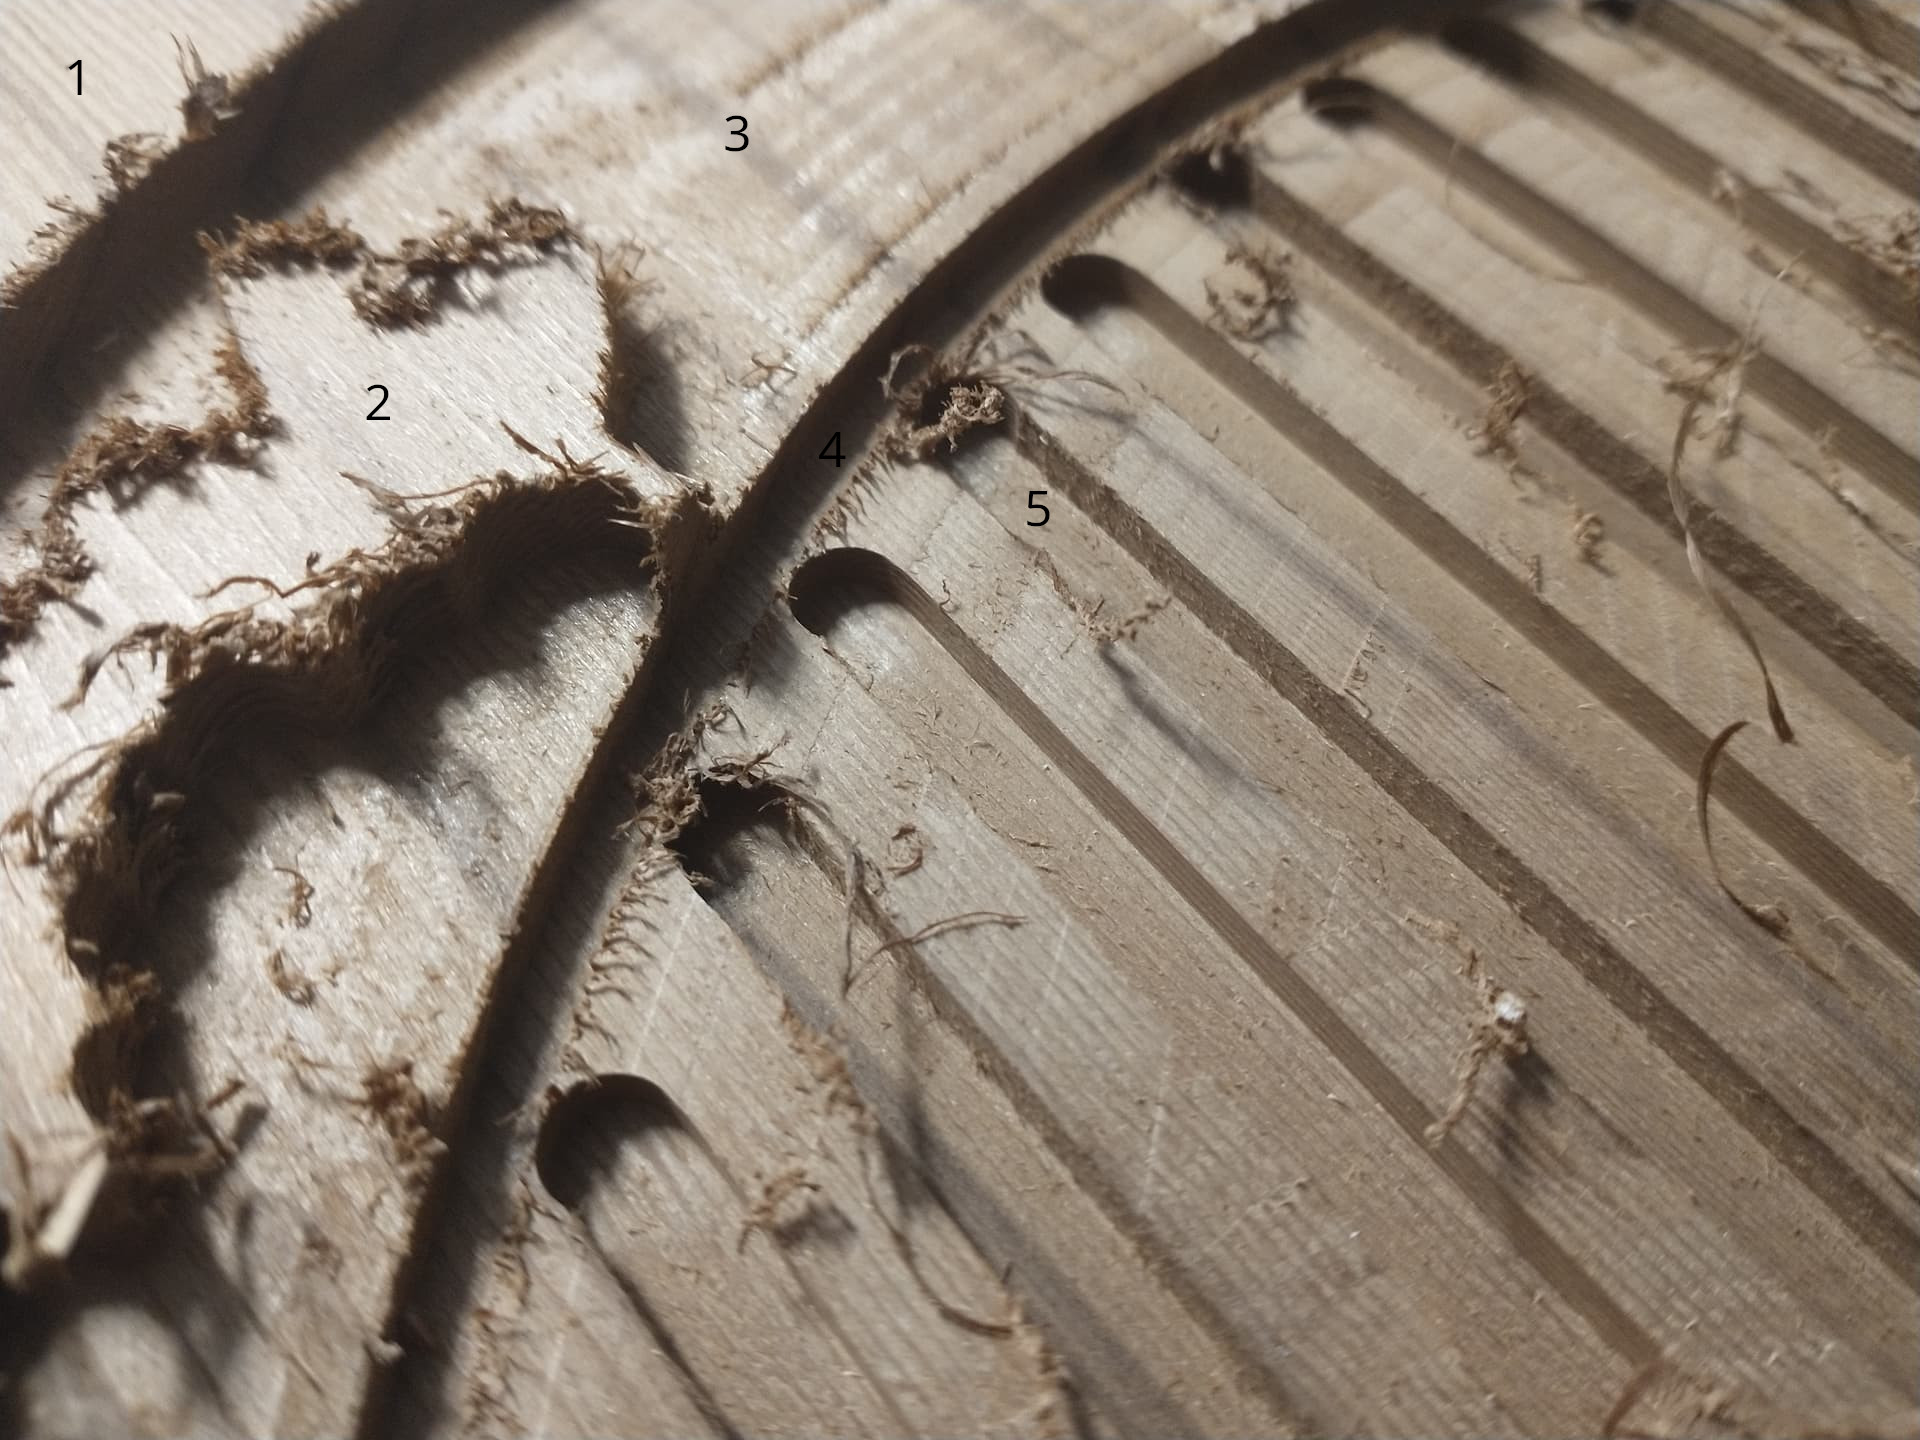
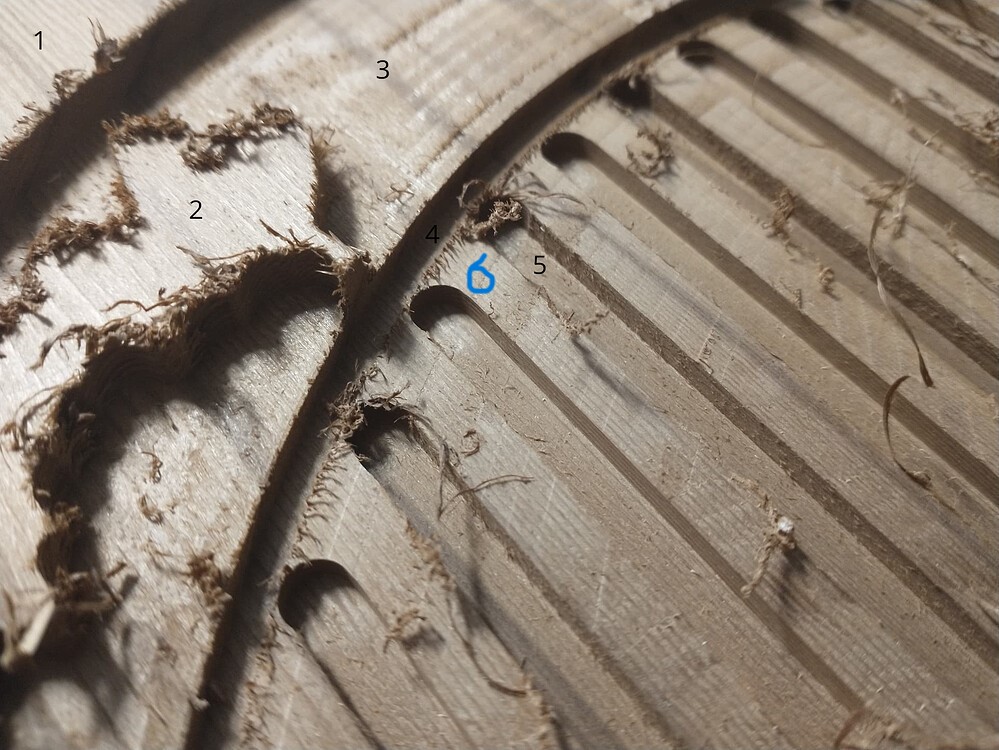
The following 2 pictures are of the cedar work piece. One shows the slightly deeper cut, & the other shows a different area that wasn’t incorrectly cut too deeply.
You mentioned it happened after a bit change. Did you set the Z zero after the bit change?
I’m not sure from your original post if it’s cutting to deep just in one area or if it’s always too deep after it first cuts too deep. If it is just in one area that’s too deep and then it moves to another area and it’s not too deep then I would think it is either the material or the spoil board that needs to be resurfaced. Sometimes I will surface the work piece after clamping it down to make sure I have I nice flat surface parallel to the machine.
Thank you @_Michael, I’m glad to be a part of the group!
I did zero the xyz after the bit change. On one attempt I even zeroed xyz after every tool path, just to totally eliminate any possibility.
Sorry for the confusion. So after the bit change it does both: some areas it cuts flush with the 1/4", but other areas it cuts just a little deeper.
I’ve thought about surfacing being the issue. I figure if there was unevenness in the material that the pocket & profile cuts would even out, & just the topmost surface would be uneven, which would be easy to fix. But I could be wrong.
I would upload my designs but it seems like I can’t do that just yet.
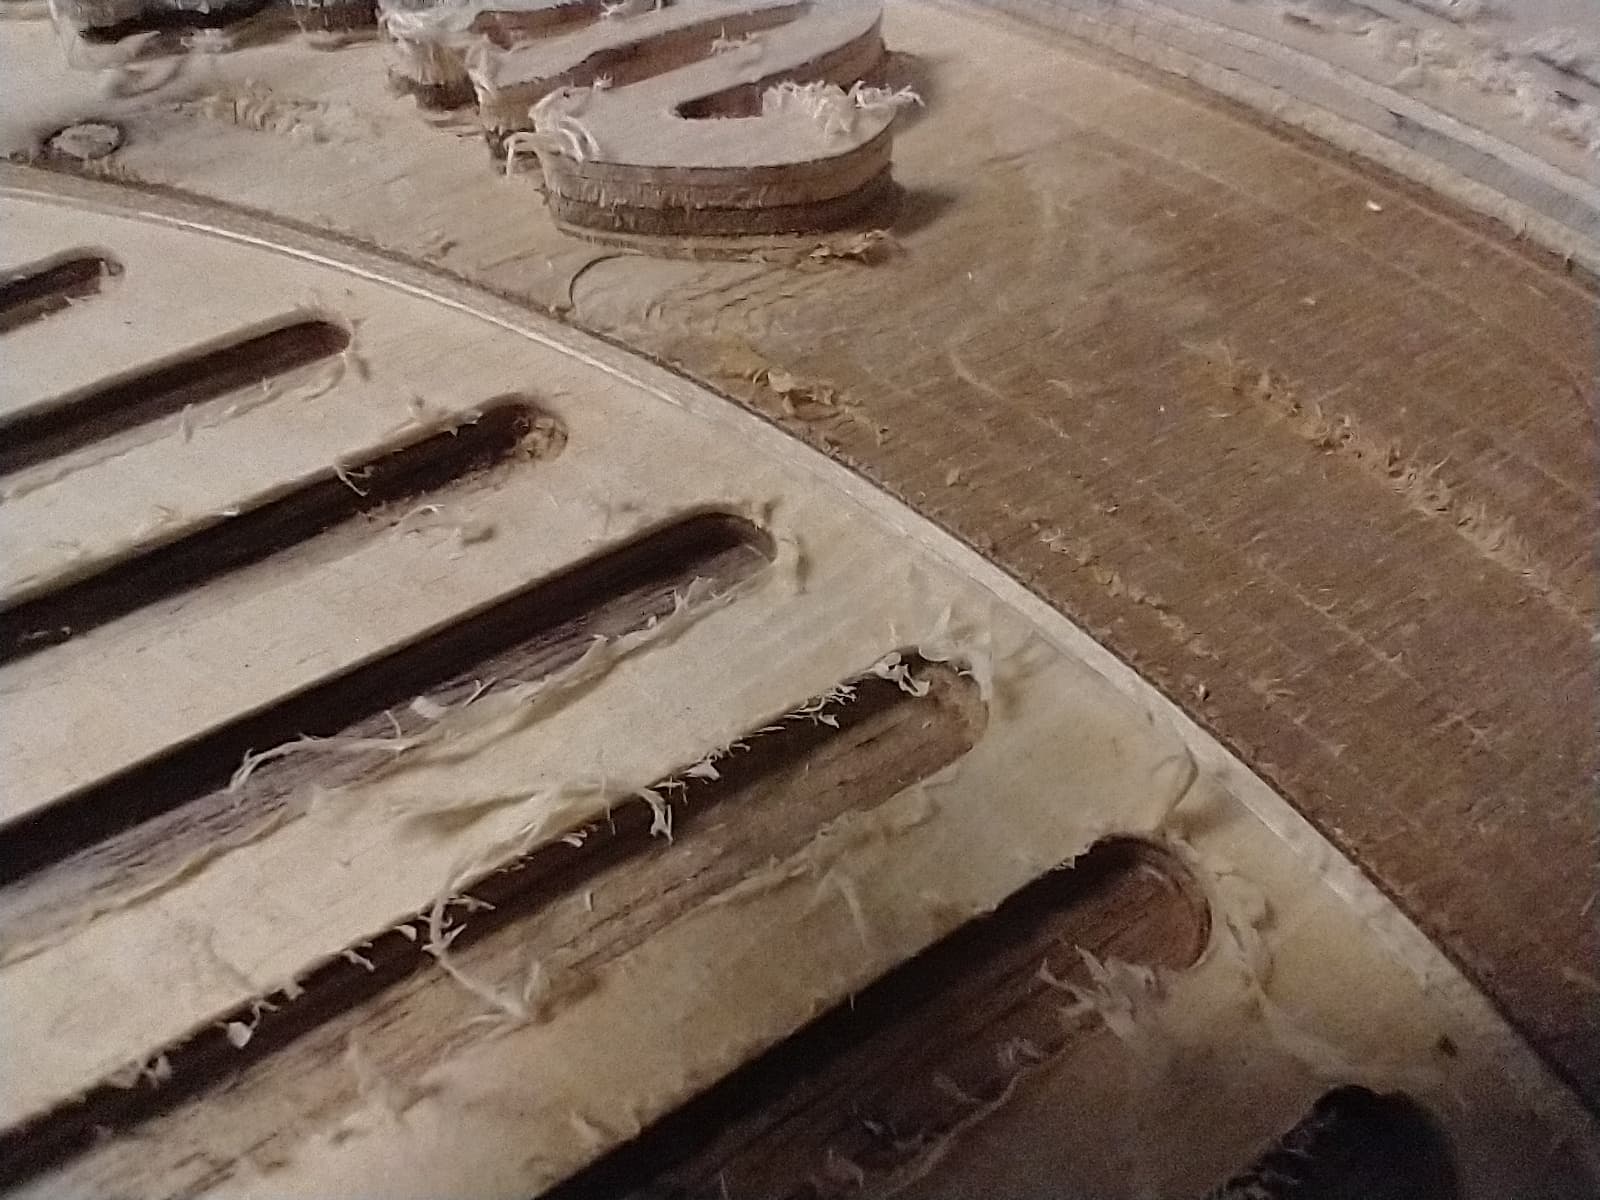
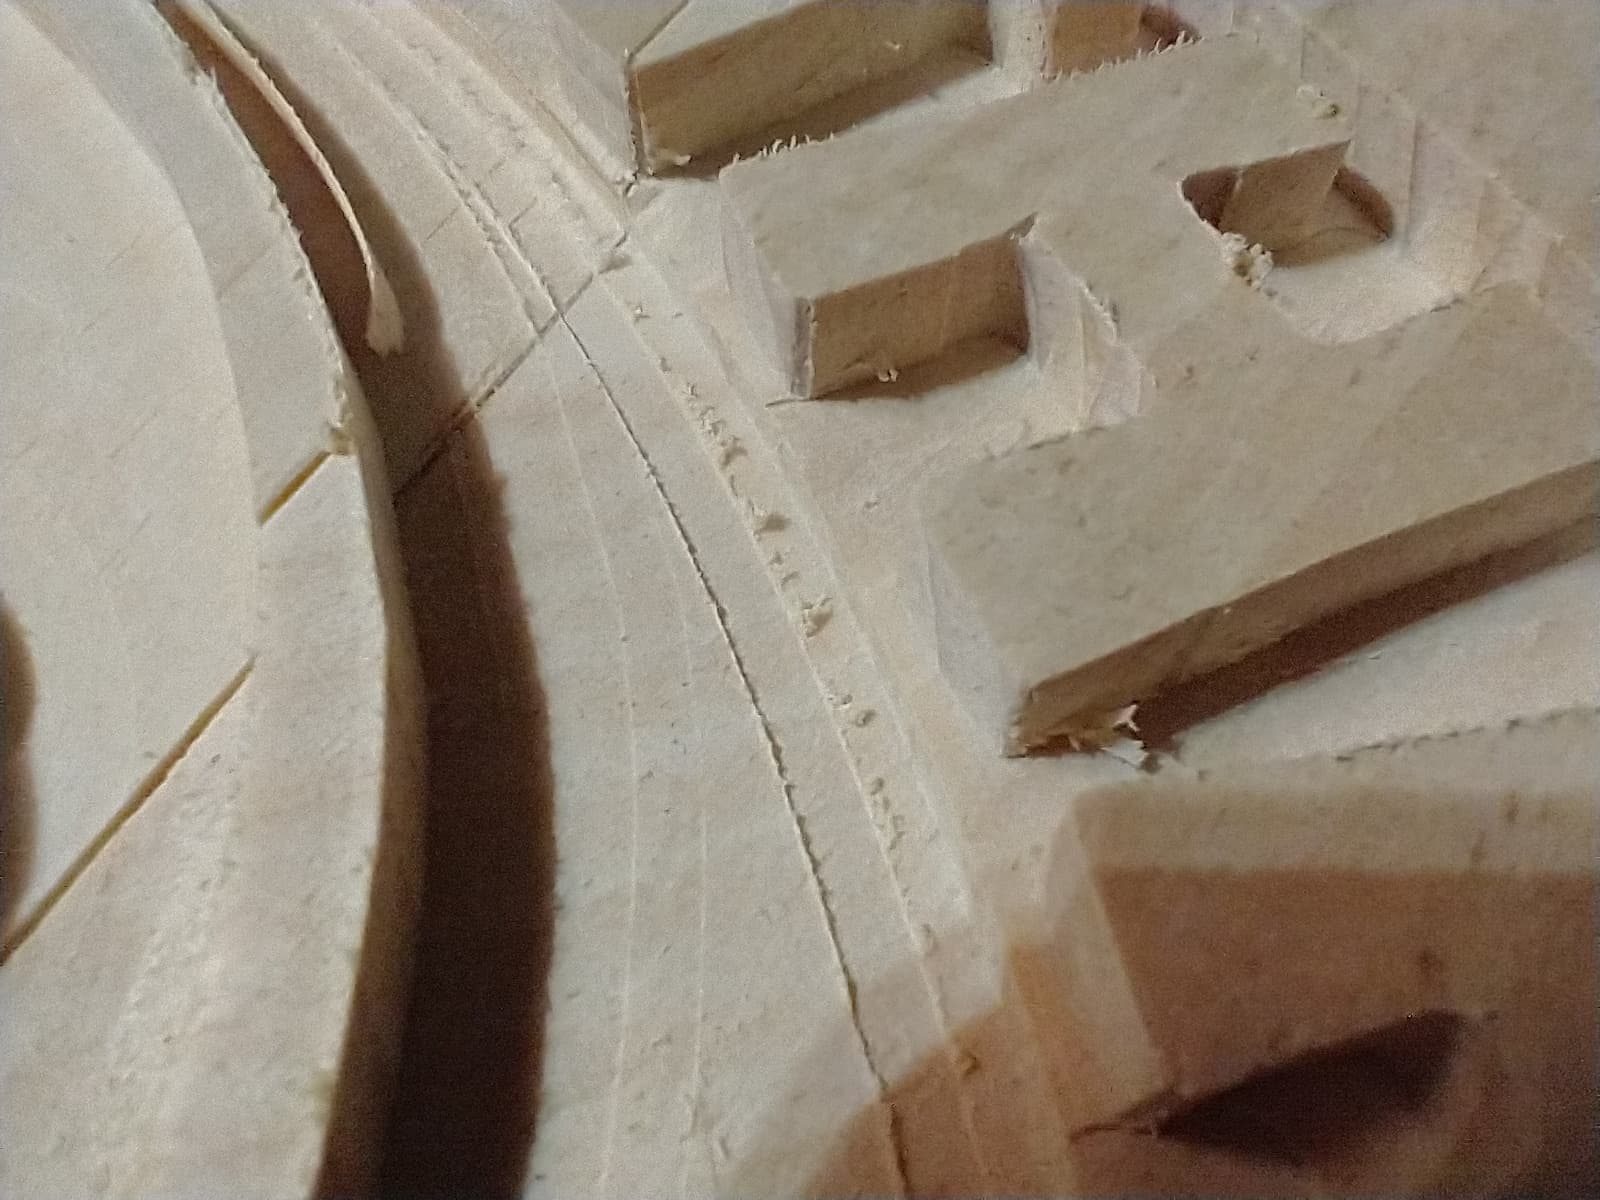
Here’s a picture of my mounting system. I’ve clamped an additional spoilboard, & taped & glued it to the underside of my work piece.
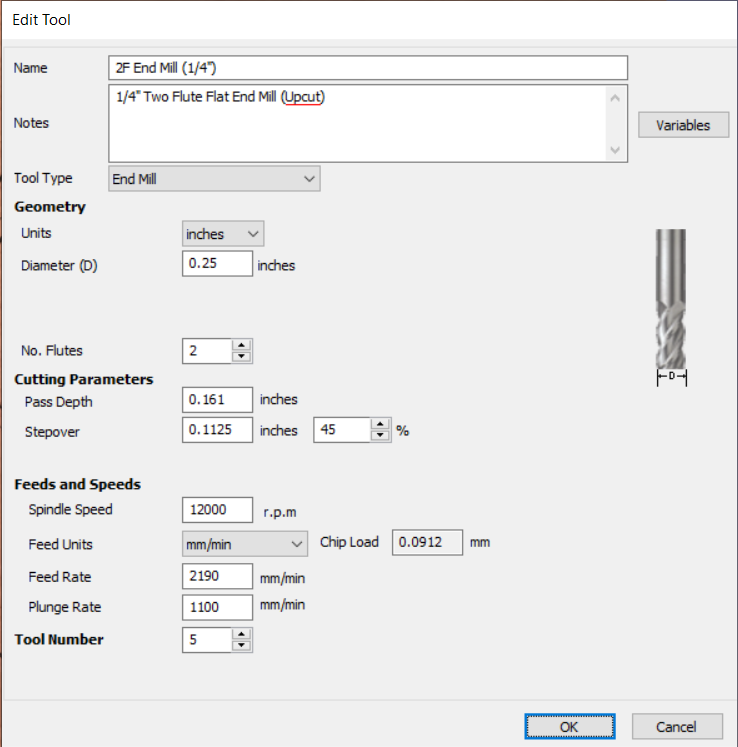
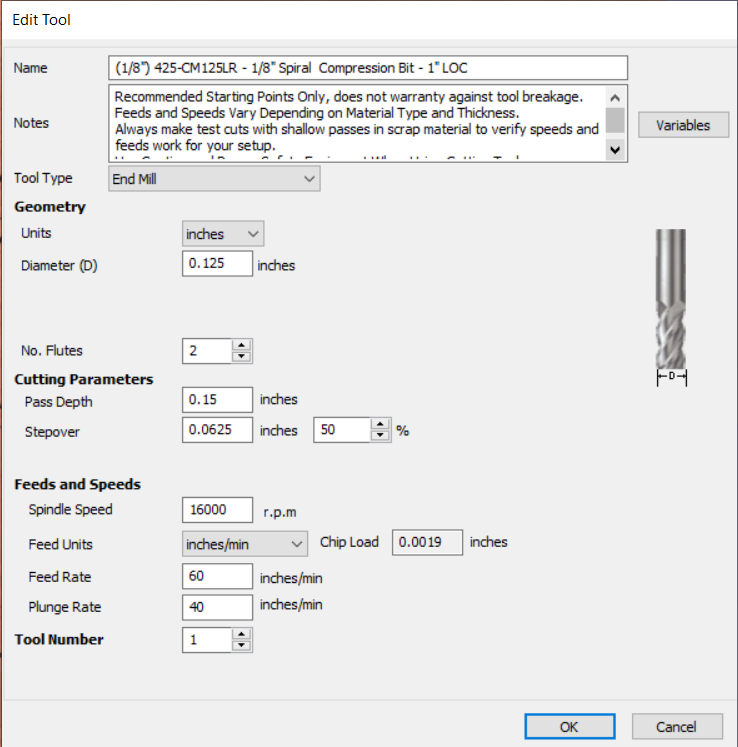
Also, here is a screenshot of part of the design. You can see the area is first cutout with the 1/4" bit, then later the 1/8" bit. The 1/8" bit here and on the remaining 1/8" bit cuts are cut just slightly deeper than the specified 3/8" depth.
That’s good, at least everyone knows where to look now. It might be deceiving but it doesn’t appear to off by much at least at the lower left. It looks like it might be getting deeper as it gets closer to the top right.
I’m not sure what the solution is.
This makes me question whether a clamp or something moved but in your first post you said it has happened twice in the same area with cedar. Random clamp slipping would be unlikely to happen twice the same way I would think.
I’m stumped . Hoping someone else can help us out.
Usual preface, I’m with PreciseBits. So while I try to only post general information take everything I say with the understanding that I have a bias.
There’s a few reasons I can think of for this.
The simplest one is that the bit is slipping. Are all the deeper cuts either in the beginning or end of the toolpath? This could be on either tool. Simple way to test it is to mark the tools at the face of the collet and see if it moves during the cut. Which way bits could move depends on the tool geometry (helix angle, up/down cut)
Another thing that can do this is deflection. I find it hard to believe that it wouldn’t have shown up in the ply test though. Unless you changed the feed/speed/stepover/pass depth between the cuts. I would need to know how much the depth is off, the tools used, and the settings for each cut to even give a decent guess if this was happening.
The last thing is that wood in known to warp from enough material removal. There a bunch of reasons listed for it (moisture content, surface stress, nature of wood grain, etc). The short version though is that as material is removed sometimes the wood can warp. It’s not as much of an issue with ply as that’s a bunch of smaller sheets with grain orientation changes.
Hope that’s useful. Let me know if there’s something I can help with or expand on.
I had wondered if cedar was one of the woods known for warping from material removal. By the time I’ve switched to the 1/8" (& later 1/16") toolpaths, the 1/4" toolpaths has indeed dug out a majority of the material. Plus, this is all taking place in humid Florida, so that surely adds to the warping.
The material is only 3/4" thick, so I can see how warping would be very easy in this case. On my last attempt I glued 3 strips of cedar perpendicular to the backside of the piece. But it seems like even that wasn’t enough to prevent warping.
I’ve heard some YouTube woodworkers let their pieces settle after ripping or milling. Do you think that could be a solution? I could just cut some or all of only the 1/4" toolpaths one day, wait a day or so, then cautiously try another toolpaths?
Also, if I double the thickness do you think that would help any? I would simply glue 2 working pieces together, maybe making the grains perpendicular.
I will test for bit slip on my next attempt. On some toolpaths the cut depth gradually changes cyclically throughout the job; it might start flush, gradually cut too deep, then back to flush, and so on.
The only alteration is I tried to change the cut depth of my 1/8" compression bit to account for how far it should plunge. I don’t quite know it’s plunging to the custom depth though. When it’s running it’s not easy to tell if it’s plunging at the default depth or the one I set. Just another thing on my list of things to check.
@BB2 As usual, you have received a lot of good advice on how to address your issue. Since you have raised the warping/humidity aspect, I’ll offer up my 2 cents worth.
Looking at your pictures, you are using OSB for an auxiliary spoil board. OSB is a construction grade product and it seldom, if ever, is flat. If you want to use it, you must surface it before putting your project piece onto it. I would caution, though, that surfacing it will dull bits very, very quickly. I would strongly advise trashing it for this purpose. FWIW
You have realized that cedar moves. All wood does, but the open pores on cedar make it particularly reactive to humidity and stress movement. Since we are removing material on only one side with our machines, we contribute to warping and movement issues.
I can’t tell from the pics what your project looks like, but if you can, using thin brad nails to hold the centre down will go a long way to preventing wood movement. If that is unacceptable, try using blue tape and CA glue.
It depends on the cause. I’ll go over the 2 most common ones I’ve run into but I’m going to preface this with I’ve never seen a good enough study or experiment to convince me that any of these are the majority, real, or only issues. A lot of the others “theories” get… complicated.
The first one is related to moisture. Where opening up the wood face allows trapped moisture to escape faster and unevenly causing the wood to warp. Alternatively, completely dry wood in high humidity the opposite where you open more area to absorb moisture. The issue with this is that I also know of people working with 10+ year old wood dried on site that still have the issue.
Another thought is that as wood dries it develops a “skin” that is harder than the rest of the wood. This is in addition to tension in the grain. As you remove it the wood warps. To prevent this some people will surface both side of the material before cutting or make a shallow pocket in the back to “counter” the effects.
In both those cases though cutting with the 1/4", letting it rest, and then doing the 1/8" won’t help. The issue is that you can’t return those 1/4" cuts to a relative flat surface to follow up with the 1/8". It could help to leave the wood for a lot longer than a day in the shop before cutting though.
It might help some from the added piece holding down the first one. You could probably get a similar effect (in the cut) by using a higher surface hold down method like @gwilki was talking about. Two things with this though. First is that we don’t know that it’s the cause. Second is that if it is and this solves it you’d need to see what happens to the piece after it “settles”. In the case of laminating 2 sheets it might delaminate over time. In the case of using a better hold down it might warp bad enough to not be a good piece.
If the bit is slipping then it should start correct at the beginning of the tool path and get worse over time as the tool either get’s pulled out or pushed further into the collet. In the case of an up-cut or it gets deeper the as the bit get pulled down. In the case of a down-cut it gets pushed up into the collet. The compression is more complicated as it has both features. It will depend on which there is more of in the pass depth you are using.
This might account for something but I couldn’t tell you from this. You should be able to tell how much it’s cutting per pass from the CAM setting through.
I in general agree with this. However (assuming I properly understand the issue), since the mismatch is against another cut while it might not be “flat” or level" or should be “true” to the previous cut. At least assuming that the zero position is the same and it’s not warping.
Some things I’d like to know: How much different the 1/8" depth is to the 1/4" tool as this could help narrow down things. Do you know if/how the wood you’re sourcing is dried? Has it been stored at a local place or are you shipping it in? What tools are you using for the 1/4" and 1/8" cut (cut direction, flute length, etc)?
You are correct, I’m using a secondary spoil board of OSB, and I haven’t surfaced it. My main spoil board is MDF, and it is surfaced. I’m using 2 spoil boards because I wanted to try an alternative clamping system: the tape and glue method (contact cement; haven’t found an affordable superglue yet).
Thanks for the recommendation to avoid surfacing/ using OSB. I’ll probably change it out with another MDF sheet to save my bits of unnecessary abuse.
I hadn’t thought of using brad nails before. I’ll have to give that a shot and see how it turns out.
The piece is approximately 16" x 15". One attempt I used 4 - 6 hold-down clamps. The last attempt I just used tape & glue. There probably isn’t a magic number of clamps to use, but at least the outside of the piece should be clamped well enough. It sounds like I should try using some brad nails for the middle.
It’s difficult to measure the offset. The distance is so small I would need a digital measuring tool or a laser. The 1st attempt could be about a paper’s thickness. The 2nd is a hair shorter than the 1st.
Not sure of the dryness. It is store (Lowes) bought cedar. The pieces are stored in my garage shop, so they should have adjusted by the times I attempted cutting.
Thankfully I don’t have to use cedar for this project if it comes to it, but I would like to understand the problem & some solutions instead of just moving on with different wood. Thank you all for the suggestions & info you’re providing.
Design files: TrashPandas_2.zip (3.2 MB)
The “Pocket - Panda Space” toolpaths are the ones in question.
@BB2 I looked at the .crv file. FWIW, I would not be using a compression bit to clean up after the 1/4" clearing bit. Since you are not getting beyond the upcut portion of the compression bit, you end up pulling fibers up from the bottom of the pocket created by the end mill. I believe that you will find that you will get much better results using a downcut mill to clear out the bulk of the pocket and a tapered ball nose to clean it up. YMMV and others here will, no doubt, do these projects differently. There are no wrong answers. However, a compression bit is not designed for clean up work. It’s designed to cut through material in one pass, if possible. The upcut portion leaves a clean finish on the bottom of the material and the down cut portion leaves a clean finish on the surface.
BB2, not sure if the sign is for inside or outside but in either case using 3/4 cedar and milling out 3/8 will guarantee warpage due to moisture and any wood stresses from the drying process. It should be noted that you cannot stop wood from warping if you try it will eventually split, you can only design to allow the expected moovement. If you are stuck on cedar use a minimum of 1 1/2 thickness preferably solid. If you are going to laminate to get a desired thickness max lamination pieces would be 1/4 inches thick alternating grain direction with each lamination. Personally I would use something different than cedar. If it is for inside MDF, softwoods, plastics, foam for painted, or any hardwood for bare wood or transparent finishes. For exterior use redwood and cedar (1 1/2 minimum preferably solid) teak, oak or my choice red grandis at 1 inch. Good luck.
Look at your picture of the material you are cutting. One side is thicker than the other and also warped. Why did you put that extra board on top of the mdf, instead of mounting directly to the mdf?
Hi all, Sorry for the lack of updates. As you can understand, things have been busy.
Suggestions so far:
Bit slip - The cut depth seems consistent throughout toolpath. So I do not believe this is the issue.
Deflection - Unsure. Not able to measure the unusual cut depth. What would be the best way to test for this?
Warping - Seems unlikely since the issue has been reproduced on pine. But happy to retest on a suggested material.
Use a downcut mill instead of spiral compression bit - I will try this. It sounds like I’m not using the right tools (bits) for the job.
Latest updates
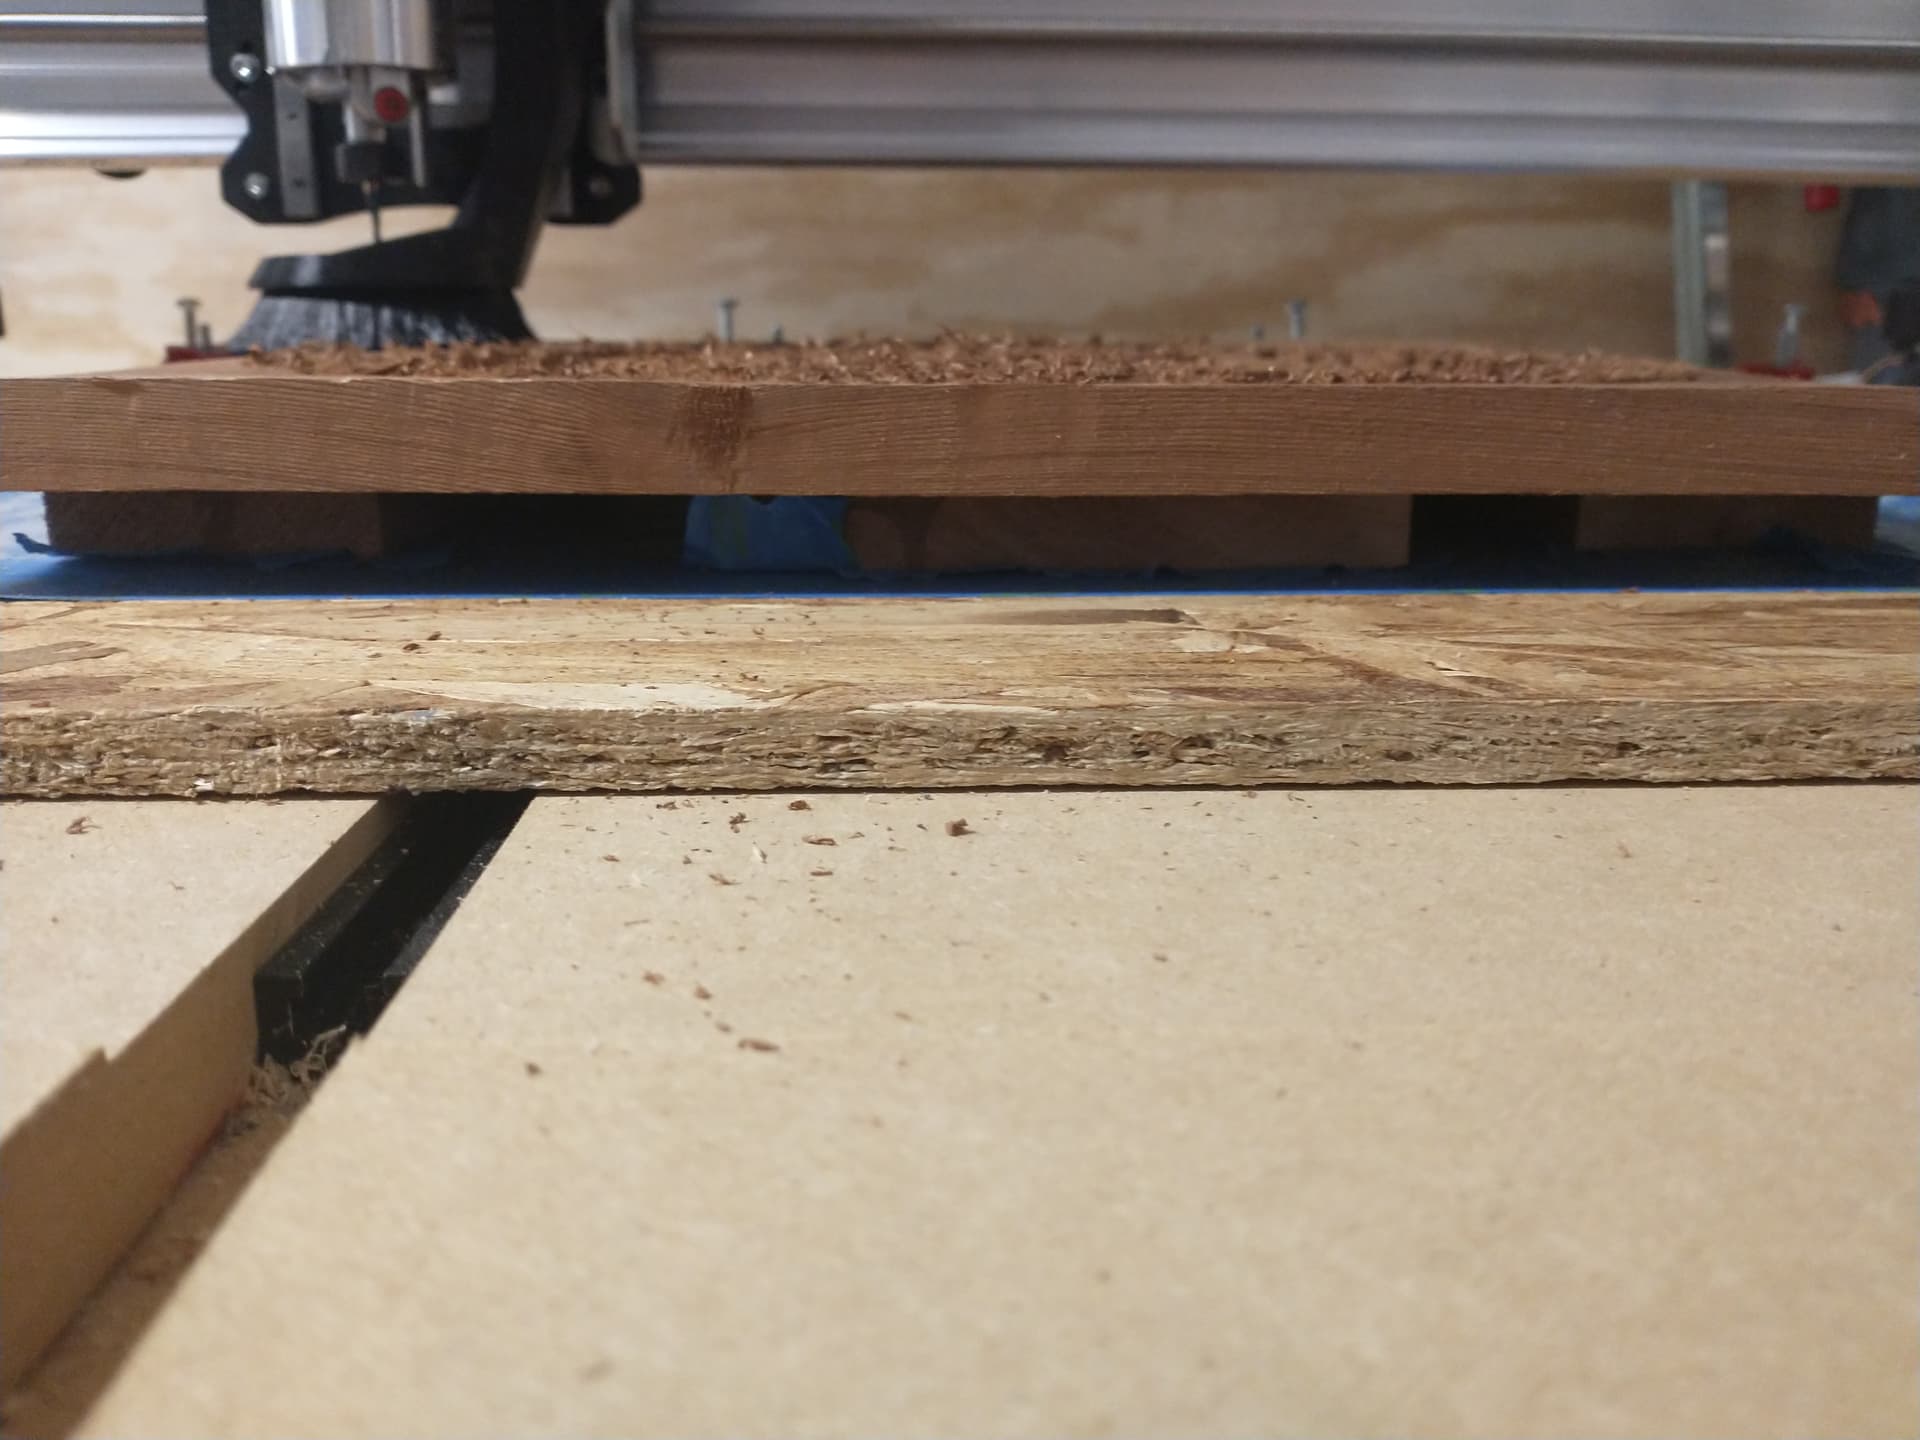
I tested the design on on 3/4" pine today, unfortunately with the same outcome.
I’m less inclined to believe the issue is due to warping since the issue has been reproduced on something besides cedar. I wonder if there are some calibrations I need to make that I’ve overlooked or not fine tuned enough?
Also, I’ve noticed some strange “outlining” that might be related. As you can see below, both bits (1/4" & 1/8") leave behind a faint outline of their paths. This is especially noticeable in “empty” spaces in the piece. Since the bits are from 2 different companies, I don’t think it’s due to the bit’s quality (dull, poor material…). Does anyone know what might cause this? Could this be related to the issue at hand?
I do have another much more complicated version of this that tests for deflection with less than 100% stepover. Let me know if you want it.
Another quick way to check this would be to run a second pass. It’s not great for the tool as it won’t (or at least shouldn’t) be cutting much. But if running a second pass removes the steps or remaining material than the deflection is at least part of the issue.
I wouldn’t say this rules out warping. If you want an easy real world way of testing this use something with no grain like MDF or a plastic. While those can still warp they are not for the same reasons or in the same ways.
The first 2 things I would guess is out of tram or deflection can basically cause the same thing (tool/machine bends so the tip is no longer “flat”).
Going through the info I didn’t get to address last time.
That compression cutter no matter what is going to deflect, potentially a lot. It has a very long cutting length and even greater stickout due to being a ground down on a 1/4" shank. To demonstrate what I mean I’m going to be using a tool call Millalyzer. To be clear this is just giving it’s best guess of forces and their effect. It doesn’t account for everything and makes some assumptions. Additionally, I have to make some assumptions as there’s only so much of the tool geometry that I can get from a picture of a tool. For my assumptions I’m going to assume a “generic” geometry and I’m modeling an extremely rigid system to try and show only the tool’s effects. I’m also using MDF for these as it’s the softest material I can model for this.
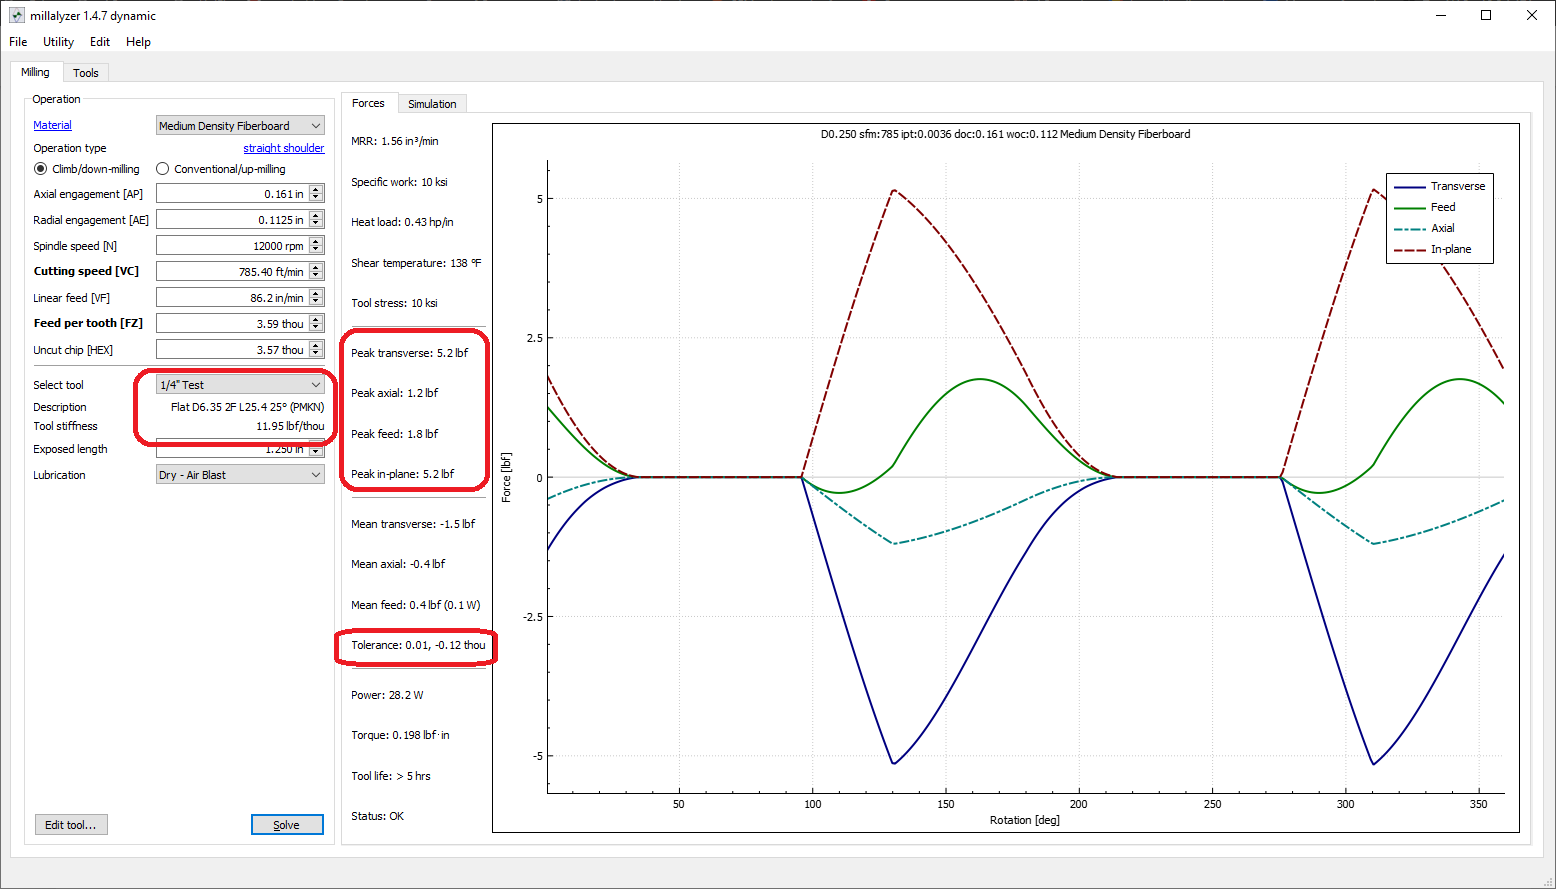
Let’s start with the 1/4" tool to show something in the more normal range. Here’s what that looks like with your listed feed, speed, and stepover. I’ll be using 1.25" stickout for both this and the 1/8" compression tool.
So in this fist one we can see the estimated tool stiffness is 11.95lb/thou. Meaning that it takes that much force to move it 0.001". We can also see the estimated forces for those cut settings with a peaks being 5.2 pounds resulting in the tool in a single rotation moving 0.12 thou off path.
This is what it looks like trying to account for the tool having to return and cut in the previous error. You can see the waveform at the top which is the amount the tip is moving off path and the peak results in the red box . 0.4 thou feed (cut direction), 0.2 thou transverse (perpendicular to the cut direction).
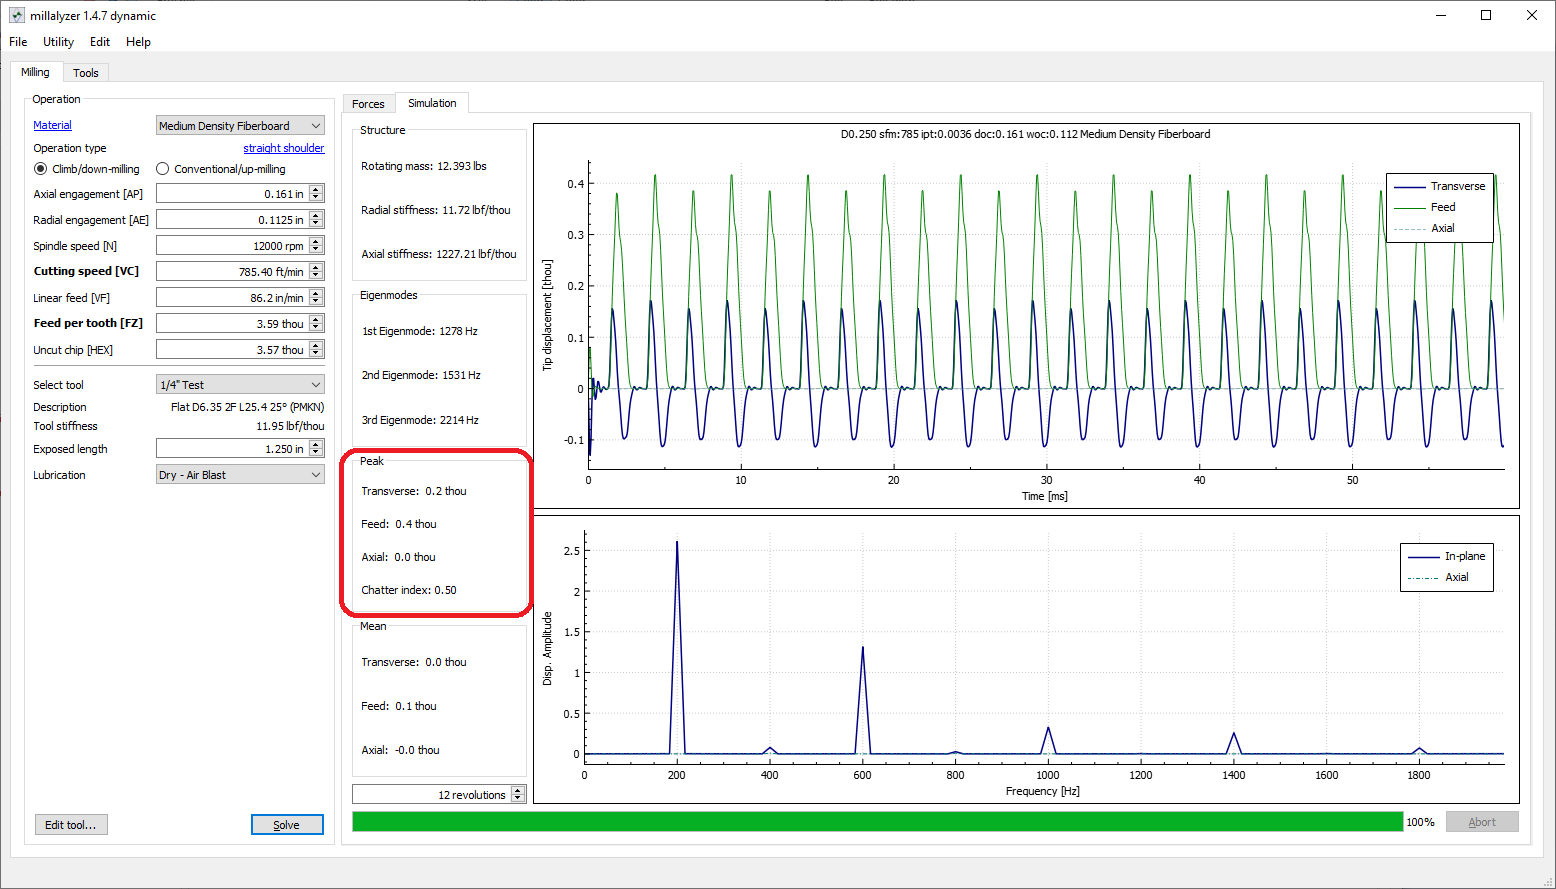
Now let’s look at the very long 1/8" tool. Again using the listed settings from your screen shot.
The force required to move this tool 0.001" is only 0.95lb. This cut produces a peak force of 2.3lb and the estimate for a single rotation off path error is 0.84 thou.
Here’s where we get into the real problem. As you can see this error accumulates to the point were the program gives up calculating the error as it exceeds 10% of the tool diameter in less than 12 rotations. This means that the tool is going to move more than 10% of it’s diameter off path.
Again, this doesn’t model everything. It assumes a certain carbide grade, I’m assuming geometry, and there are many geometry and material factors that are not accounted for in the program. That being said it shows a like for like massive difference in the tooling and a lot of errors can crop up if a tool is bending even close to that much in it’s cut.
There an saying I like to use. Every part of a tool will be used. Either for or against you. So don’t buy any feature you aren’t going to use (length of cut, flutes, etc.).
To be clear. I’m not saying this is a bad tool. I don’t know enough about it nor even if I did would I comment on that. It’s just not a good fit for this application. Or at least not without finishing passes.
So all that’s to say I’m not sure that that tool is causing this issue but it’s adding a huge variable. If you need the 1/8" tooling get something that has a much shorter cutting length and that you can choke up further into your collet. Even a 0.5" cutting length 0.8" stickout will produce much closer numbers to the 1/4" tool. Again a simple test to see if this is part or all of the issue is to recut the toolpaths (preferably immediately after the first pass without changing mounting or zeros).
Hope that actually helps and isn’t a just a bunch of techno babble. Probably could have said it a lot more simply but wanted to show the why and by how much difference there is. Let me know if there’s something I can help with.