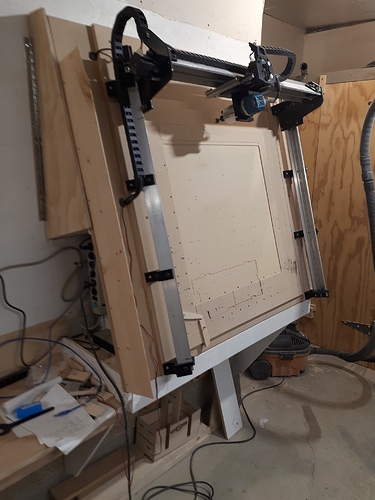
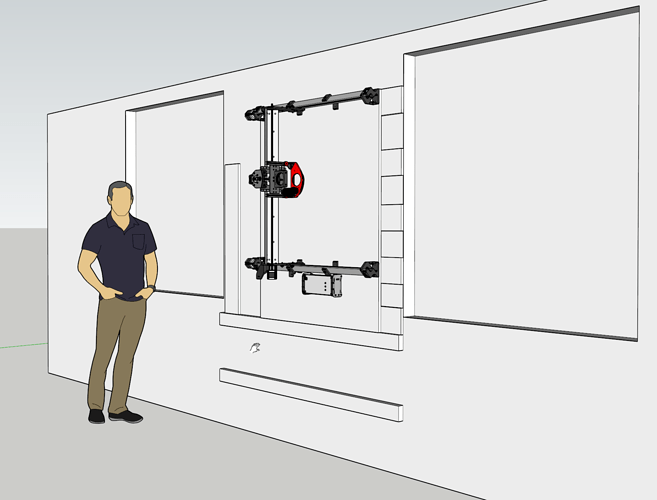
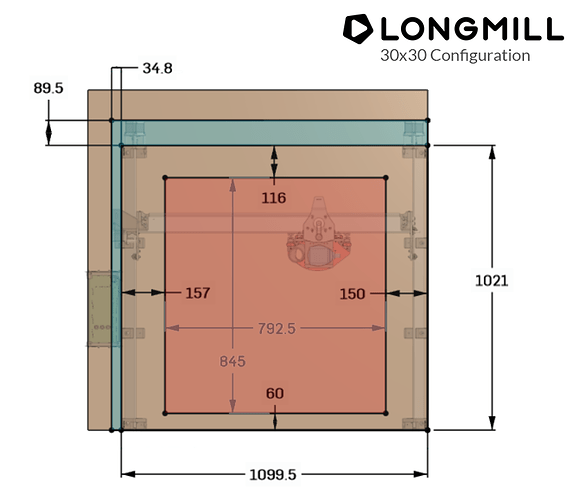
I’ve been playing with things in Sketchup to see how I could best mount my 30x30 Longmill for vertical milling while also allowing the potential future use of longer work pieces with indexing.
Here are a few photos and I’ll explain some of the details below and ask a few questions of @chrismakesstuff
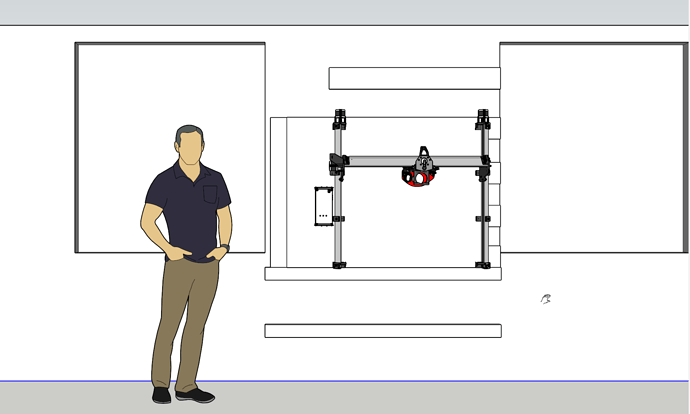
Here is a sketch of the preferred vertical orientation. My ceiling height is 8’4" (quite low for a garage, really) but a mathematically convenient 100". I did my best to try and estimate where the middle of the actual work area is, as it doesn’t seem to be documented anywhere. Is there a PDF or graphic that shows the work area footprint explicitly and with the offset from the right edge of the waste board (assuming you line up the feet with the right hand corners/edge of the wasteboard)?
So I’ve put the center of the wasteboard at ~50". Is there a dimensioned drawing of the wasteboard including the actual usable cutting area? I’ve seen the older PDF but it doesn’t explicitly say where the work area is in a clear and dimensioned way.
Based on a 100" ceiling, I believe I could load a work piece up to 65" in length. 65" Would put the top edge at the top edge of the work area while the bottom edge was against the floor. Then I could index it all the way up until the top edge was against the ceiling and the bottom edge was the the approximate bottom of the work area.
More practically, and allowing a few inches for loading and adjusting and pinching fingers, it should allow me to load 5x5 baltic birch if I rip it down to 60"x33" (to allow 1.5" for screw/hold down outside of the cutting area).
[Note: conveniently there is a power outlet about where the lower 2x4 is (hmm, better check my heights on that). The second 2x4 is to provide a surface to stabilize and secure a longer work piece during indexing.
To keep it simple, I am planning on just lag bolting a 2x4 in to the studs on the exterior wall in the photo (which is set between two large windows). Then the Longmill wasteboard edge would sit on it and the 2x4 would carry the weight. Behind the Longmill I’m going to use 6" long pieces of 3/4" that I ripped off some sheets I recently bought.
I did my best to ensure that there was backing directly under the positions for the feet with the goal of maintaining rigidity.
The purpose of the 3/4" is to give me some extra “oops” space under the waste board, in case I accidentally plunge a bit too deep. I wouldn’t want to cut the wall or studs. I’m also thinking there might be some clamping opportunity using the gaps, but that is an unexplored area. More importantly, they give me various places to screw the waste board down to in order to secure it once it is sitting on top of the 2x4.
If I’m careful, I think I could lift the Longmill up and secure it on my own, as well as remove it if necessary. I may add some rotating hold downs in to the 3/4" strips in the corner areas to give me an “extra hand” in those situations.
The extra width on the waste board (it is 56" in the drawing) was to accommodate the USB cable and bend radius when I turn the entire setup 90 degrees for “side loading” of the work piece. Originally I estimated the cable could collide with the bottom mounting rail, but now that I’ve reduced the design to just a 2x4 there is no collision so I am considering dropping the width down to just 52" (since everyone says it is a tight fight for the controller on 48" and I have a V1 so no mounting brackets). I figured I could put a few screws in there to hang the collet wrenches as well.
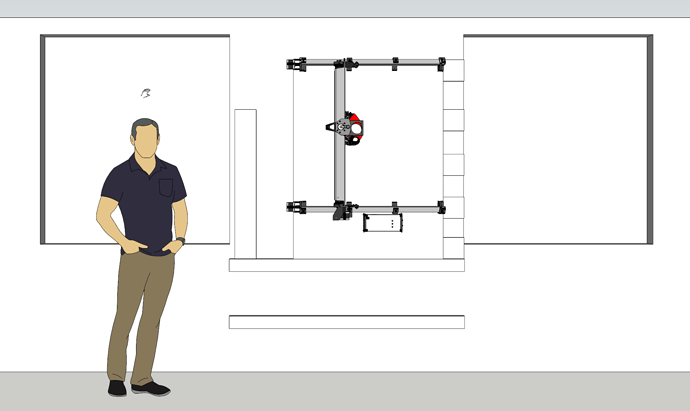
ALTERNATE POSITIONING - SIDE LOAD
If I ever wanted to work on a piece longer than 5’ the idea would be to unscrew the Longmill and rotate it 90 decress CCW, so the controller is on the bottom edge. Per Chris’ earlier comments, to avoid excessive wear, would use this on for unusual jobs every now and again.
This way it would be possible to load an 8’ sheet from the side and I have another 8’ clear out the far side. The only problem is how do you support this giant lever and how do you avoid breaking the window (or your wrist)?
I haven’t decided on that yet, but it occurred to me that by using the spaces between the 6" backing plywood I could potentially repeat that on the far sides of the windows and slide 2x4s in there temporarily to span across the window. Then just sit the long workpiece atop them to pass it through (using indexing) the work area and out the other side. I would need to figure out how to hold them in place temporarily, but I’m willing to defer that to an “if I need it I’ll figure it out”. Maybe even some pocket hole screws up from the bottom 3/4" the 2x4 extensions would sit on?
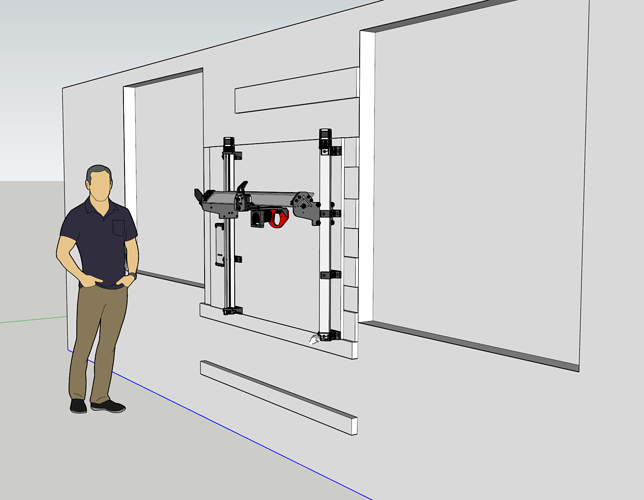
Here is an angled shot of the “horizontal” wall mount idea on the exact same wall.
Note: I added the additional top strip to ensure both long rails were fully supported along their entire length.
THOUGHTS PLEASE:
My conclusion so far is that I think I can probably meet most of my hobby needs with a 30 x 60" work area (with indexing) using the regular “vertical” wall mount orientation and this design. That keeps is simple and clear and loading will be a breeze (tilt and push up from the bottom, could even use a little jack or lift to assist with a heavy piece).
If I reduce the waste board dimension down to 50" wide I would only have a few inches of overhang past the underlying 3/4" strips. Then, I’m not nearly as worried about that extra few inches of MDF that overhang the 48" strips snapping off. At that point, I could then do without vertical 3/4" strip on the left, which would look better.
If I don’t expect to have to rotate the config, or plan to just add that 3/4" strip to the top in the future, then I can also dispense with that and it cleans things up nicely.
As a bonus thought, I figured I’d cut the tops of the top three 3/4" strips at a 45 degree angle so when/if I ever move the Longmill, I have french cleats to hang things on.
I’d love any suggestions & ideas or warnings & gotchas you can share.
Thanks all,
-Jeff
PS - One final thing that I didn’t sketch in yet, I’m planning on putting 3/4" dog holes inside of the feet but outside of the cutting areas on the bottom edge and both sides of the main wasteboard, as well as in a few spots on the two 2x4s, in order to allow me to stick these in and balance/square work pieces (since it’s a bit trickier working vertically): Kreg ACS435 Adaptive Cutting System Versa Stops -ACS435 : Amazon.ca: Tools & Home Improvement
With the bench dogs I can create temporary ledges to site the work on and square it before I screw it down or otherwise secure it.
For hold down of the main workpiece I’m planning on going old school and just screwing in to the wasteboard but am open to any interesting clamping ideas anyone has that may be particularly relevant in a vertical orientation where I have to fight gravity.
